By: Team AY1920S1-CS2103-T12-2 Since: Sept 2019 Licence: NUS
1. Introduction
This user guide serves to assist you in the navigation and utilization of our application, DeliveryMANS.
DeliveryMANS is a command-line application designed specifically for delivery centre administrators who are in charge of food delivery service. It encompasses a well-structured system for users to keep track and manage the entire delivery process. It facilitates food delivery service by coaliasing the delivery men, customers and restaurant menu. From auto-assigning deliverymen for deliveries when orders are made, to viewing statistics of the most popular dish of restaurants as well as customer ordering trends for further promotions, financial and business management decisions, DeliveryMANS is everything you need to help improve managing deliveries. With just a few simple commands, this delivery manager can help to kickstart your delivery service.
Get started with [Quick Start] and begin managing your deliveries today!
2. Quick start
Ensure you have Java 11 or above installed on your computer.
Click here to download the JAR file for DeliveryMANS.
Open the application to begin. Refer to Section 3, “Commands” for details of each command.
3. Commands
This section covers the list of commands which you can enter into our application.
Command Types
-
In DeliveryMANS, there are 2 types of commands: universal commands and context-specific commands.
-
Universal commands can be called under any context in the application.
-
Context-specific commands can only be accessed in a specific context. Context-specific commands comprise customer, restaurant and deliverymen commands, which can only be called under the customer, restaurant and deliverymen context respectively.
Command Format
-
Command words for universal commands are prepended with "-"
-
Example Usage:
-help.
-
-
Words in
UPPER_CASEare parameters to be supplied by the user e.g. in-add_order c/CUSTOMER r/RESTAURANT f/FOOD q/QUANTITY,CUSTOMER,RESTAURANT,FOODandQUANTITYare parameters to be supplied.-
Example Usage:
-add_order c/Donald Trump r/KFC f/Chicken Bucket q/100
-
-
Items with
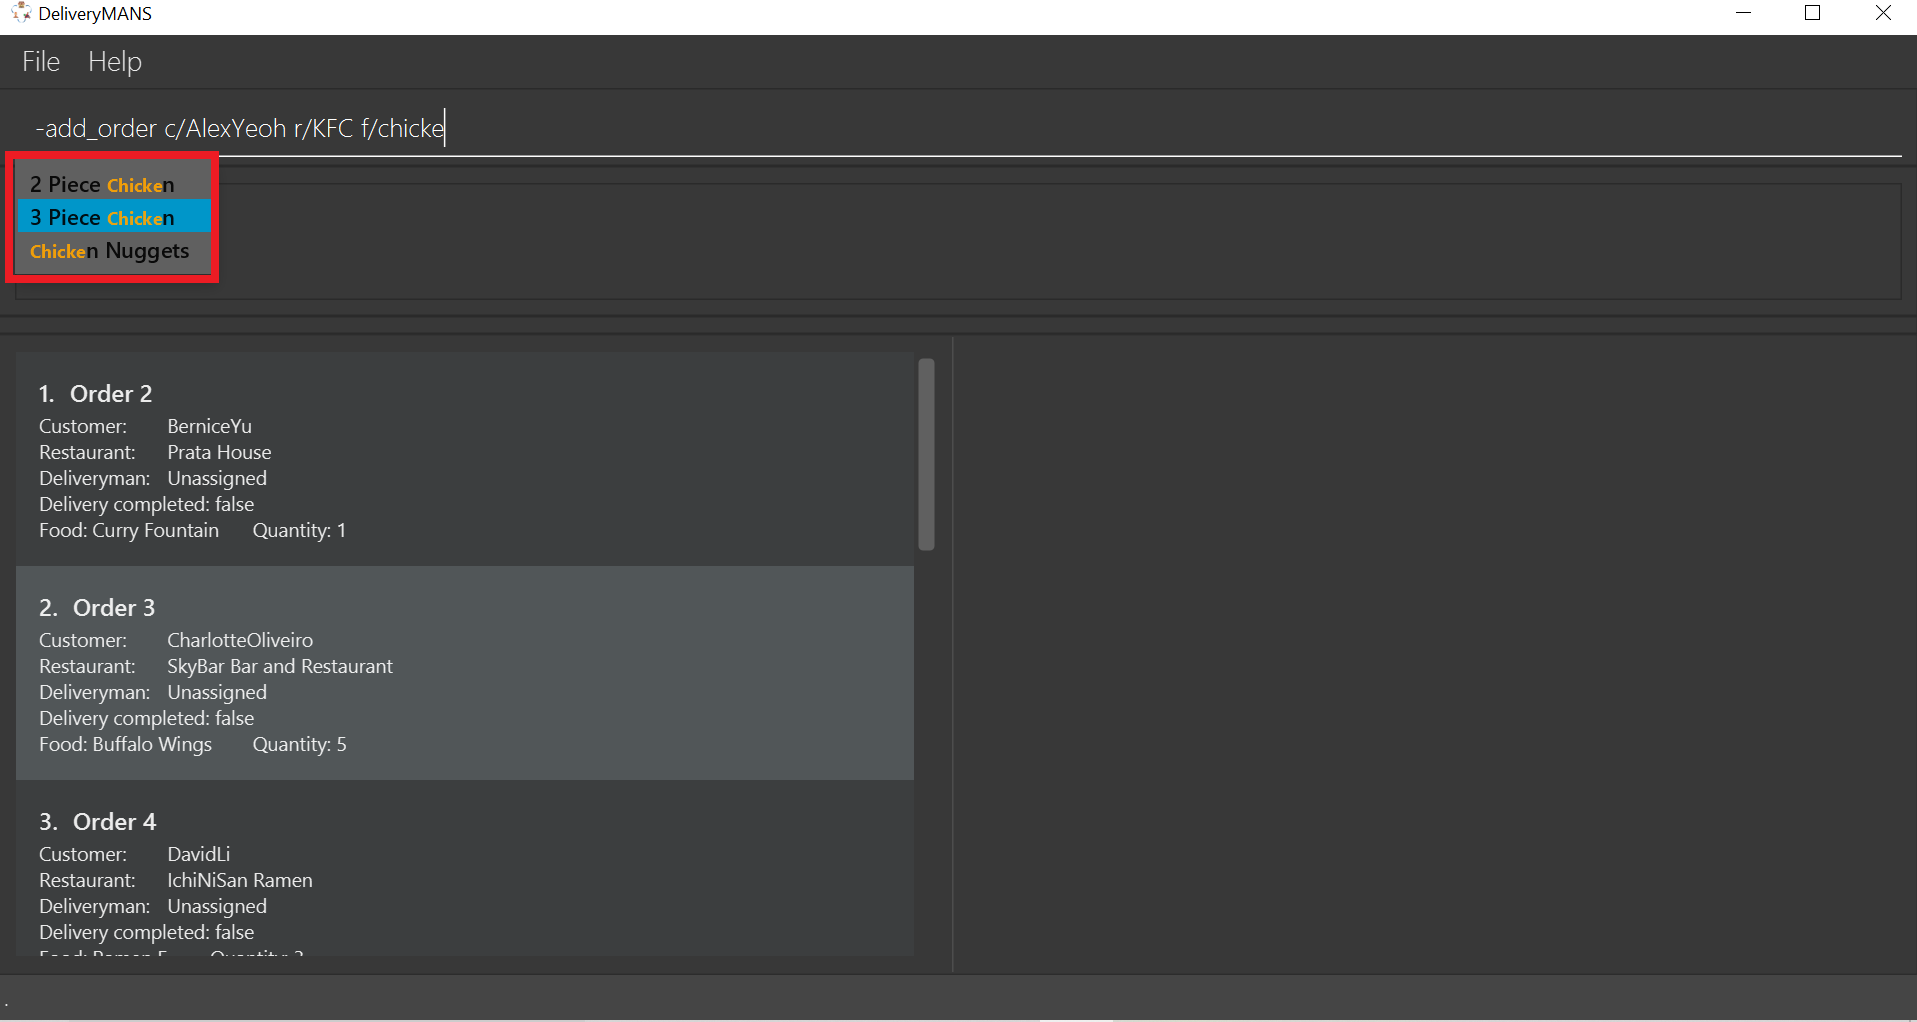
…after them can be used multiple times e.g.f/FOOD…can be used 1 or more:-
Example Usage:
f/3 Piece Chicken Mealorf/Pepperoni Pizza f/Char Kway Teow
-
-
Items with
[]are optional and can be omitted e.g.[t/TAG]…
3.1. Universal commands
These are general commands to assist you in controlling the app, which are not directly related to the customer, restaurant and deliverymen.
3.1.1. Viewing help: -help
This generates a list of commands and tips for you.
Format: -help
Example: -help
3.1.2. Switching context
This command switches to a specific context for you to enter targeted commands. The list of contexts include: customer, deliveryman and restaurant. By default, the application will be in the universal context upon startup.
Switching to customer context: -customer
This command switches to the customer context for you to enter customer-specific commands.
Format: -customer
Switching to restaurant context: -restaurant
This command switches to the restaurant context for you to enter restaurant-specific commands.
Format: -restaurant
Switching to deliveryman context: -deliverymen
This command switches to the deliveryman context for you to enter deliveryman-specific commands.
Format: -deliverymen
3.1.3. Adding an order: -add_order
This command allows you to add a new order to the database to be processed. The deliveryman to deliver the order will be allocated automatically based on the internal algorithms.
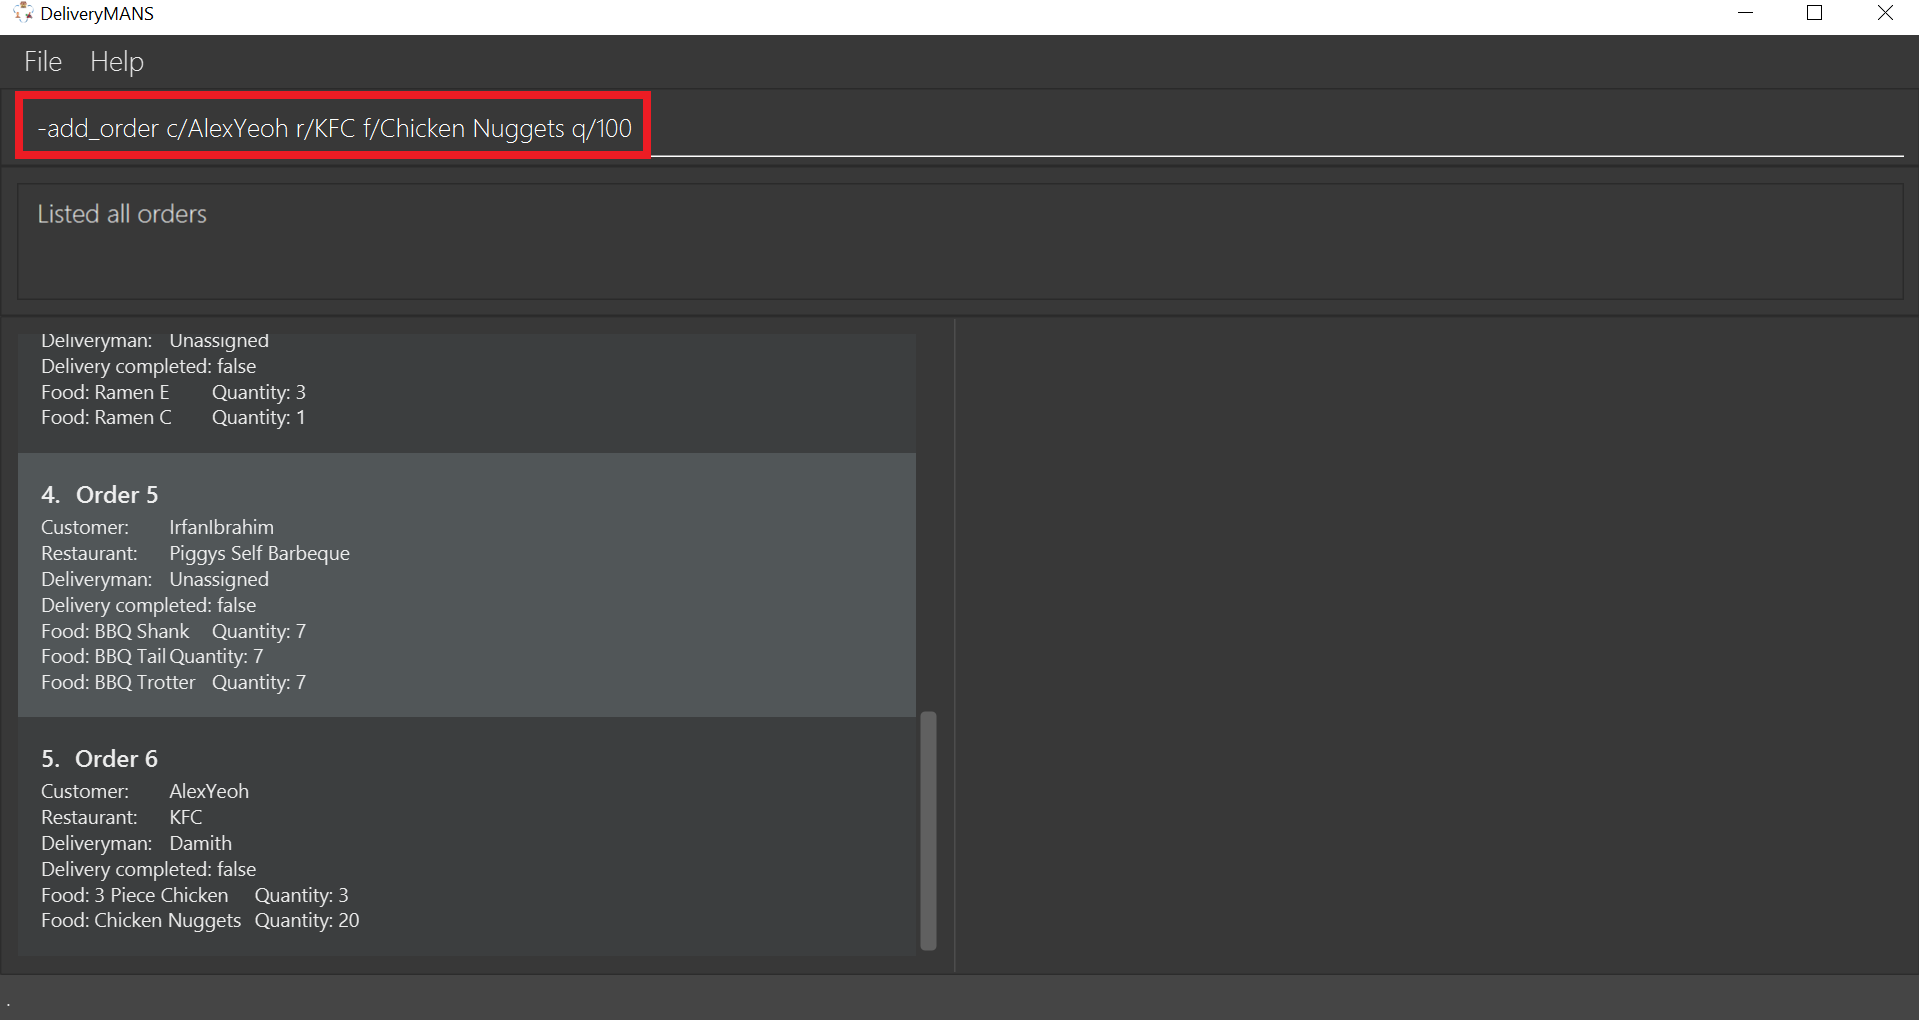
Format: -add_order c/CUSTOMER r/RESTAURANT f/FOOD… q/QUANTITY…
Example: -add_order c/AlexYeoh r/KFC f/Chicken Nuggets q/100
-
Type the command statement from the example above into the program and press Enter to execute it.
-
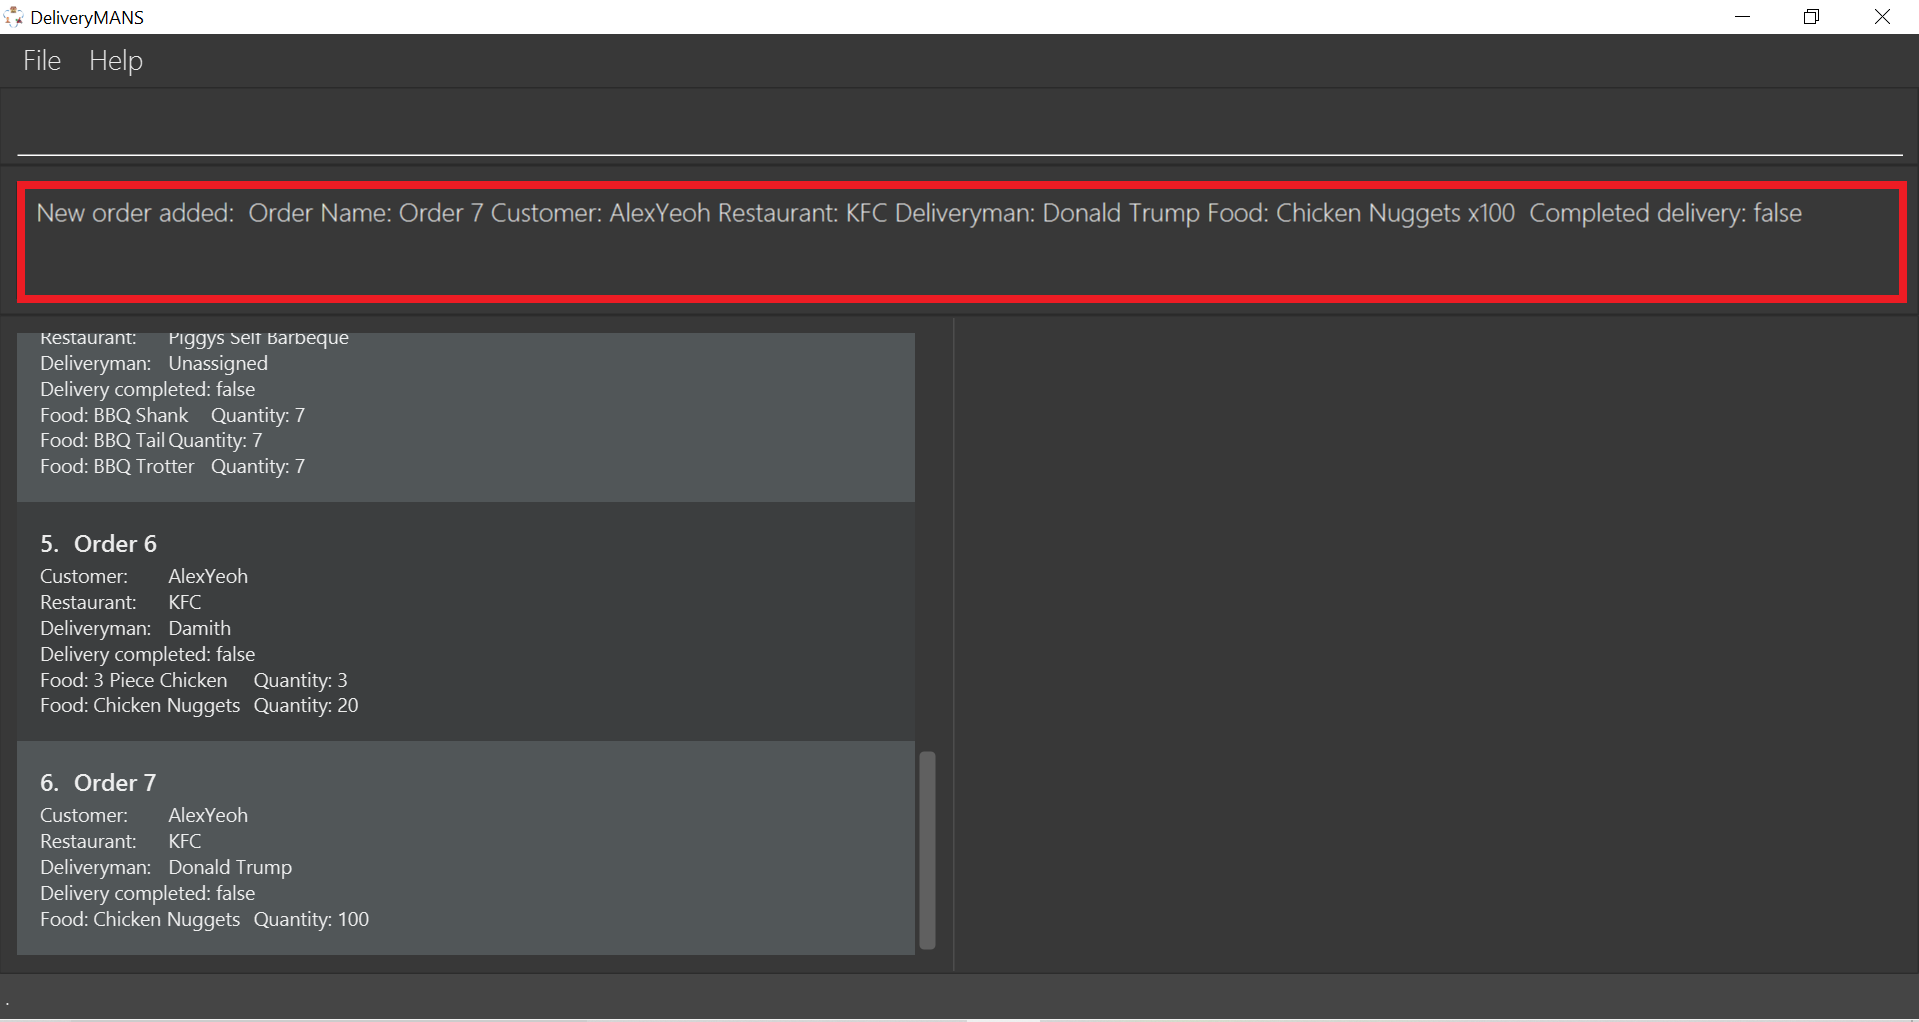
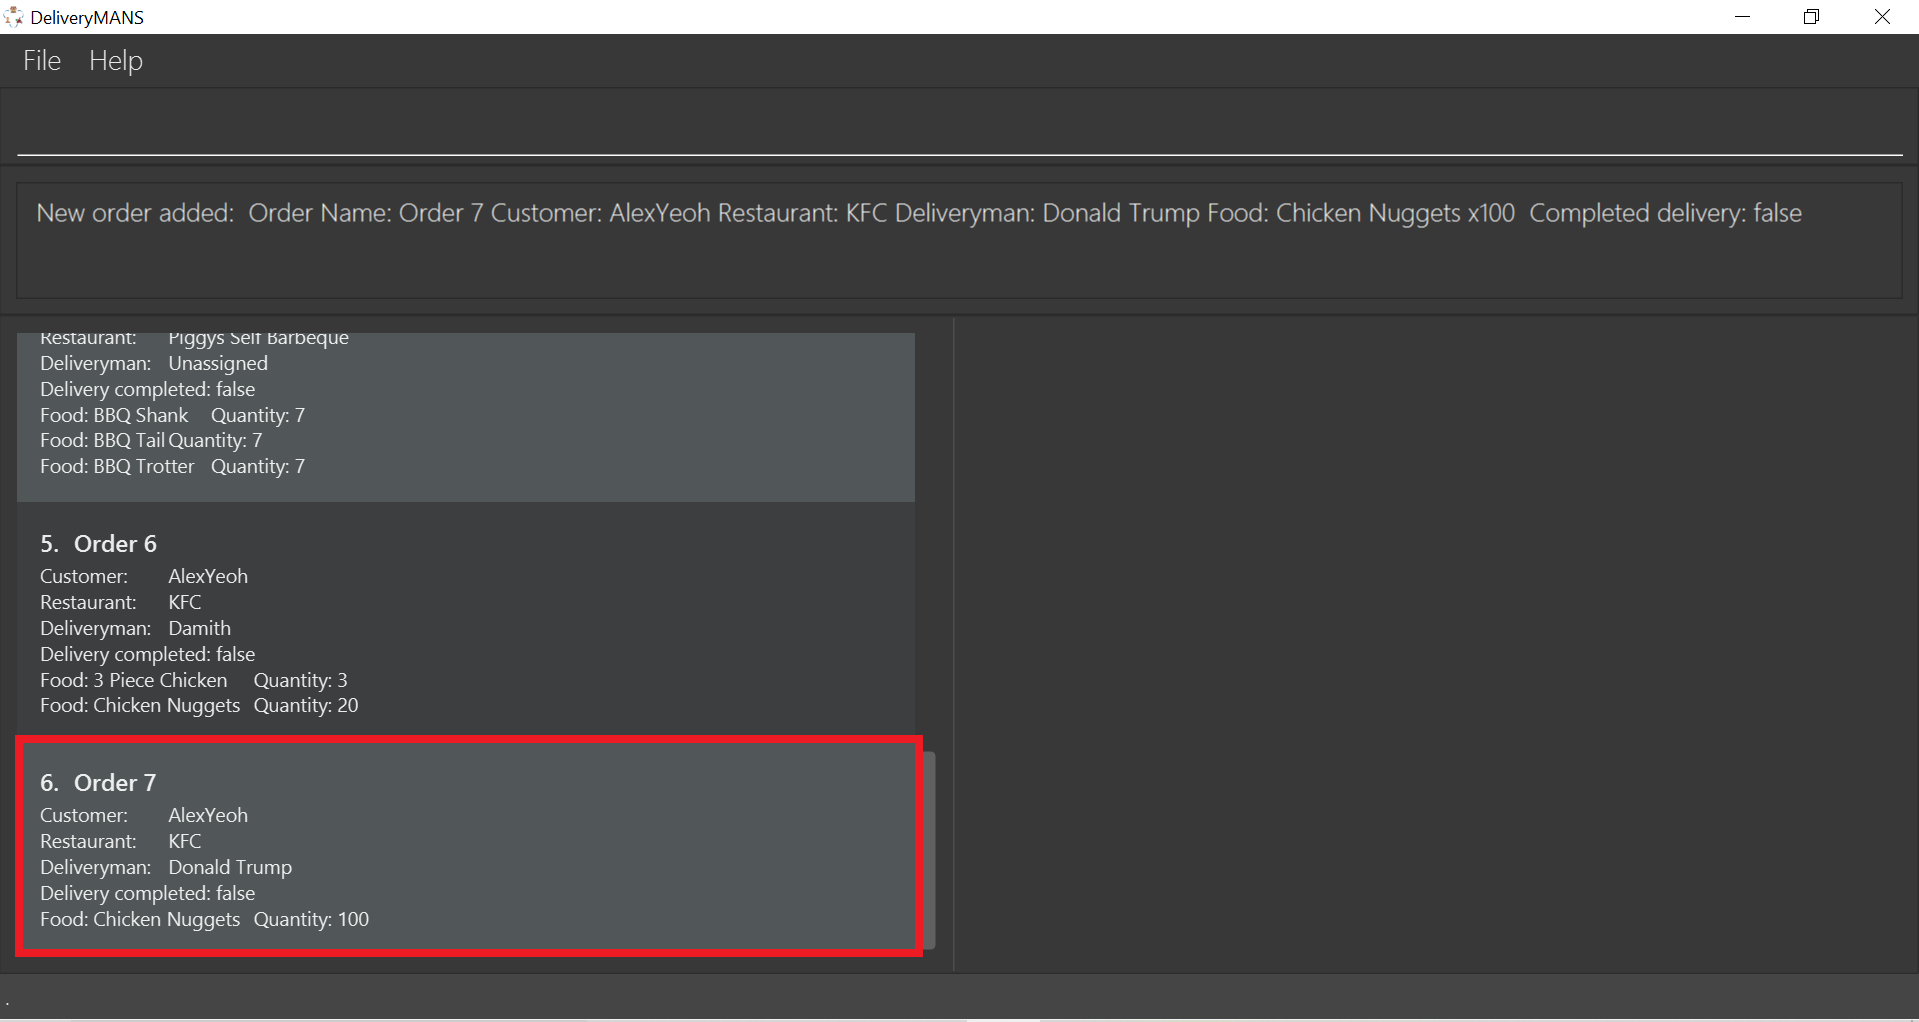
If you are successful, the result box displays the message:
"New order added: Order Name: Order 7 Customer: AlexYeoh Restaurant: KFC Deliveryman: Donald Trump Food: Chicken Nuggets x100 Completed delivery: false".
-
The order list shows the newly added order.
|
Requirements
|
|
Tip
|
3.1.4. Assigning an order: -assign_order
This command allows you to automatically assign an available deliveryman to an existing order in the database based on the internal algorithms.
Format: -assign_order n/ORDERNAME
Example: -assign_order n/Order 1
-
Type the command statement from the example above into the program and press Enter to execute it.
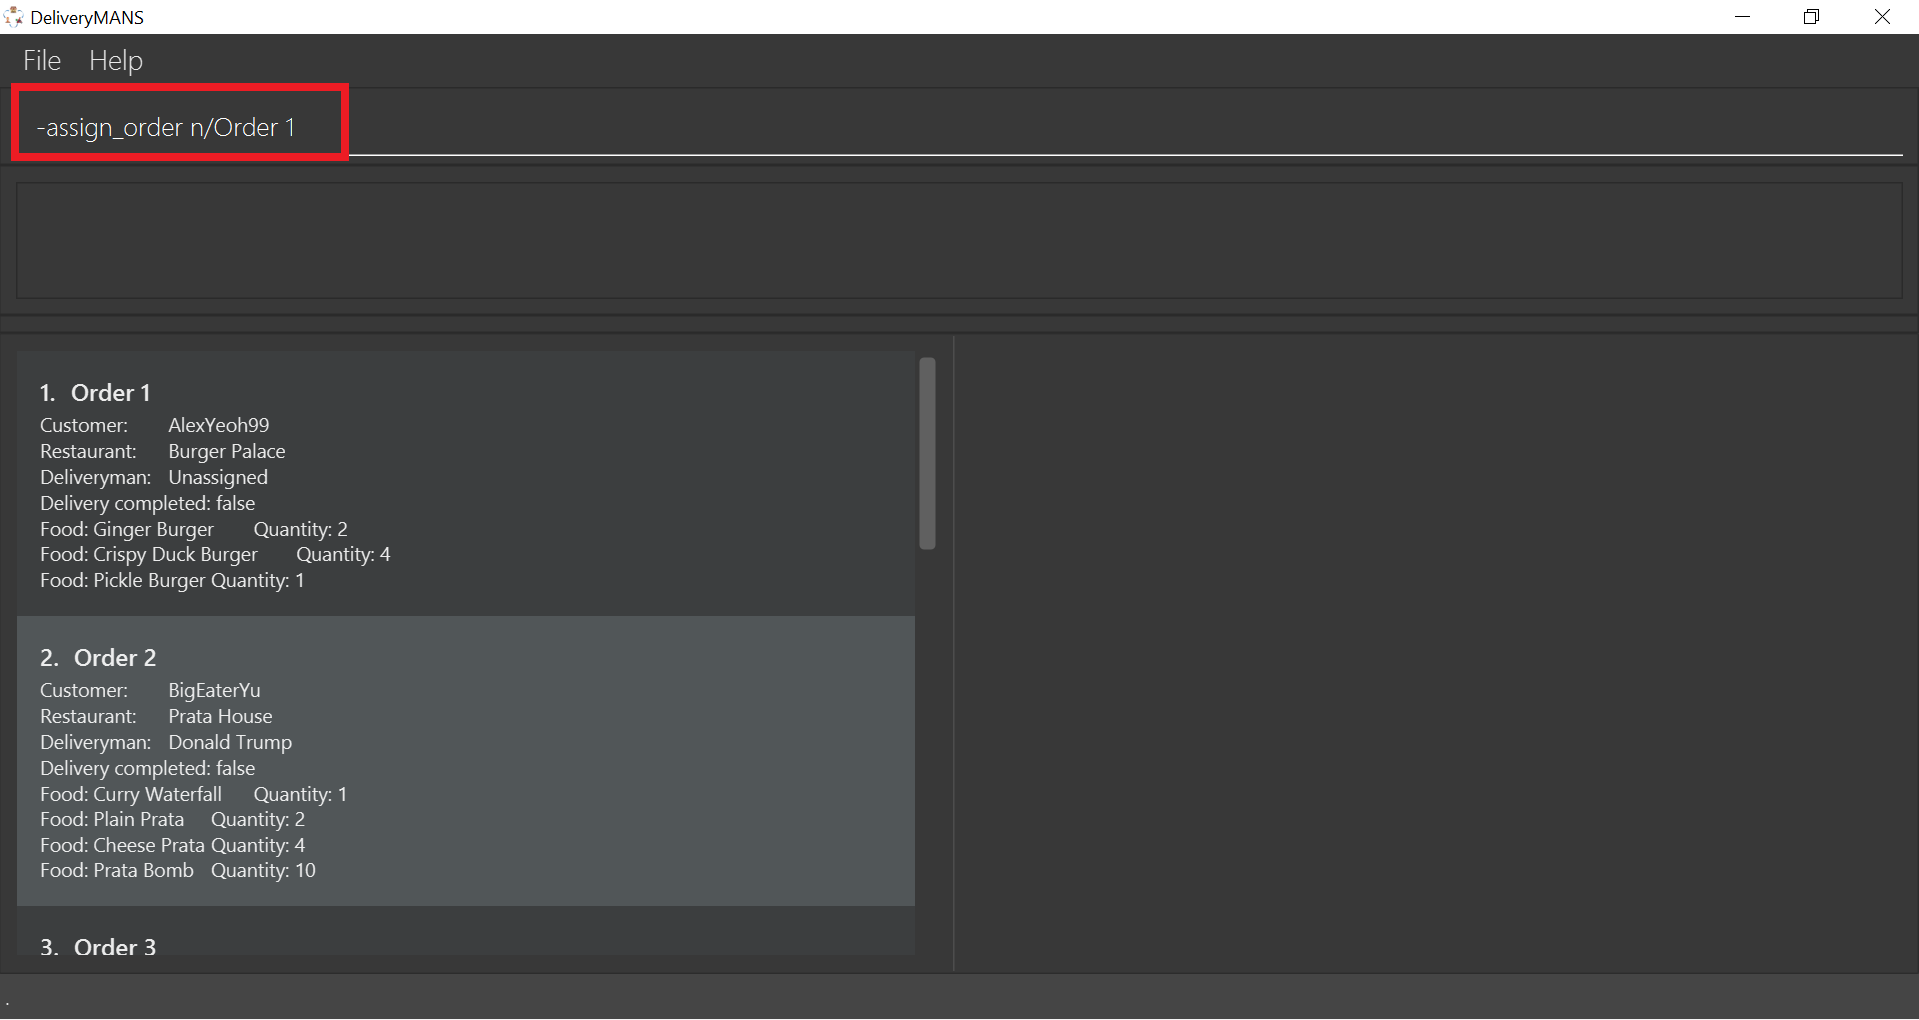
-
If you are successful, the result box displays the message:
"Assigned Order: Order Name: Order 1 Customer: AlexYeoh99 Restaurant: Burger Palace Deliveryman: Jackie Chan Food: Ginger Burger x2 Crispy Duck Burger x4 Pickle Burger x1 Completed delivery: false".
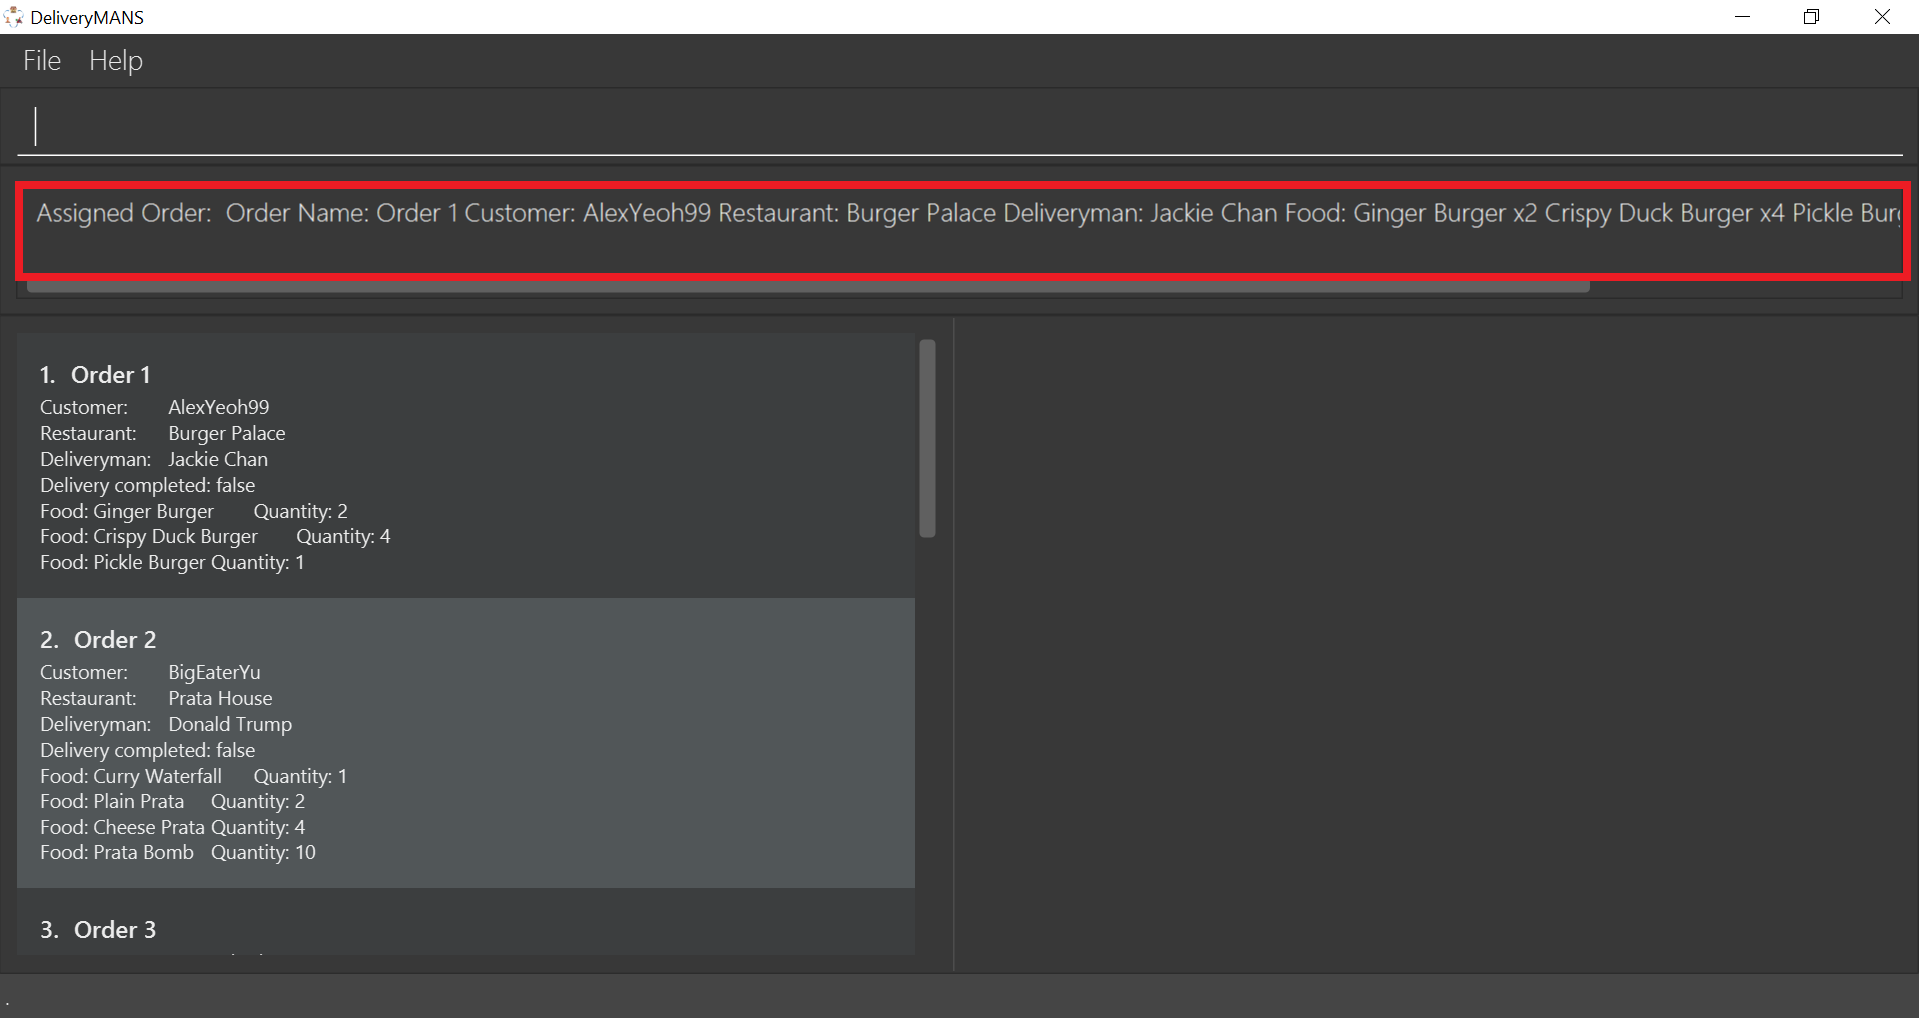
-
The order list shows the newly assigned order.
|
Requirements
|
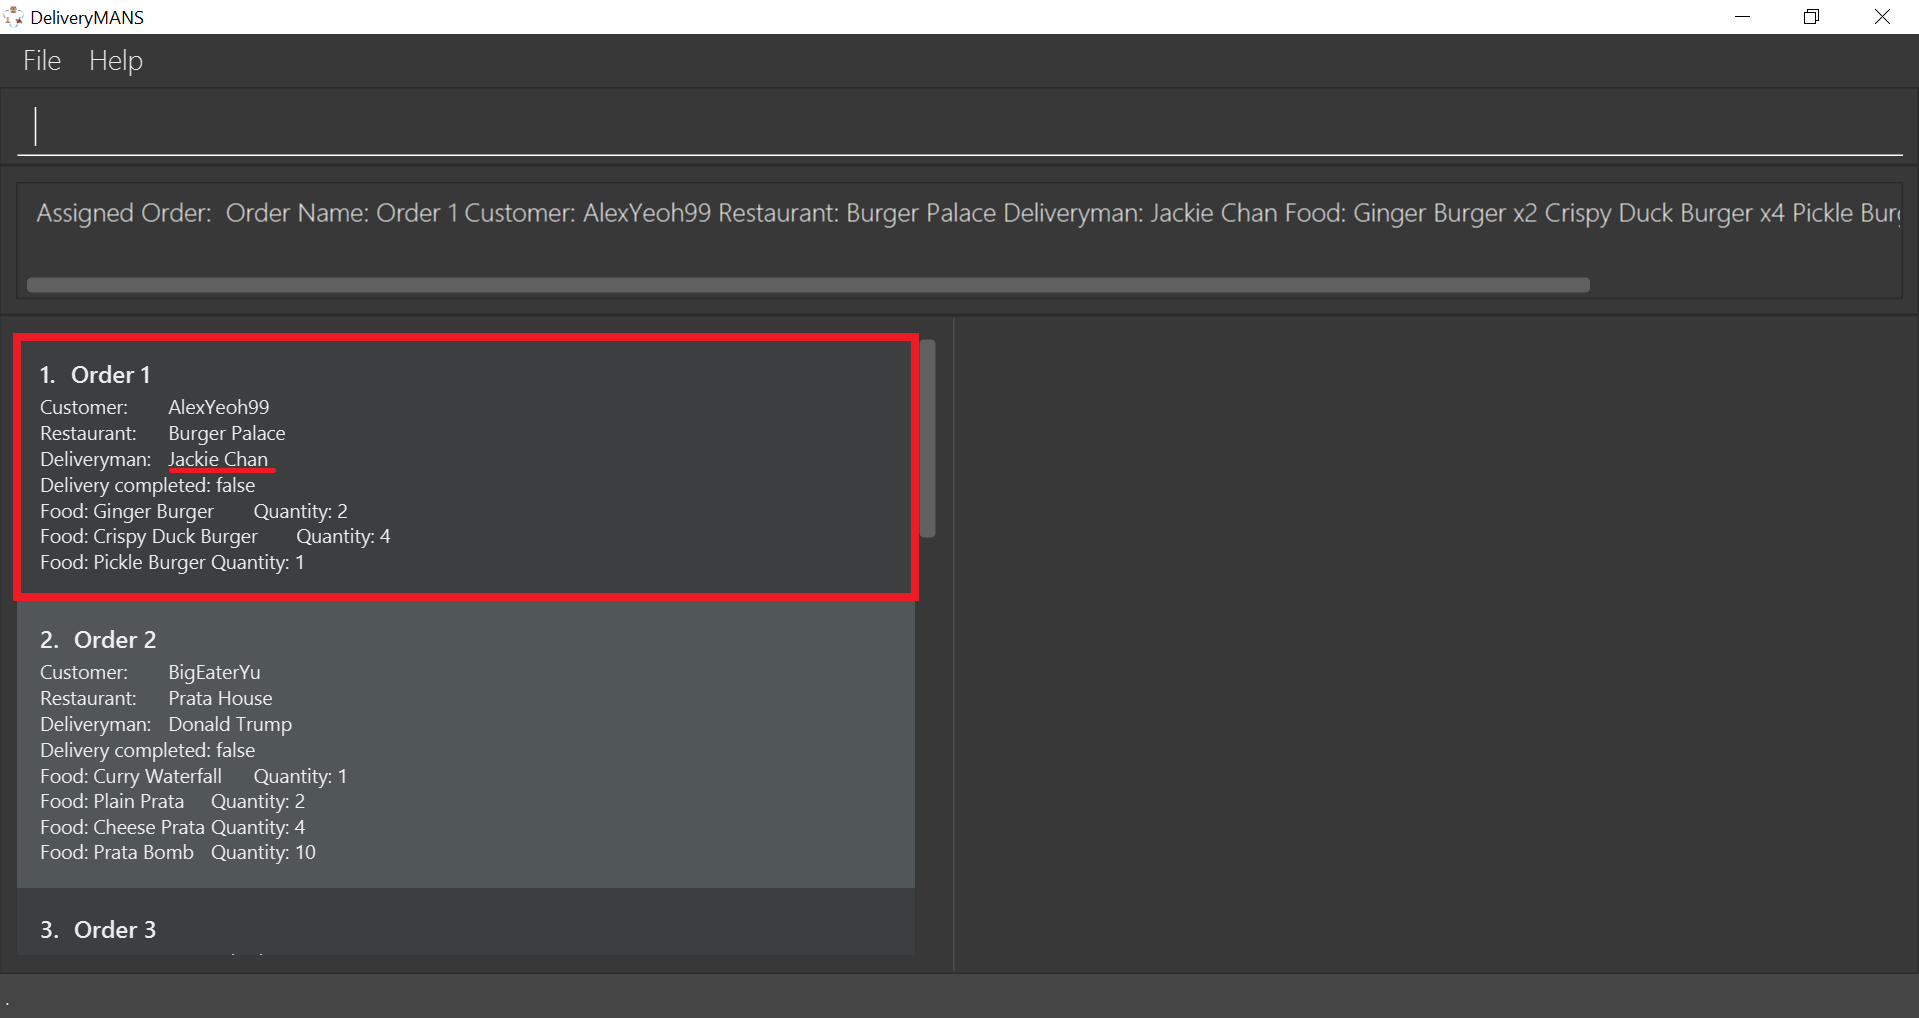
3.1.5. Completing an order: -complete_order
This command allows you to complete an order in the database by its order name. The next unassigned order, if any, will automatically be assigned to an available deliveryman in the database.
Format: -complete_order n/ORDERNAME
Example: -complete_order n/Order 1
-
Type the command statement from the example above into the program and press Enter to execute it.
-
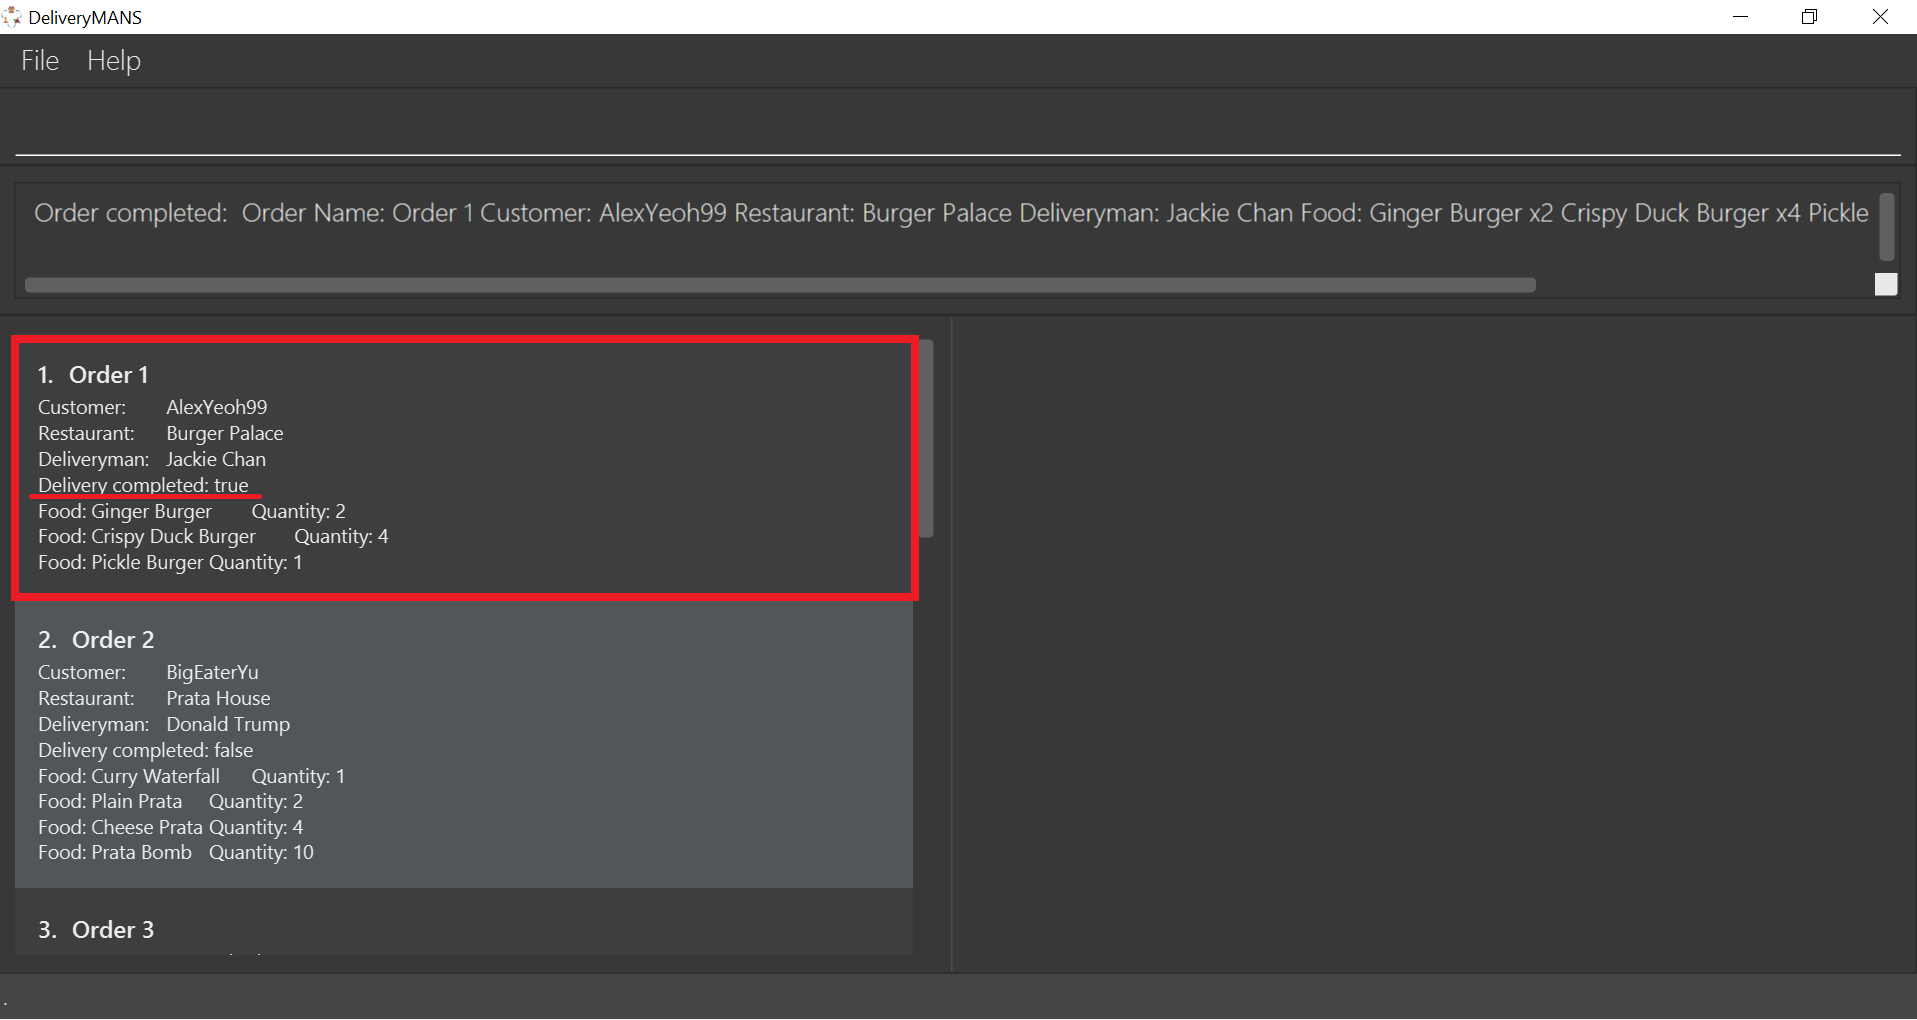
If you are successful, the result box displays the message:
"Order completed: Order Name: Order 1 Customer: AlexYeoh99 Restaurant: Burger Palace Deliveryman: Jackie Chan Food: Ginger Burger x2 Crispy Duck Burger x4 Pickle Burger x1 Completed delivery: true".
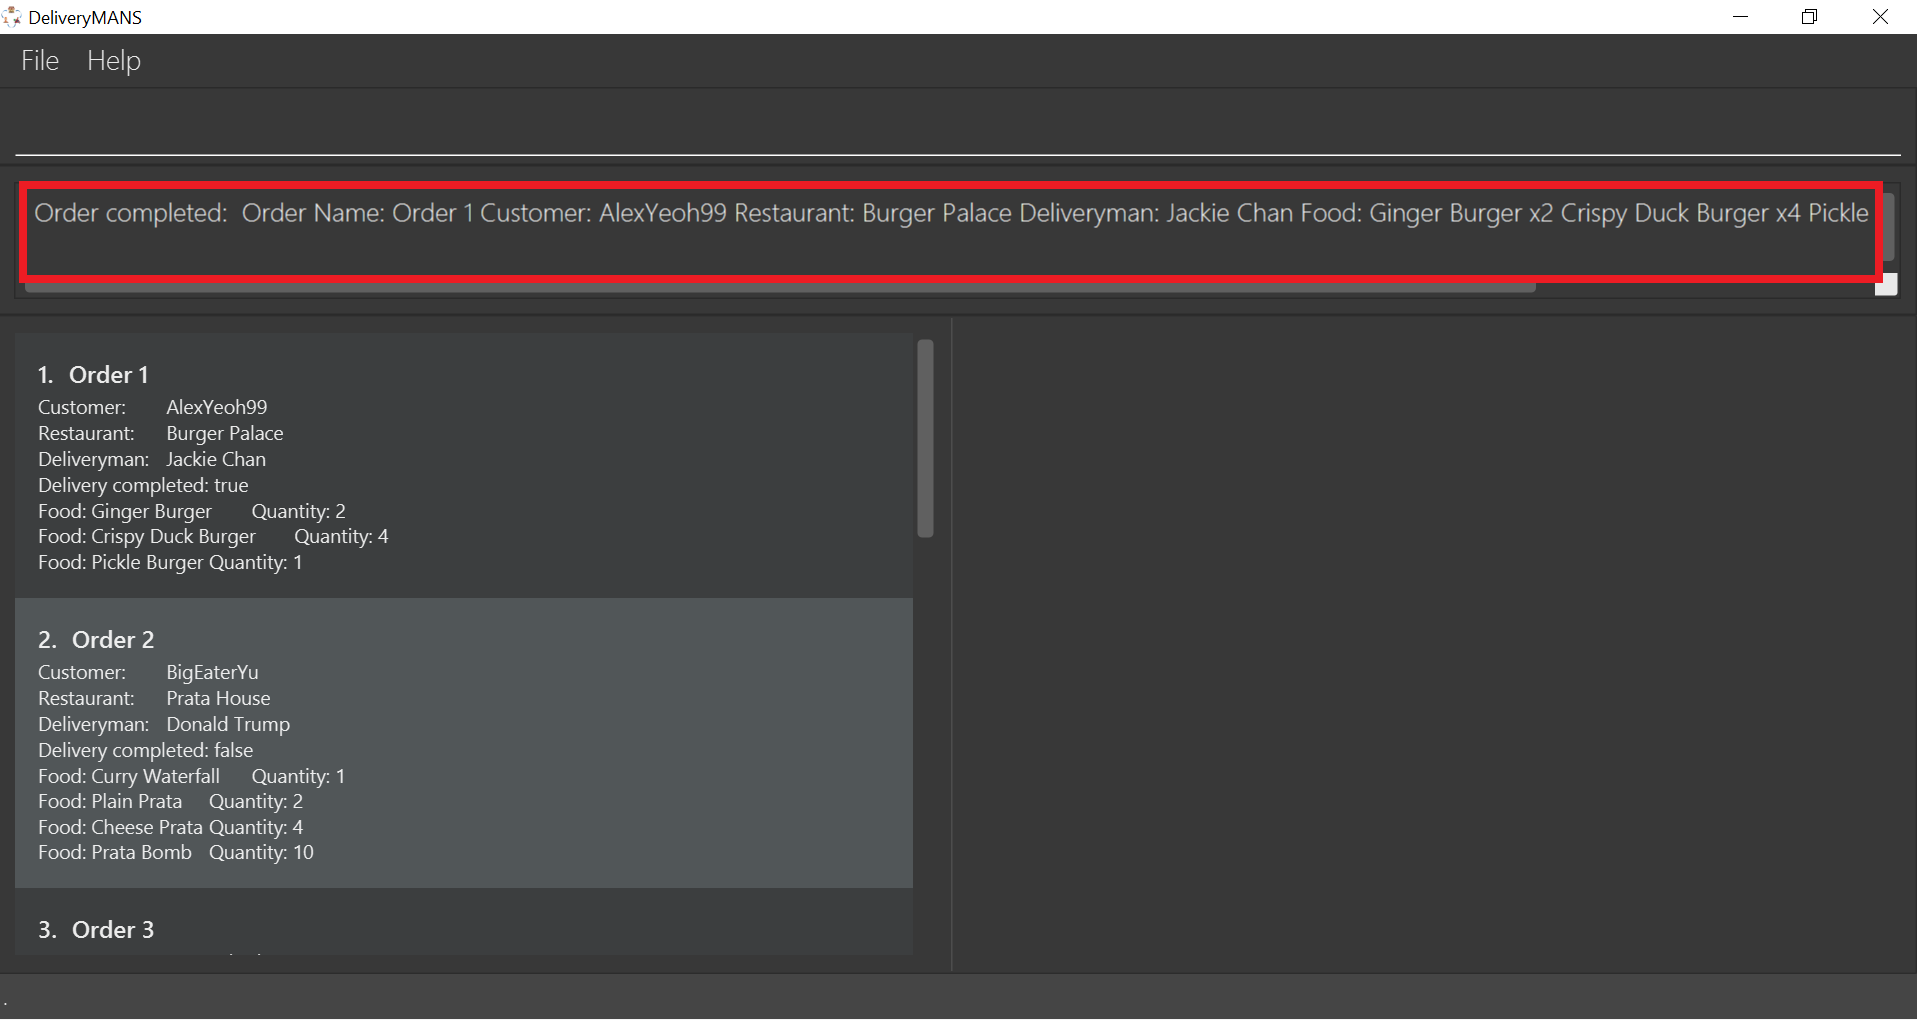
-
The order list shows the delivery status of the order as completed.
|
Requirements
|
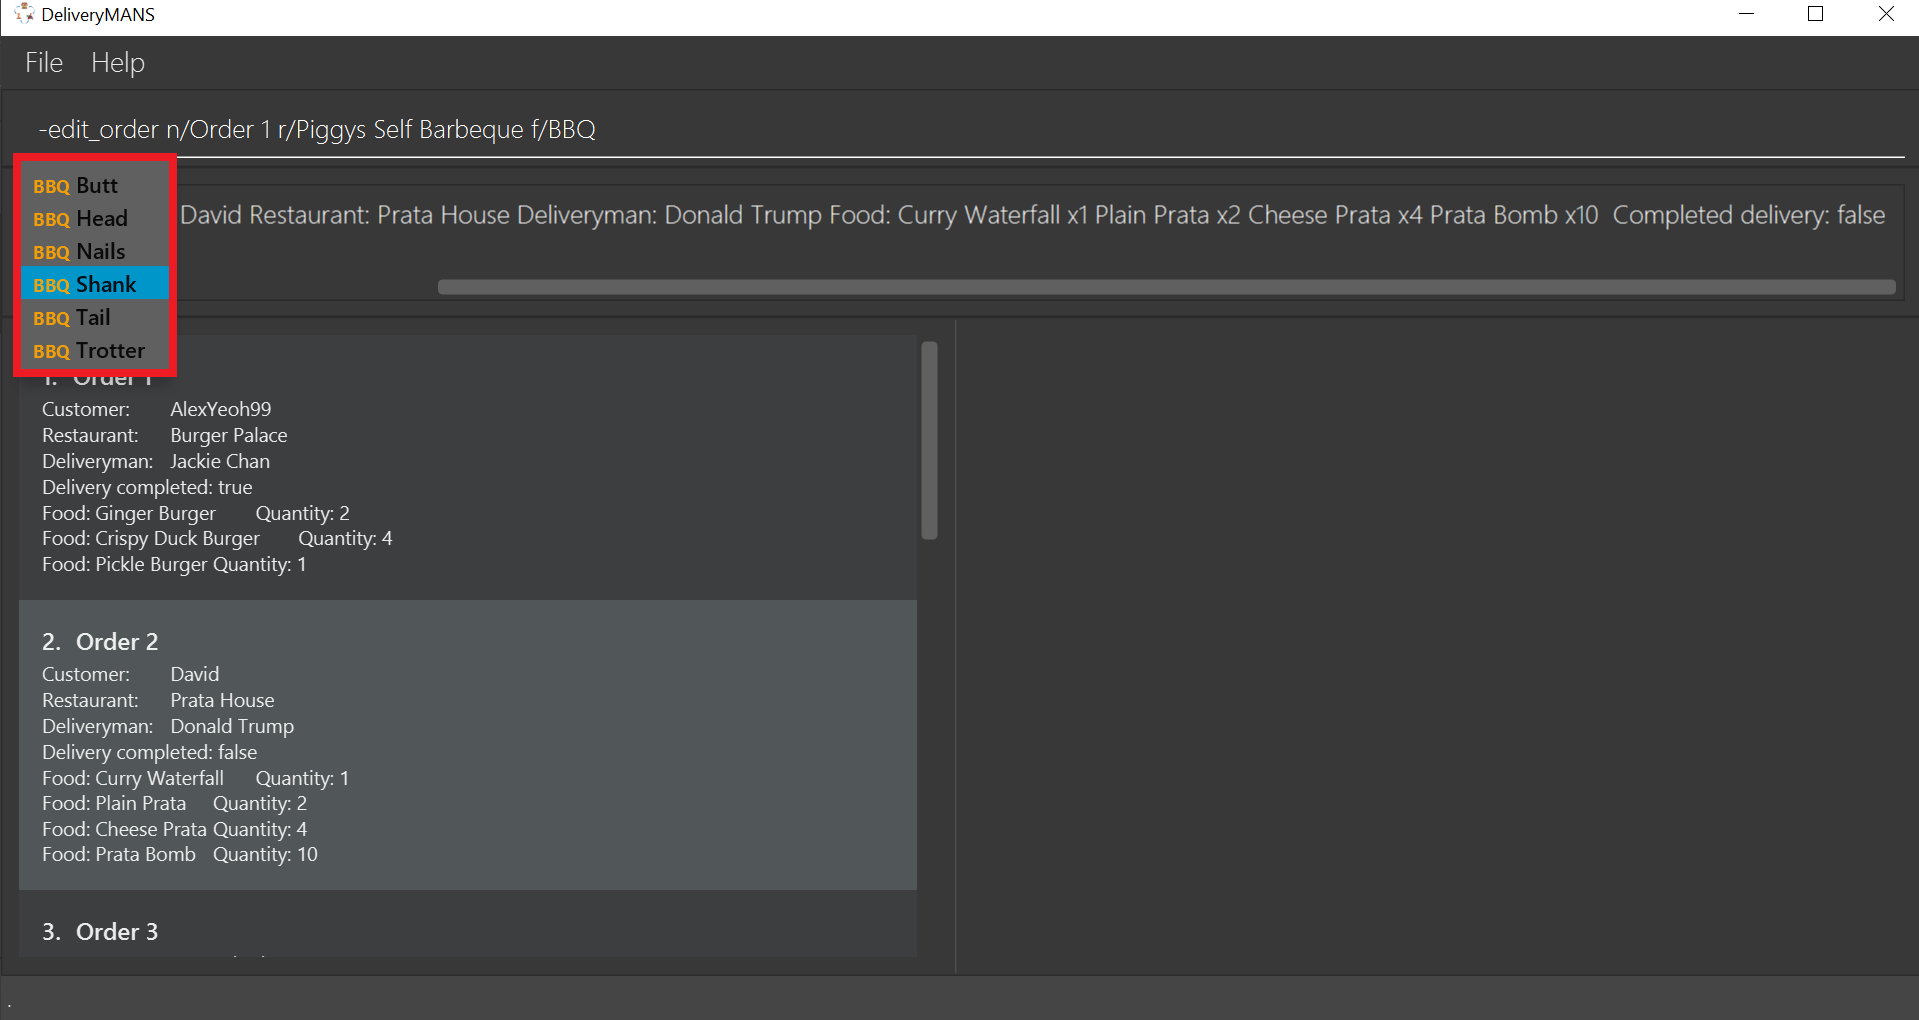
3.1.6. Editing an order: -edit_order
This command enables you to edit an order. The order to edit will have to be specified by its order name when you are entering the command.
You can change:
-
The customer
c/CUSTOMERwho made the order -
The restaurant
r/RESTAURANTwhich the order was made from -
The food
f/FOODordered as well as its quantityq/QUANTITY
Format: -edit_order n/ORDERNAME [c/CUSTOMER] [r/RESTAURANT] [f/FOOD]… [q/QUANTITY]…
Example: -edit_order n/Order 2 c/David
-
Type the command statement from the example above into the program and press Enter to execute it.
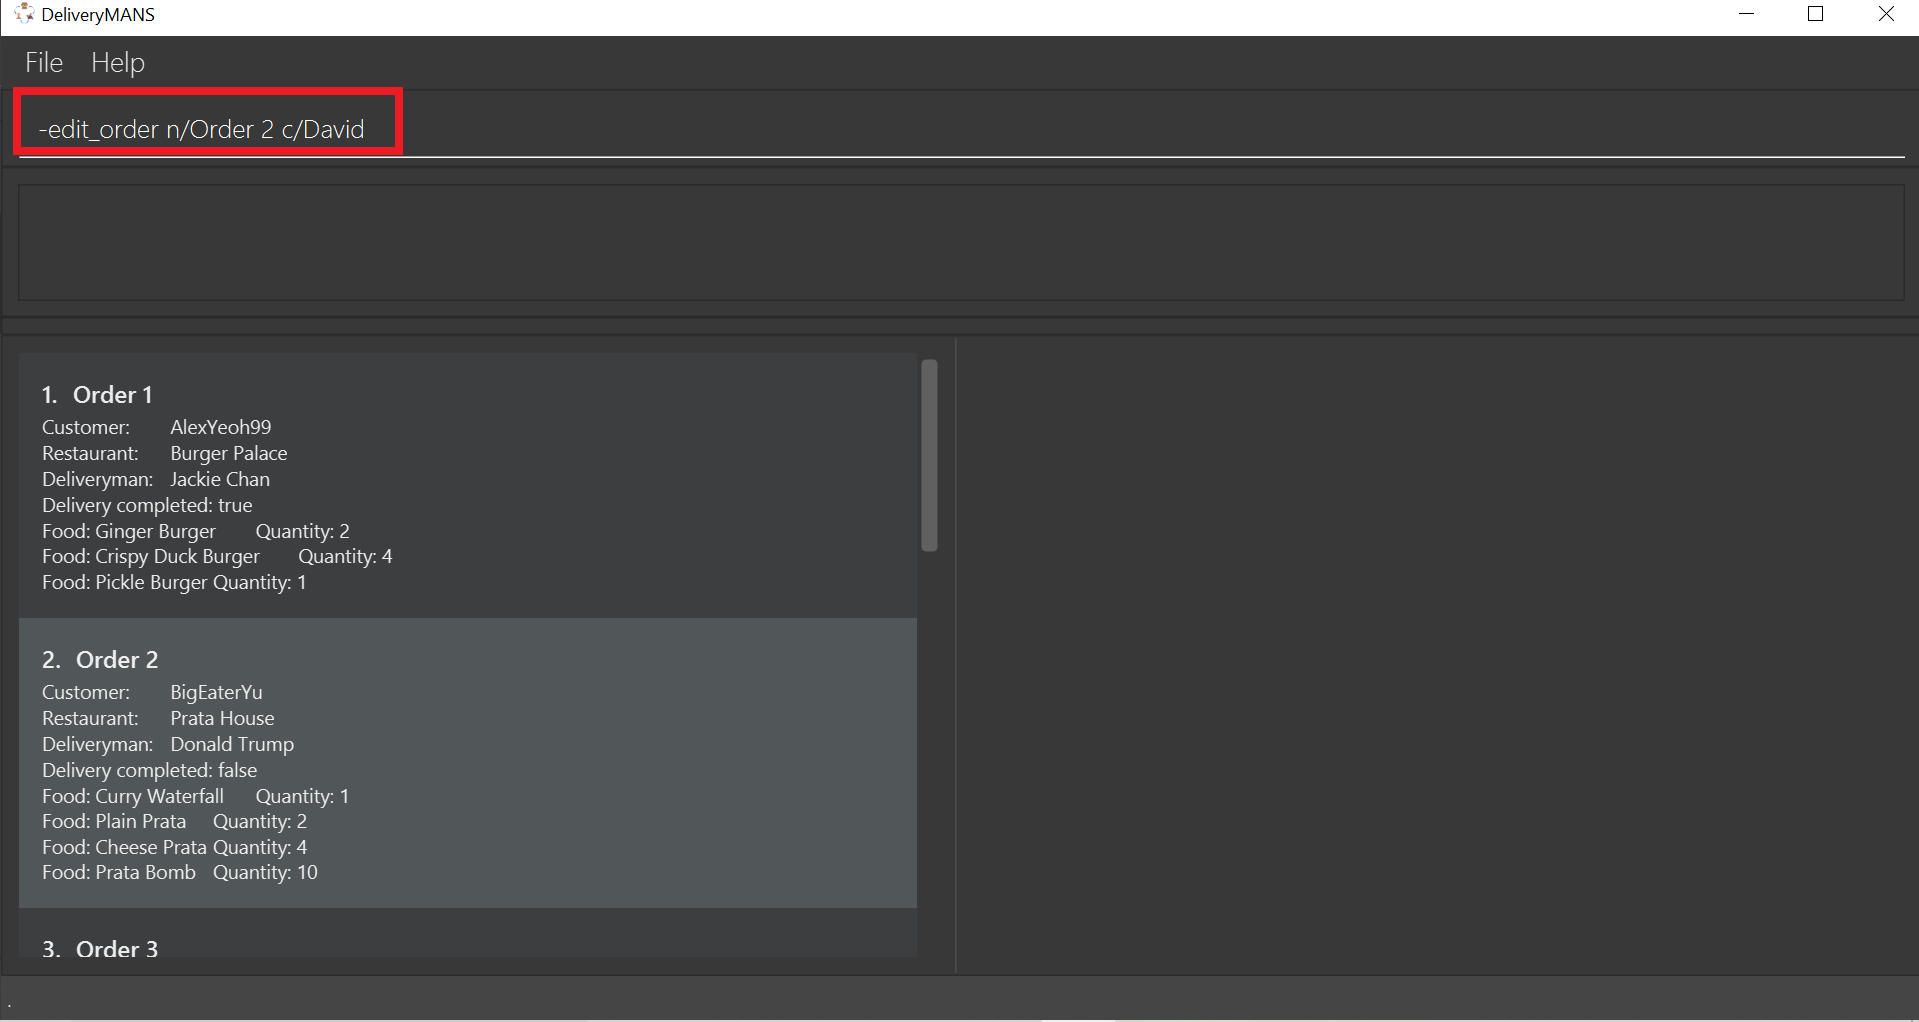
-
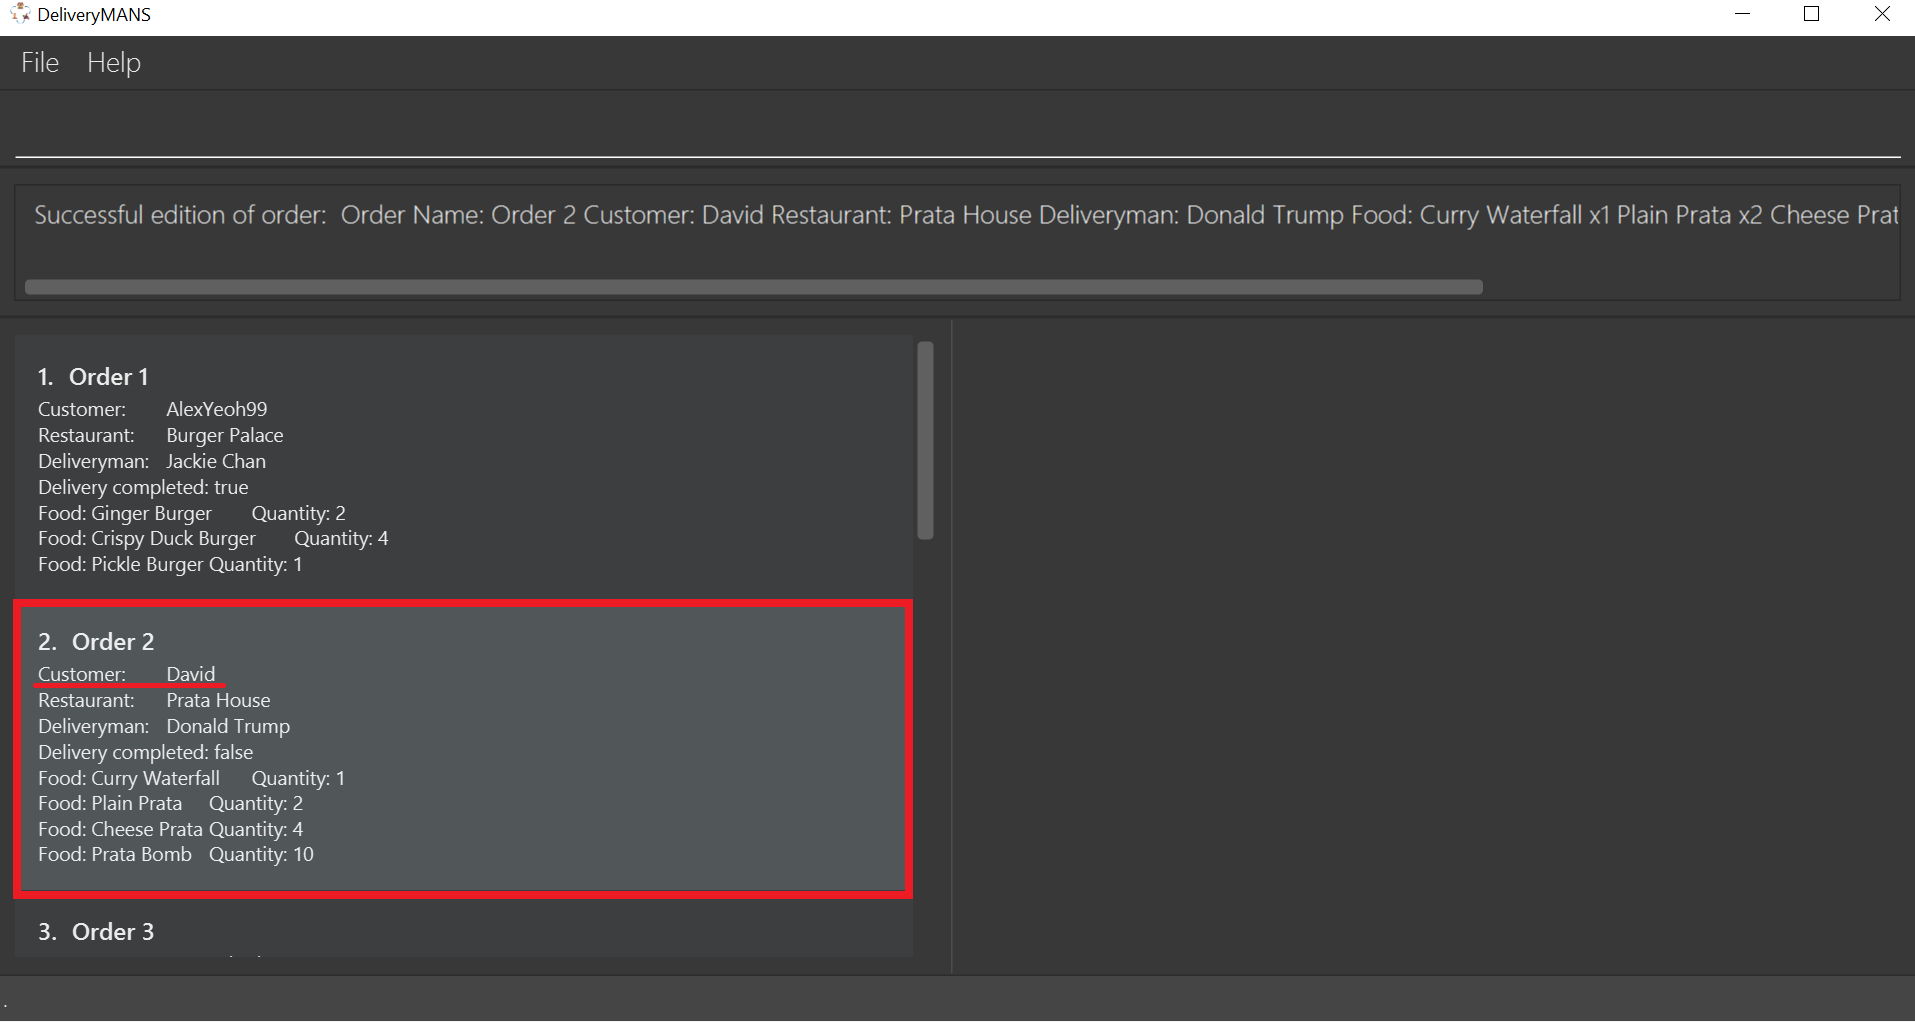
If you are successful, the result box displays the message:
"Successful edition of order: Order Name: Order 2 Customer: David Restaurant: Prata House Deliveryman: Donald Trump Food: Curry Waterfall x1 Plain Prata x2 Cheese Prata x4 Prata Bomb x10 Completed delivery: false".

-
The order list shows the updated order.
|
Requirements
|
|
Tip
|
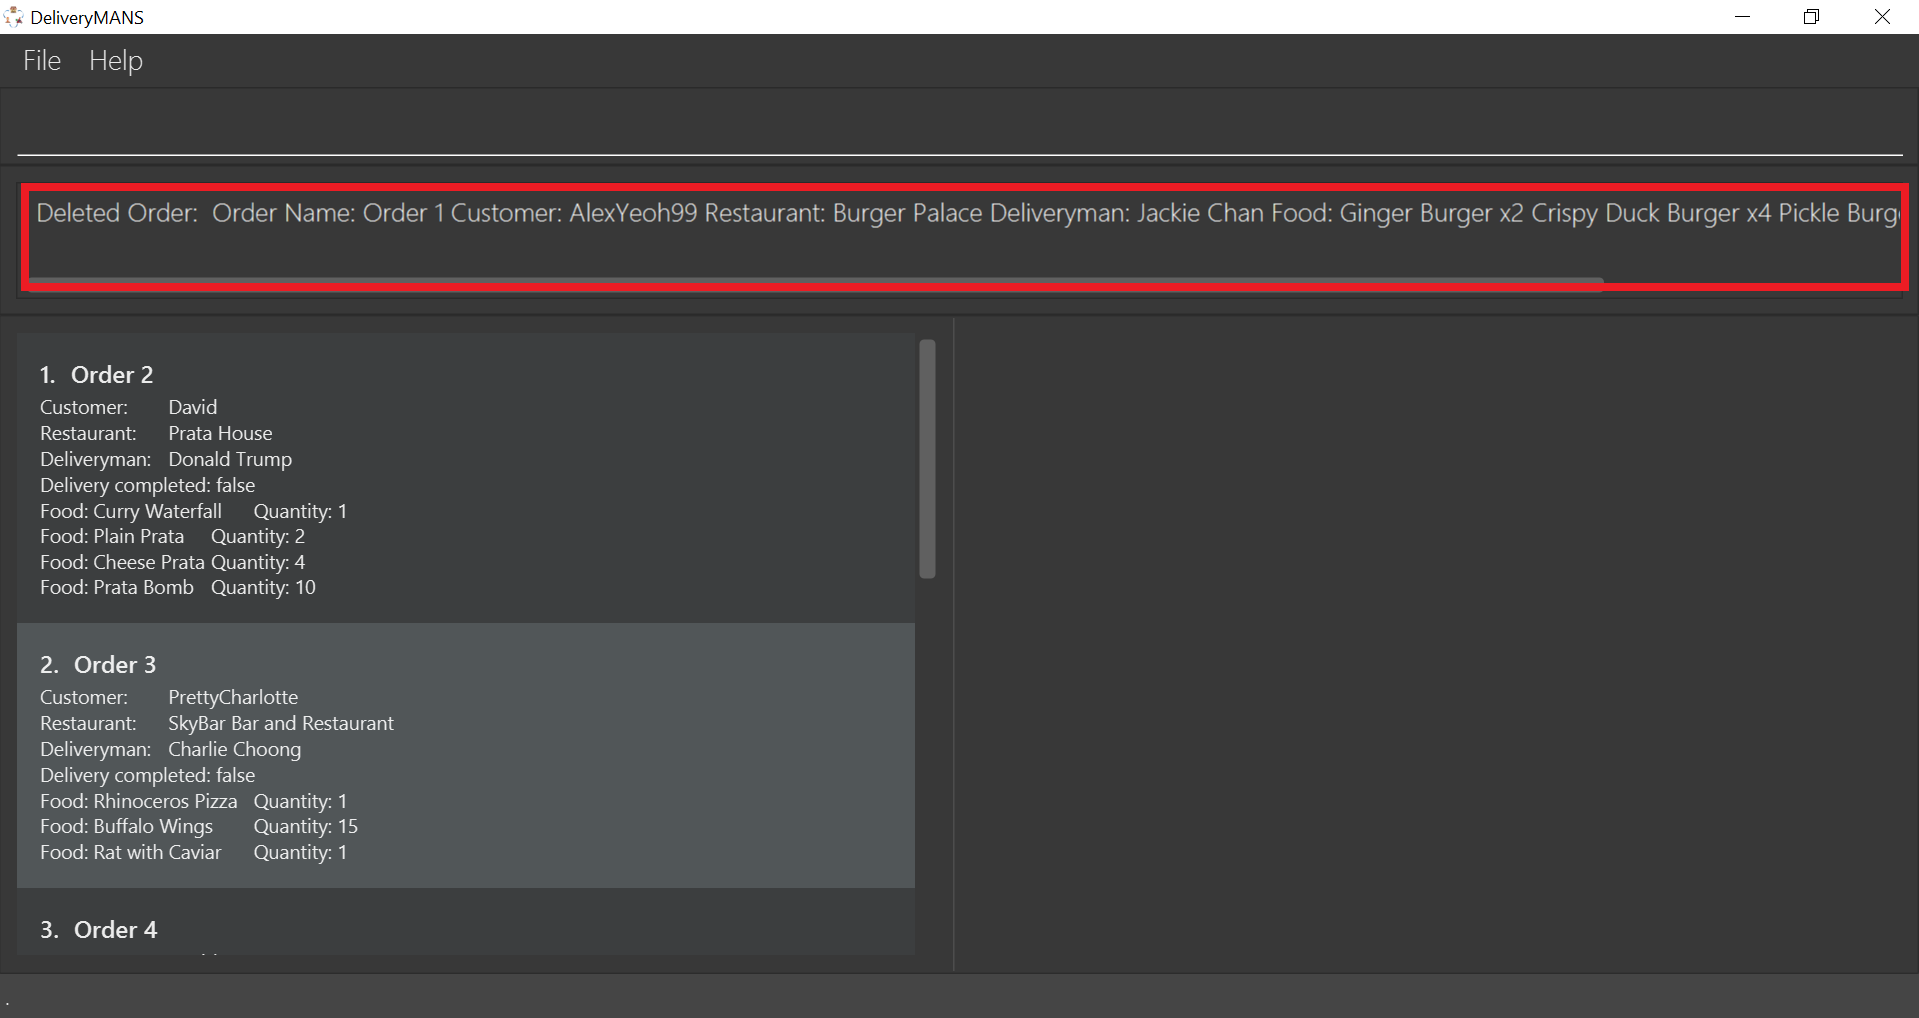
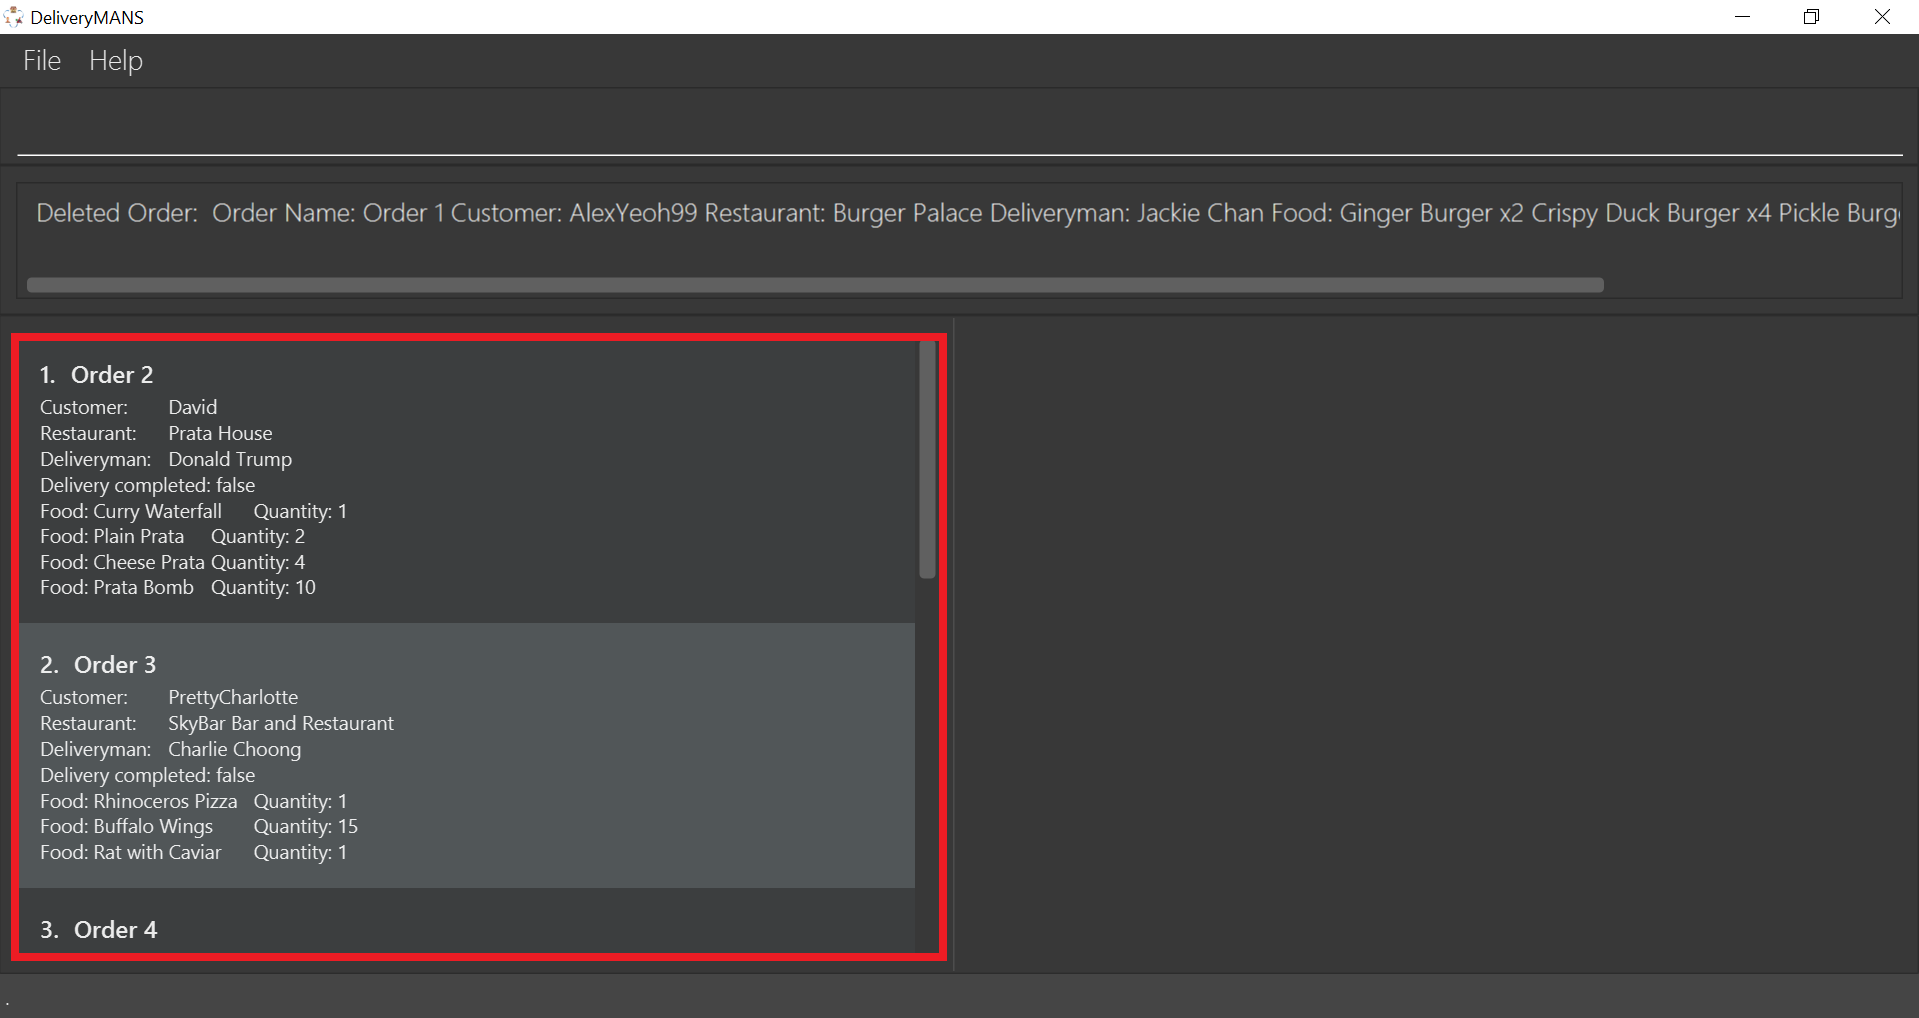
3.1.7. Deleting an order: -delete_order
This command enables you to delete an unwanted/cancelled order in the database by its order name.
Format: -delete_order n/ORDERNAME
Example: -delete_order n/Order 1
-
Type the command statement from the example above into the program and press Enter to execute it.

-
If you are successful, the result box displays the message:
"Deleted Order: Order Name: Order 1 Customer: AlexYeoh99 Restaurant: Burger Palace Deliveryman: Jackie Chan Food: Ginger Burger x2 Crispy Duck Burger x4 Pickle Burger x1 Completed delivery: true".
-
The order list shows that the order has been deleted.
|
Requirements
|
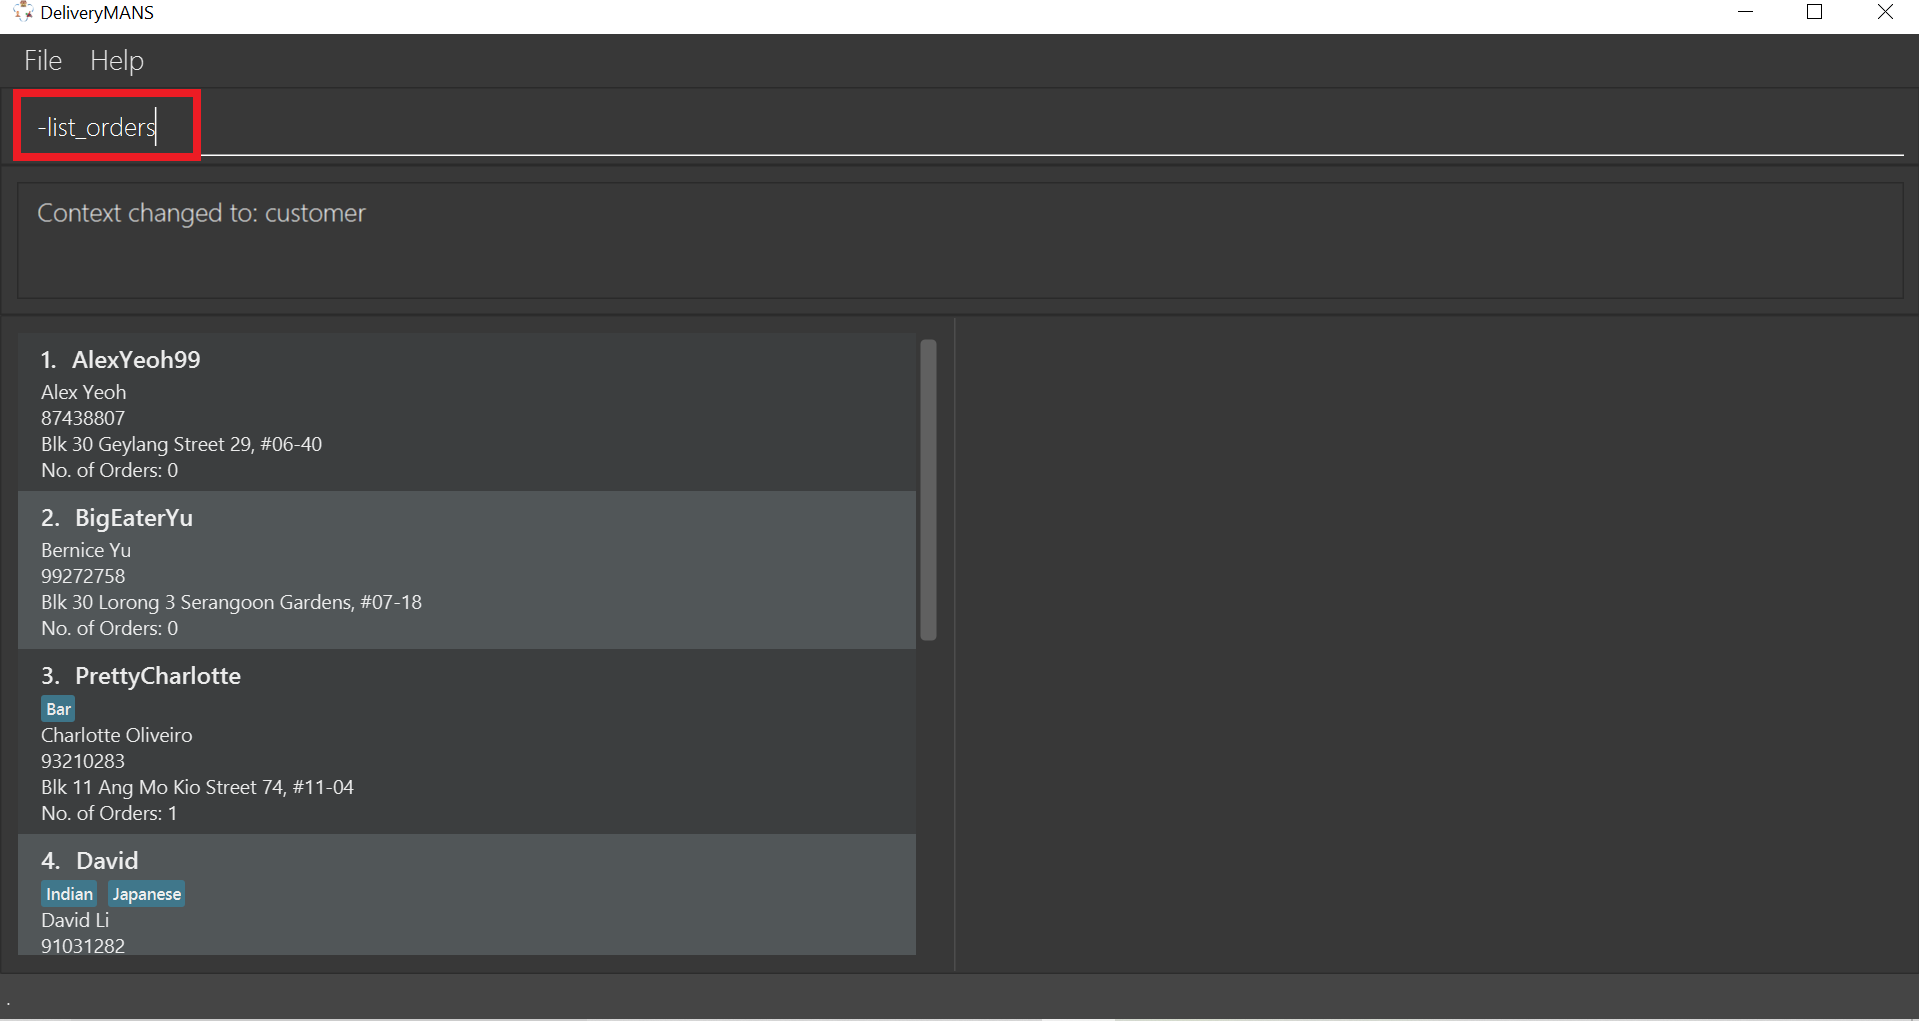
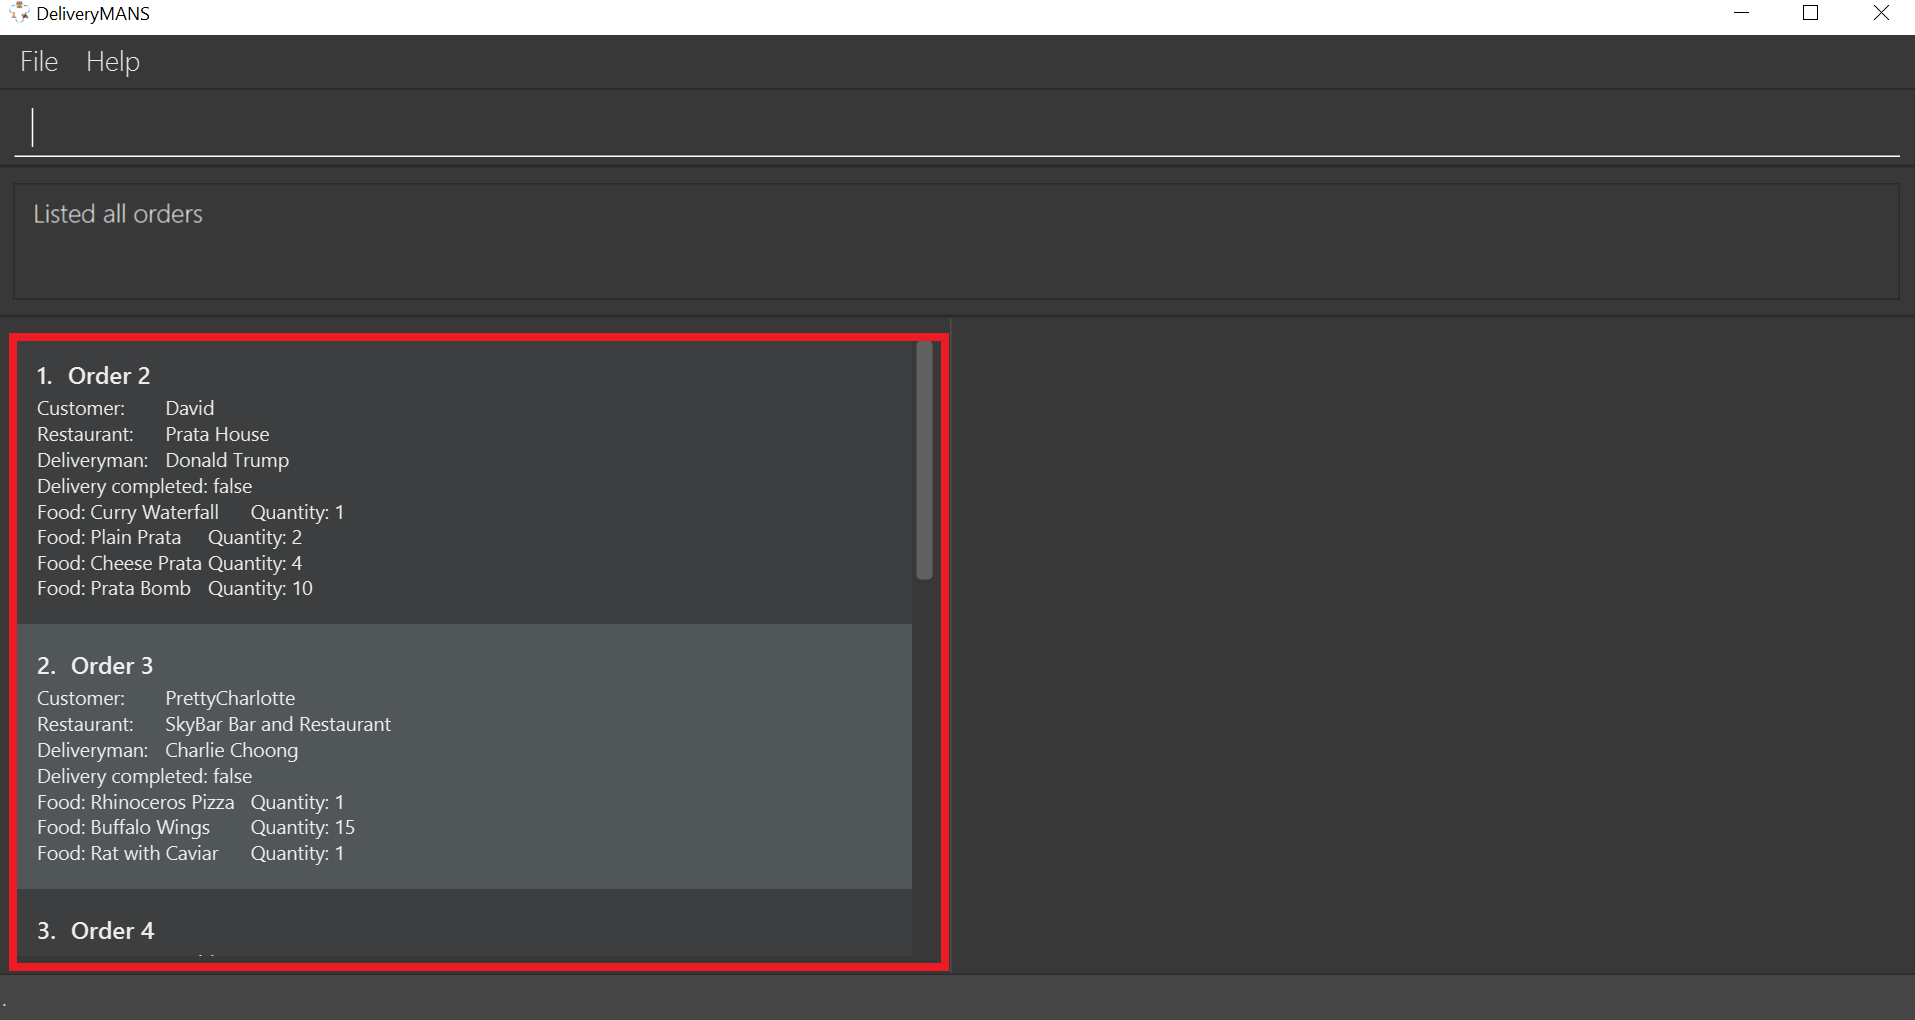
3.1.8. Listing all orders: -list_orders
This command enables you to view all orders currently in the database.
Format: -list_orders
Example: -list_orders
-
Type the command statement from the example above into the program and press Enter to execute it.
-
If you are successful, the result box displays the message:
"Listed all orders".

-
The order list shows all orders currently in the database.
3.1.9. Undoing a command: -undo
This command undoes the effects of a command that you have previously executed.
Format: -undo
Say you have accidentally executed a command and now want to reverse it. Just type -undo into the
command line and press Enter like any other command. The result box will then show the following:
Successfully undid: (your previous command here)
The command which you last performed has now been reversed. Subsequent invocations of -undo will
reverse commands which you have performed even earlier.
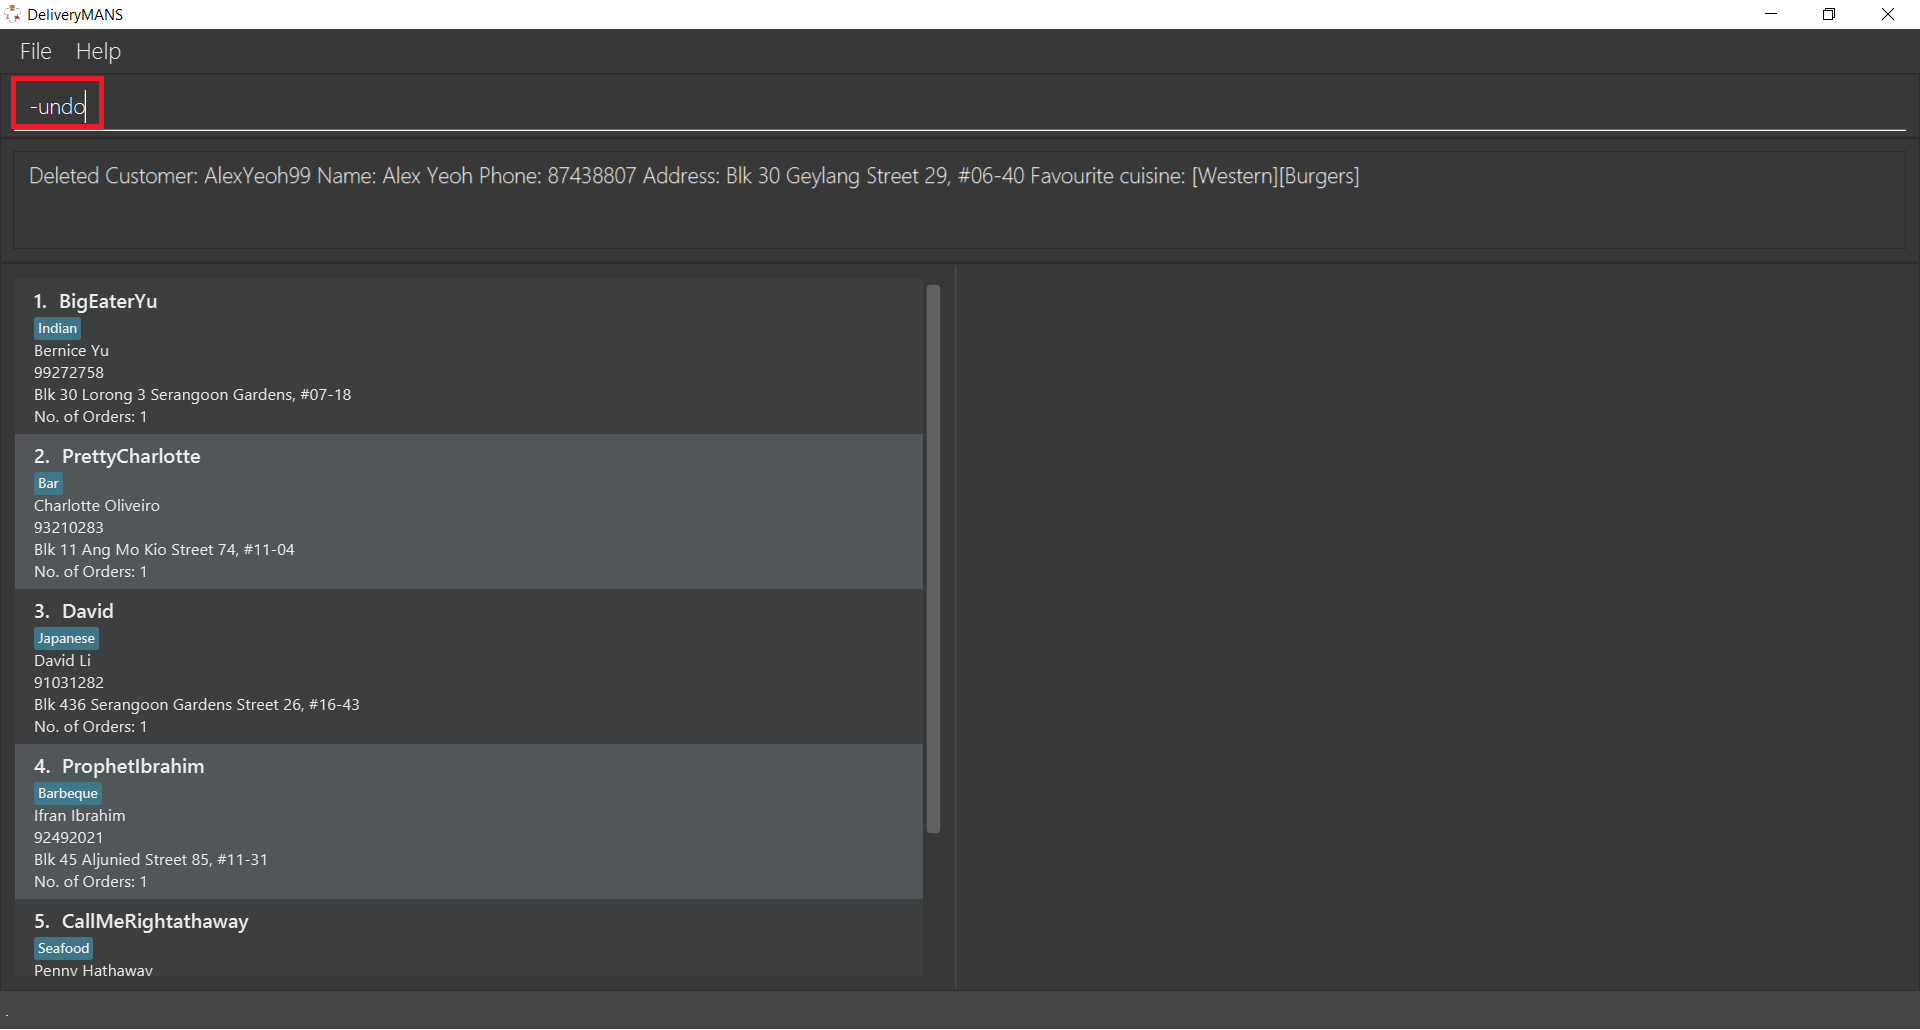
The following is a step-by-step illustration of this process. Say you have just executed delete 1
to delete Alex Yeoh from the customer list, and now realise that it was a mistake! In the image
below, the result box confirms that Alex has been deleted, and his details are no longer in the
customer list.

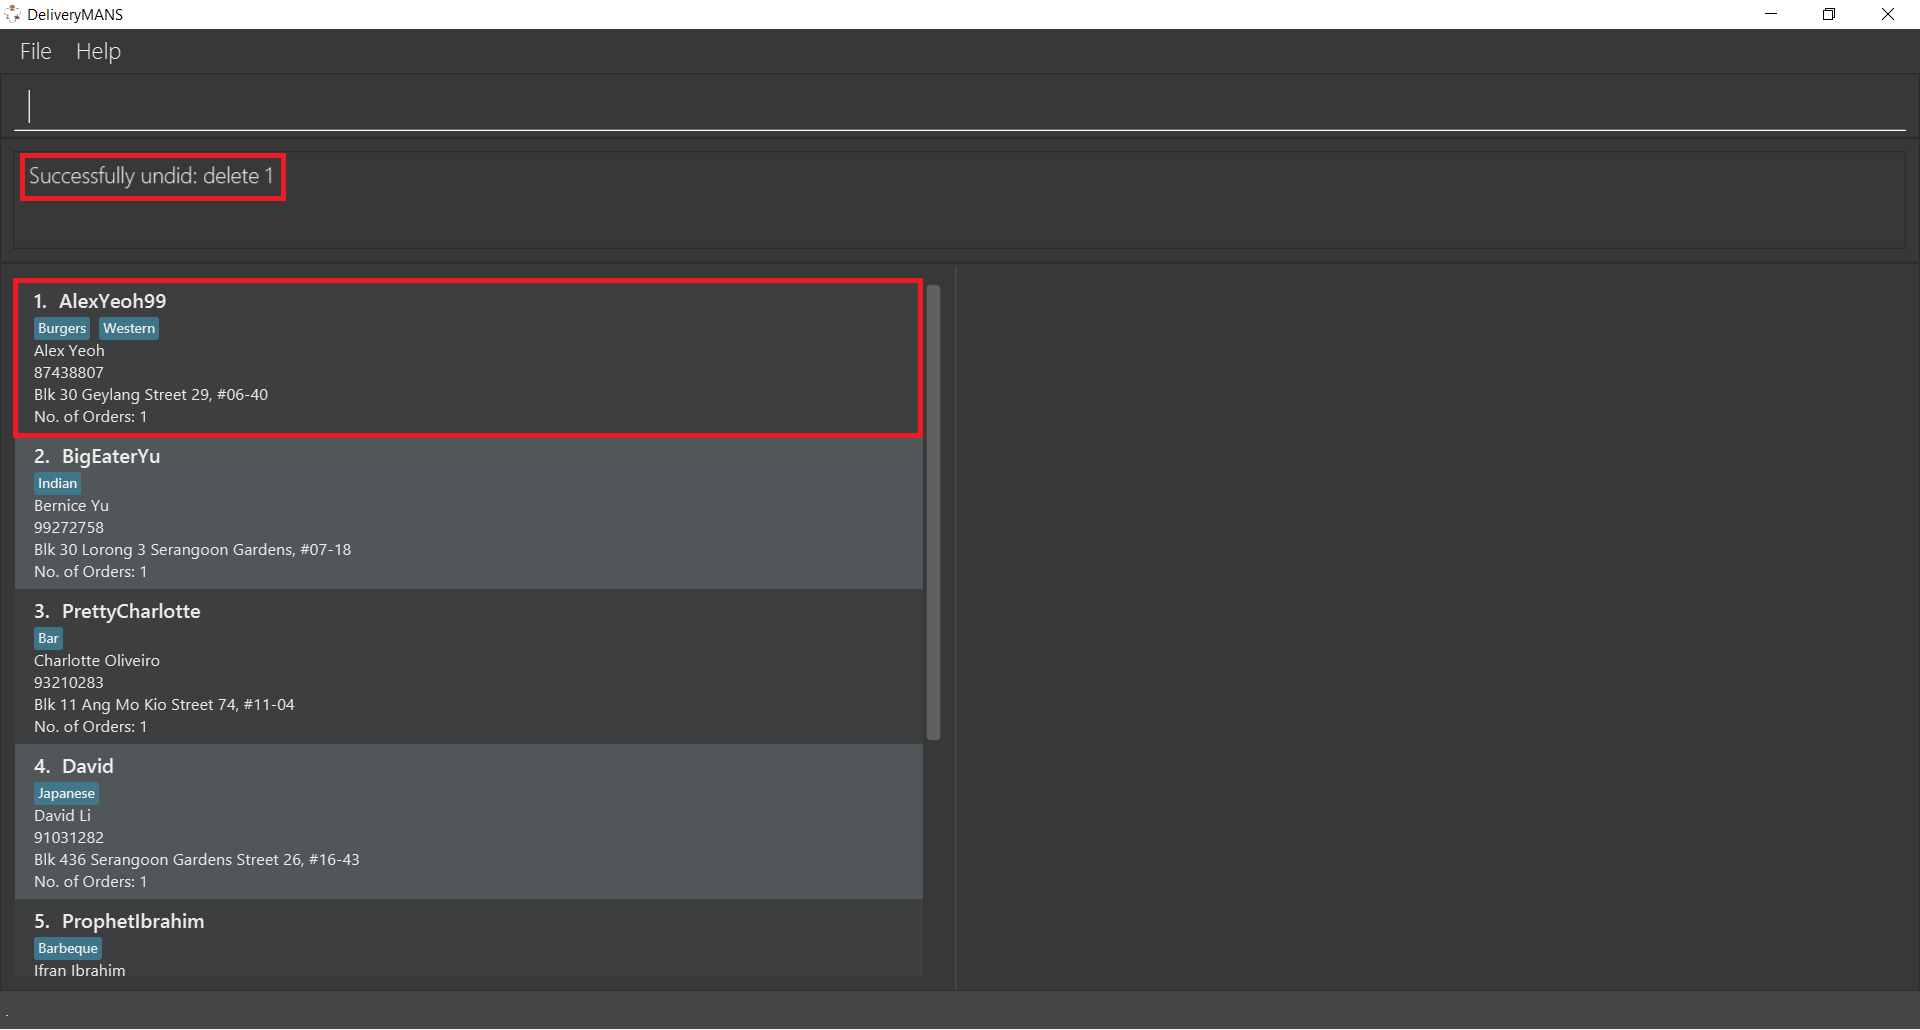
To undo this deletion, just type -undo into the program as shown and press Enter.
Success! The result box displays the undone command, and Alex is back in the customer list.
3.1.10. Redoing a command: -redo
This command redoes the effects of a command that you have just undone, in effect undoing an undo.
Similarly to -undo, this command can be used multiple times in succession to bring back multiple
commands which you have undone earlier.
Format: -redo
After performing -redo, the result box will show:
Successfully redid: (your previous command here)
The operation of this command is similar to the -undo command which is illustrated above.
3.1.11. Listing of undo/redo actions: -undo_list
This command lists the actions that can be undone and redone so that multiple actions can be redone
at once with the -undo_till command.
Format: -undo_list
Upon executing the command, the result box will show something similar to the following:
Here are the actions that can be undone or redone, use -undo_till INDEX to undo or redo till that action.
1: (Undo) (command you previously executed here)
3: (Redo) (command you previously undid here)
(Undo) indicates that the command was performed, and its effects can be undone. (Redo) indicates
that the command has previously been undone, and can now be redone. After using this command, take
note of the index of the command that you want to undo (or redo) until, and use the command
-undo_till INDEX to perform the undo or redo.
| The undo list can be seen as a timeline of commands; it is not possible to undo only certain commands and not the other intervening commands. |
Say you have undone two commands and decided that you actually want both of the commands redone.
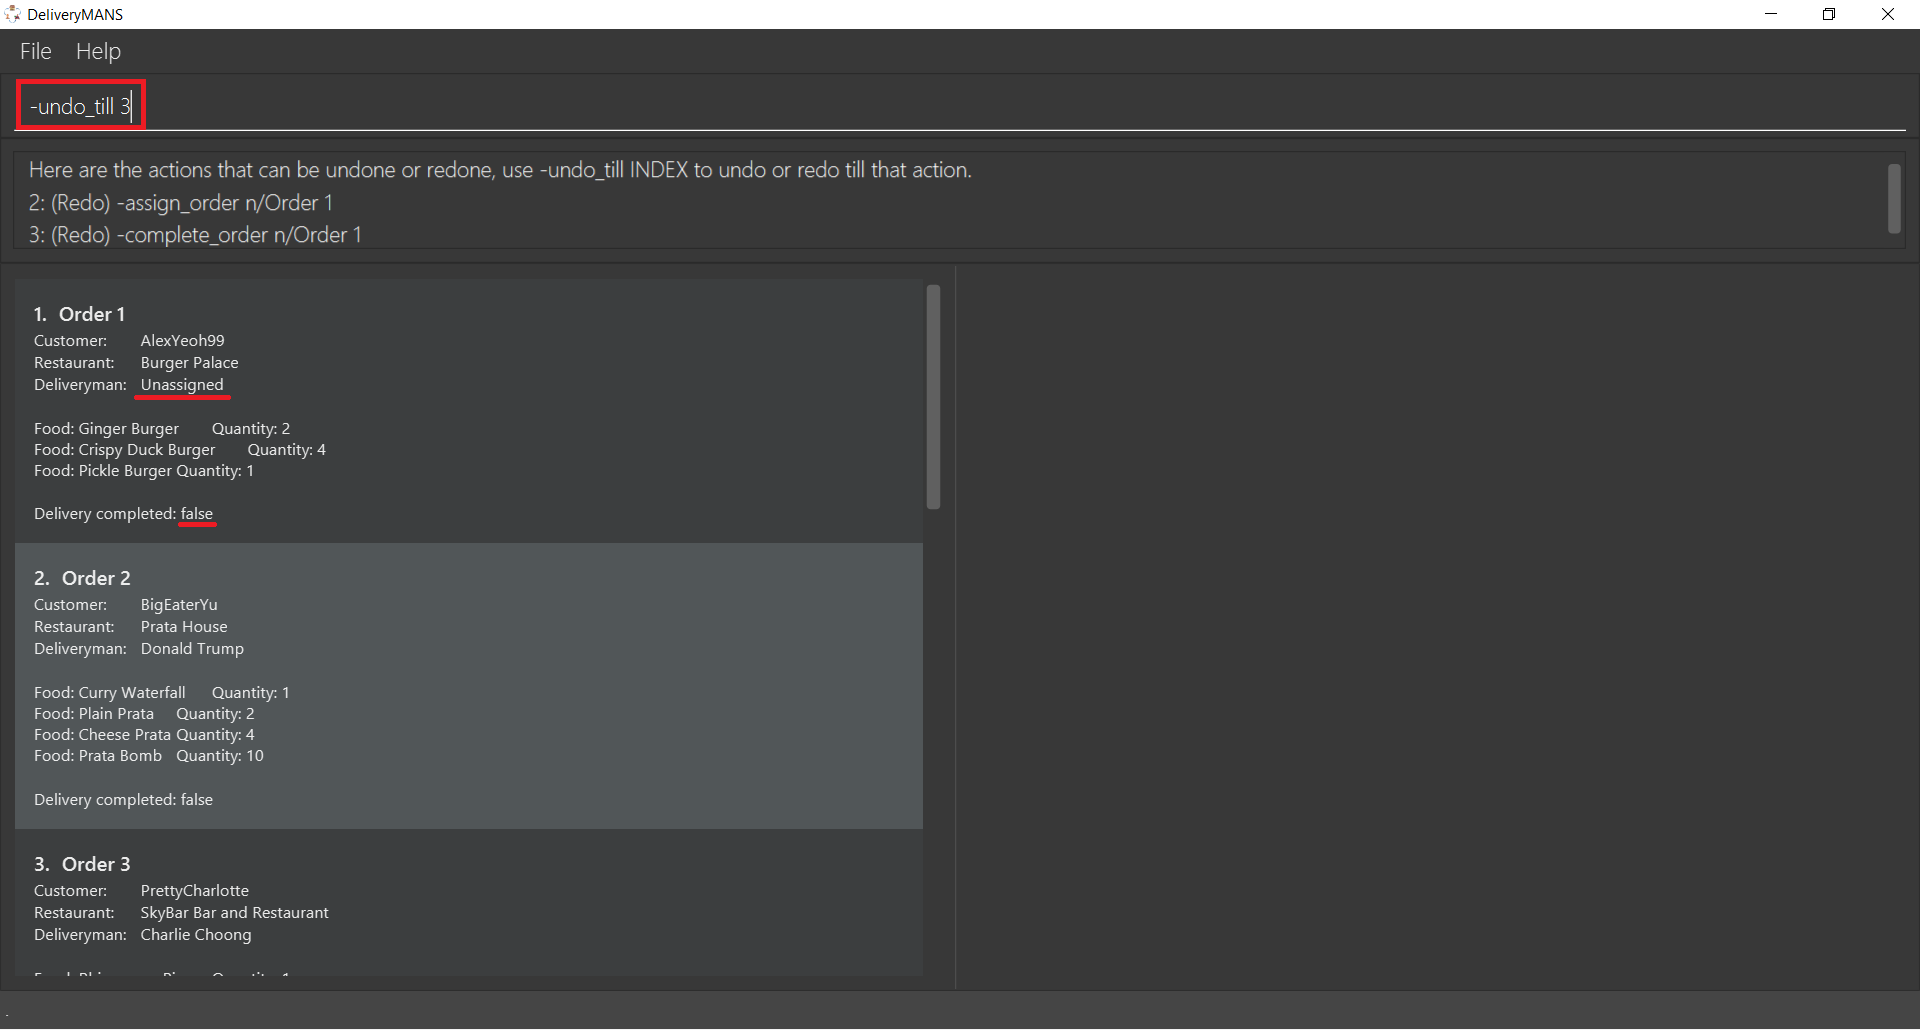
First type -undo_list in the area indicated below by the red rectangle and press Enter.

The list of commands that can be undone or redone is then listed. In the image below, there are two commands that can be redone. To redo till the last command, take note of the index of the last command, which is 3.
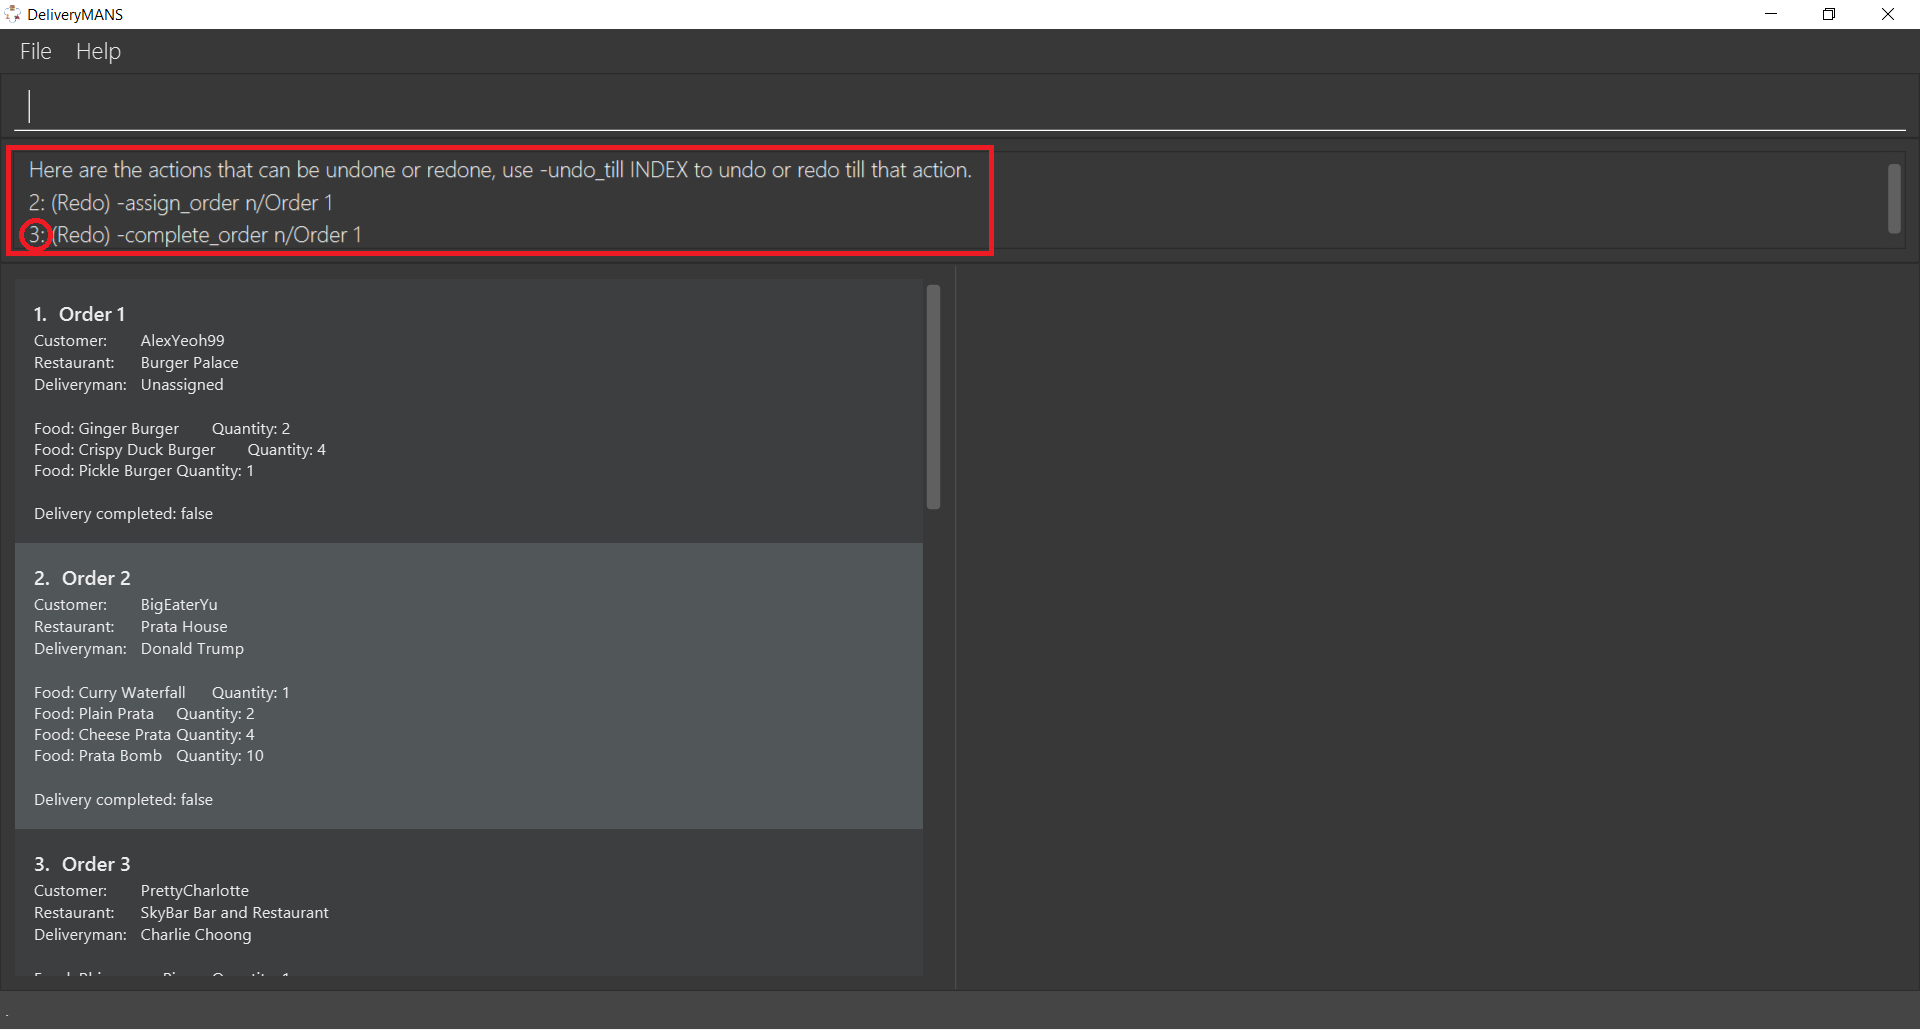
Now execute -undo_till 3. This command will be explained in more detail in the following section.
3.1.12. Undoing or redoing commands till a specific command: -undo_till
This command undoes or redoes all commands from the current state until after a specific command.
It takes in one parameter, INDEX, which is the index of the specific command. This index is obtained
from the command described in the previous section, -undo_list.
Format: -undo_till INDEX
Example: -undo_till 3
|
Requirement
The index provided must be a valid index obtained from |
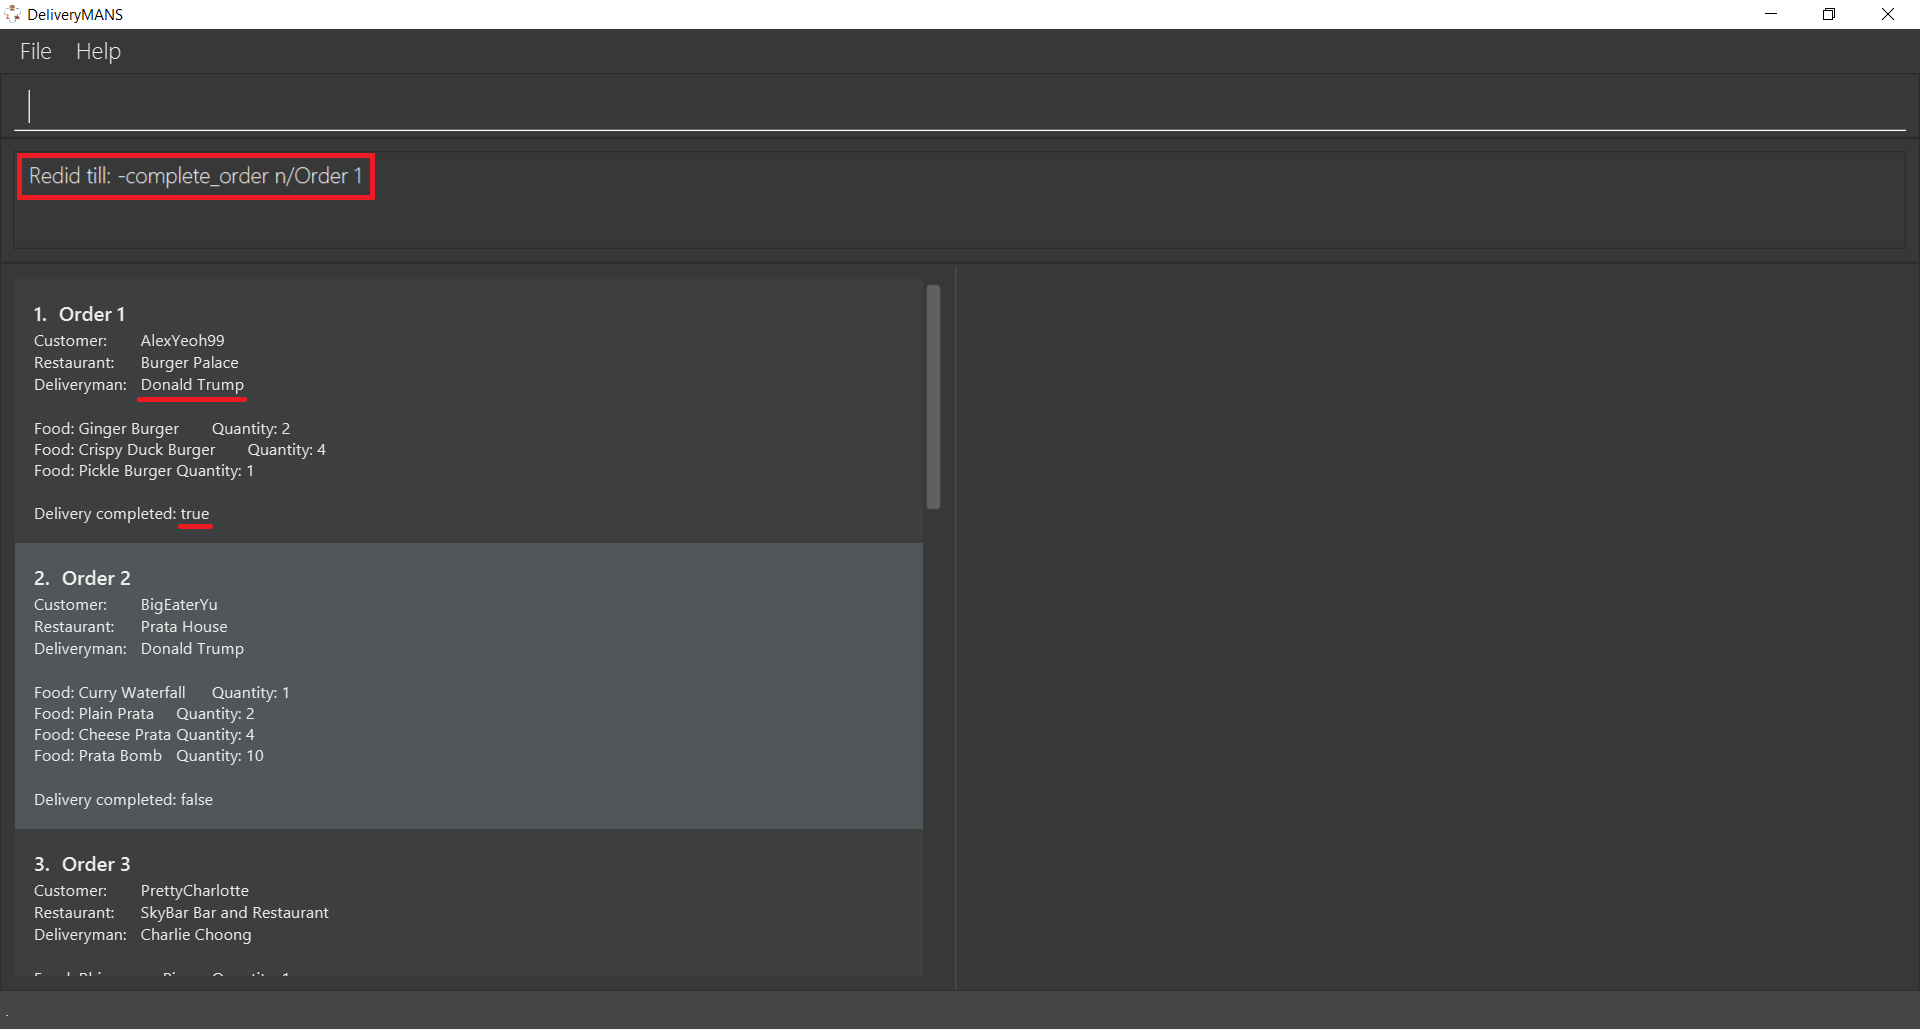
From the previous section, the index of the command to redo till is 3. Type -undo_till 3 in the
app and press Enter. From the result box in the image below, it can be deduced that the first
order was assigned a deliveryman and marked as completed, but these two commands were then undone.
The image also shows that the deliveryman is now unassigned and the order is now shown as not
delivered.
Upon successful execution, the result box shows whether commands were undone or redone, and the specific command that has been undone or redone until. Also, the first order now has the deliveryman reassigned and delivery marked as completed!
3.2. Customer commands
These are commands pertaining to customer context of DeliveryMANS. The screenshot below shows how the customer context will look like in DeliveryMANS.
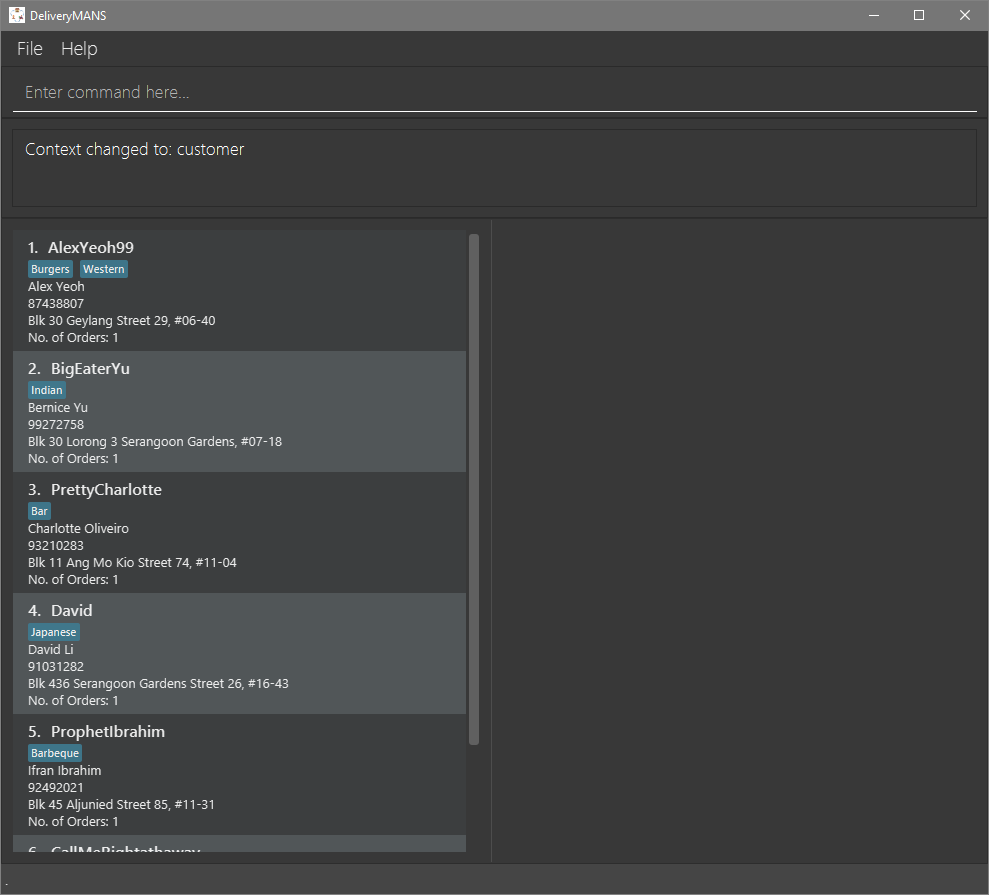
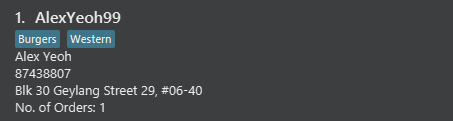
This is a customer and its information. Each card will display the customer’s username, favourite cuisine, name, phone number, address and the number of orders the customer has made.
3.2.1. Adding a customer: add
This command allows you to add a new customer to the customer list. USERNAME, NAME, PHONE and ADDRESS are necessary to a customer.
|
The |
Format: add u/USERNAME n/NAME p/PHONE ad/ADDRESS
Example: add u/JohnDoe n/John Doe p/91234567 ad/311, Clementi Ave 2, #02-25
3.2.2. Editing a customer: edit
This command allows you to edit an existing customer in the customer list. The index of a customer needs to be provided while the information to edit are optional.
Format: edit INDEX [n/NAME] [p/PHONE] [a/ADDRESS]
Example: edit 1 n/John Woe p/97654321
-
You want to change John Doe’s phone number but his address stays the same.
-
Simply type in
edit 1 p/97654321into the command line and press enter.
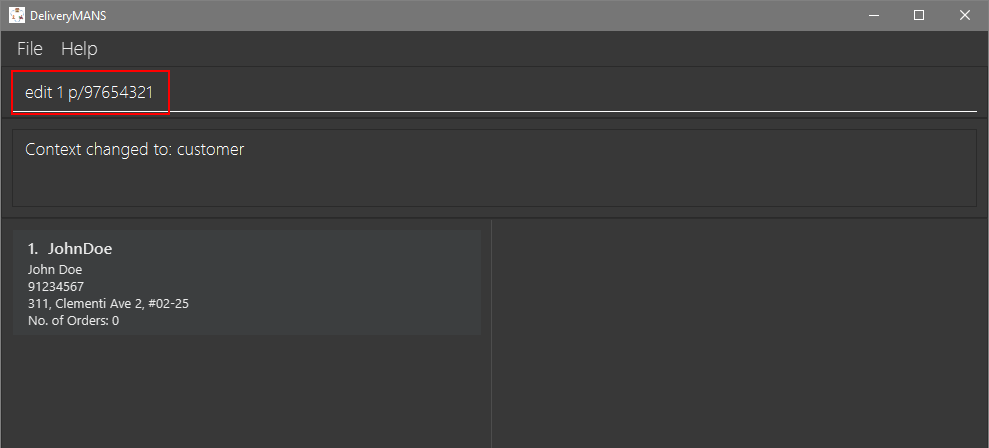
-
The result box will display that the edit is successful and John Doe’s phone number has changed.

|
Requirements
|
3.2.3. Deleting a customer: delete
This command allows you to delete an existing customer in the customer list. The index of a customer needs to be provided.
Format: delete INDEX
Example: delete 1
|
Requirements
|
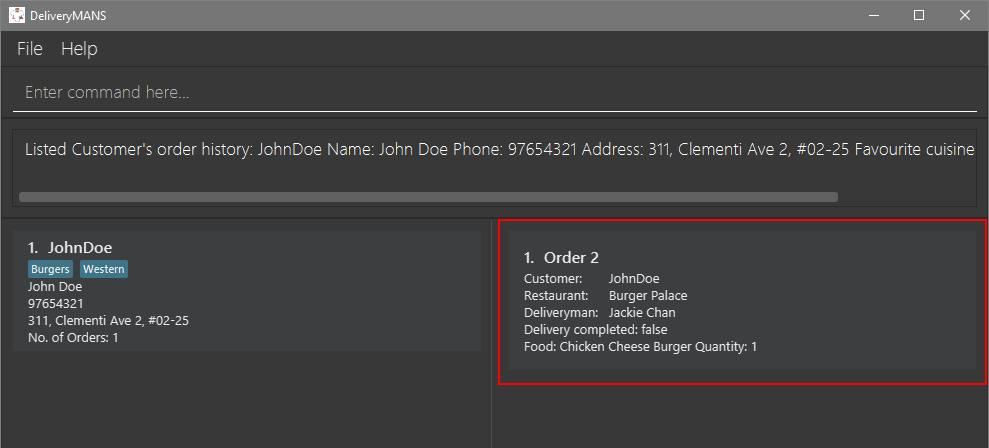
3.2.4. Viewing a customer’s order history: history
This command allows you to view a customer’s order history. The index of a customer needs to be provided.
Format: history INDEX
Example: history 1
-
You want to view John Doe’s order history.
-
Simply type in
history 1into the command line and press enter.
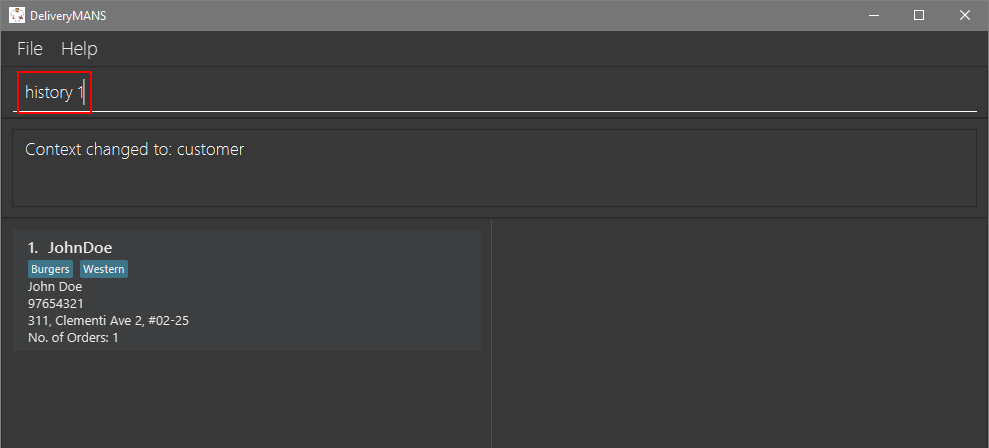
-
John Doe’s order history will be listed on the right panel.
|
Requirements
|
3.3. Restaurant commands
Commands in the restaurant context
3.3.1. Adding a restaurant: add
This command adds a restaurant to the restaurant database.
Format: add n/NAME l/LOCATION [t/TAG]…
-
LOCATIONcan only be one of the following locations: Jurong, Tuas, Woodlands, Bishan, City, Marina, Changi, Punggol.
Example: add n/KFC l/Jurong t/FastFood
3.3.2. Deleting a restaurant: delete
This command deletes the restaurant at the specified index in the restaurant list from the restaurant database.
Format: delete INDEX
-
INDEXmust be a positive integer from 1 to n, the number of restaurants in the restaurant list.
Example: delete 1
|
Note:
|
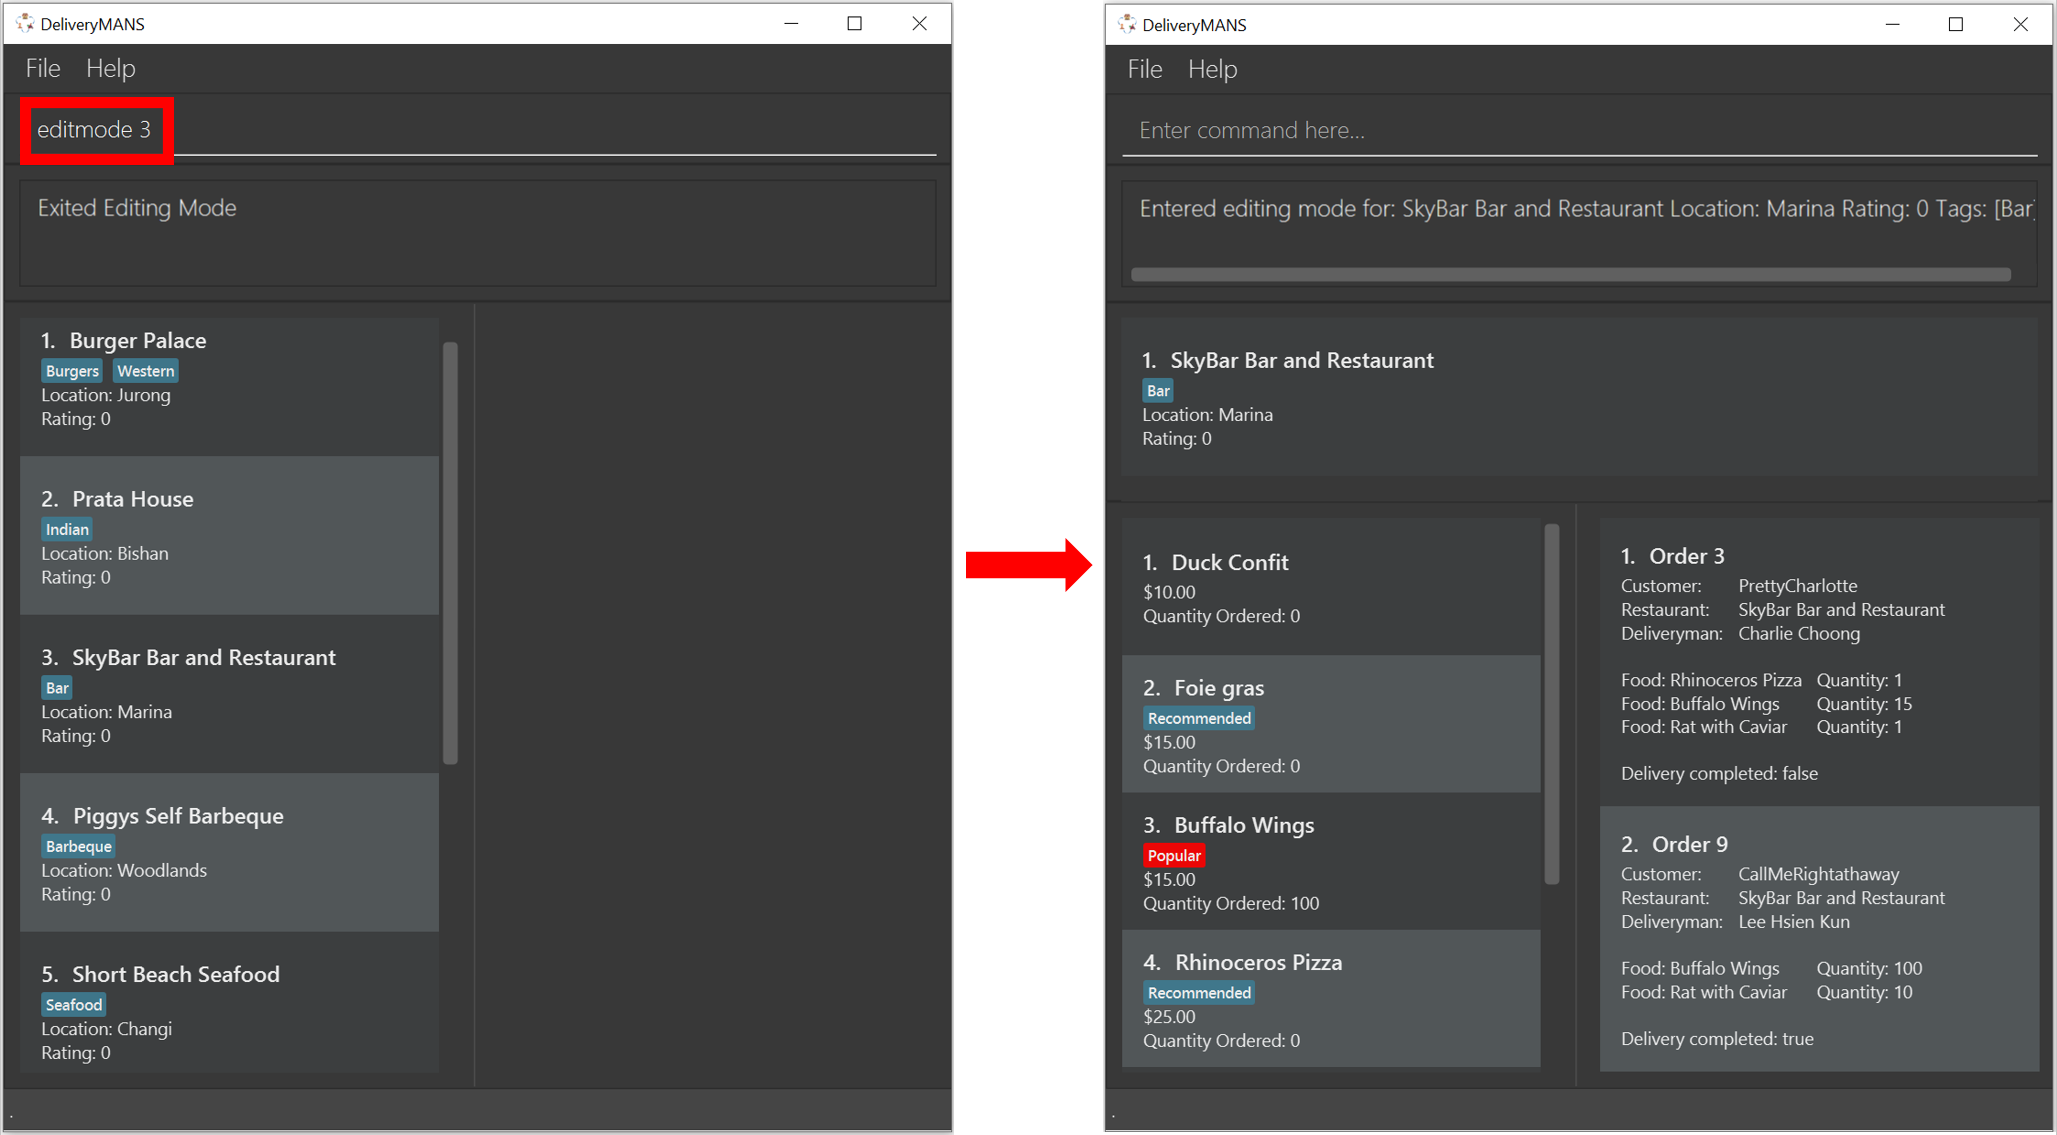
3.3.3. Entering EditMode: editmode
This command enters EditMode for the restaurant identified by the specified index in the restaurant list. Displays the restaurant’s details, menu and current orders. Unlocks commands for editing details, adding and removing of food items in the menu, and adding of rating.
Format: editmode INDEX
-
INDEXmust be a positive integer from 1 to n, the number of restaurants in the restaurant list.
Example: editmode 3
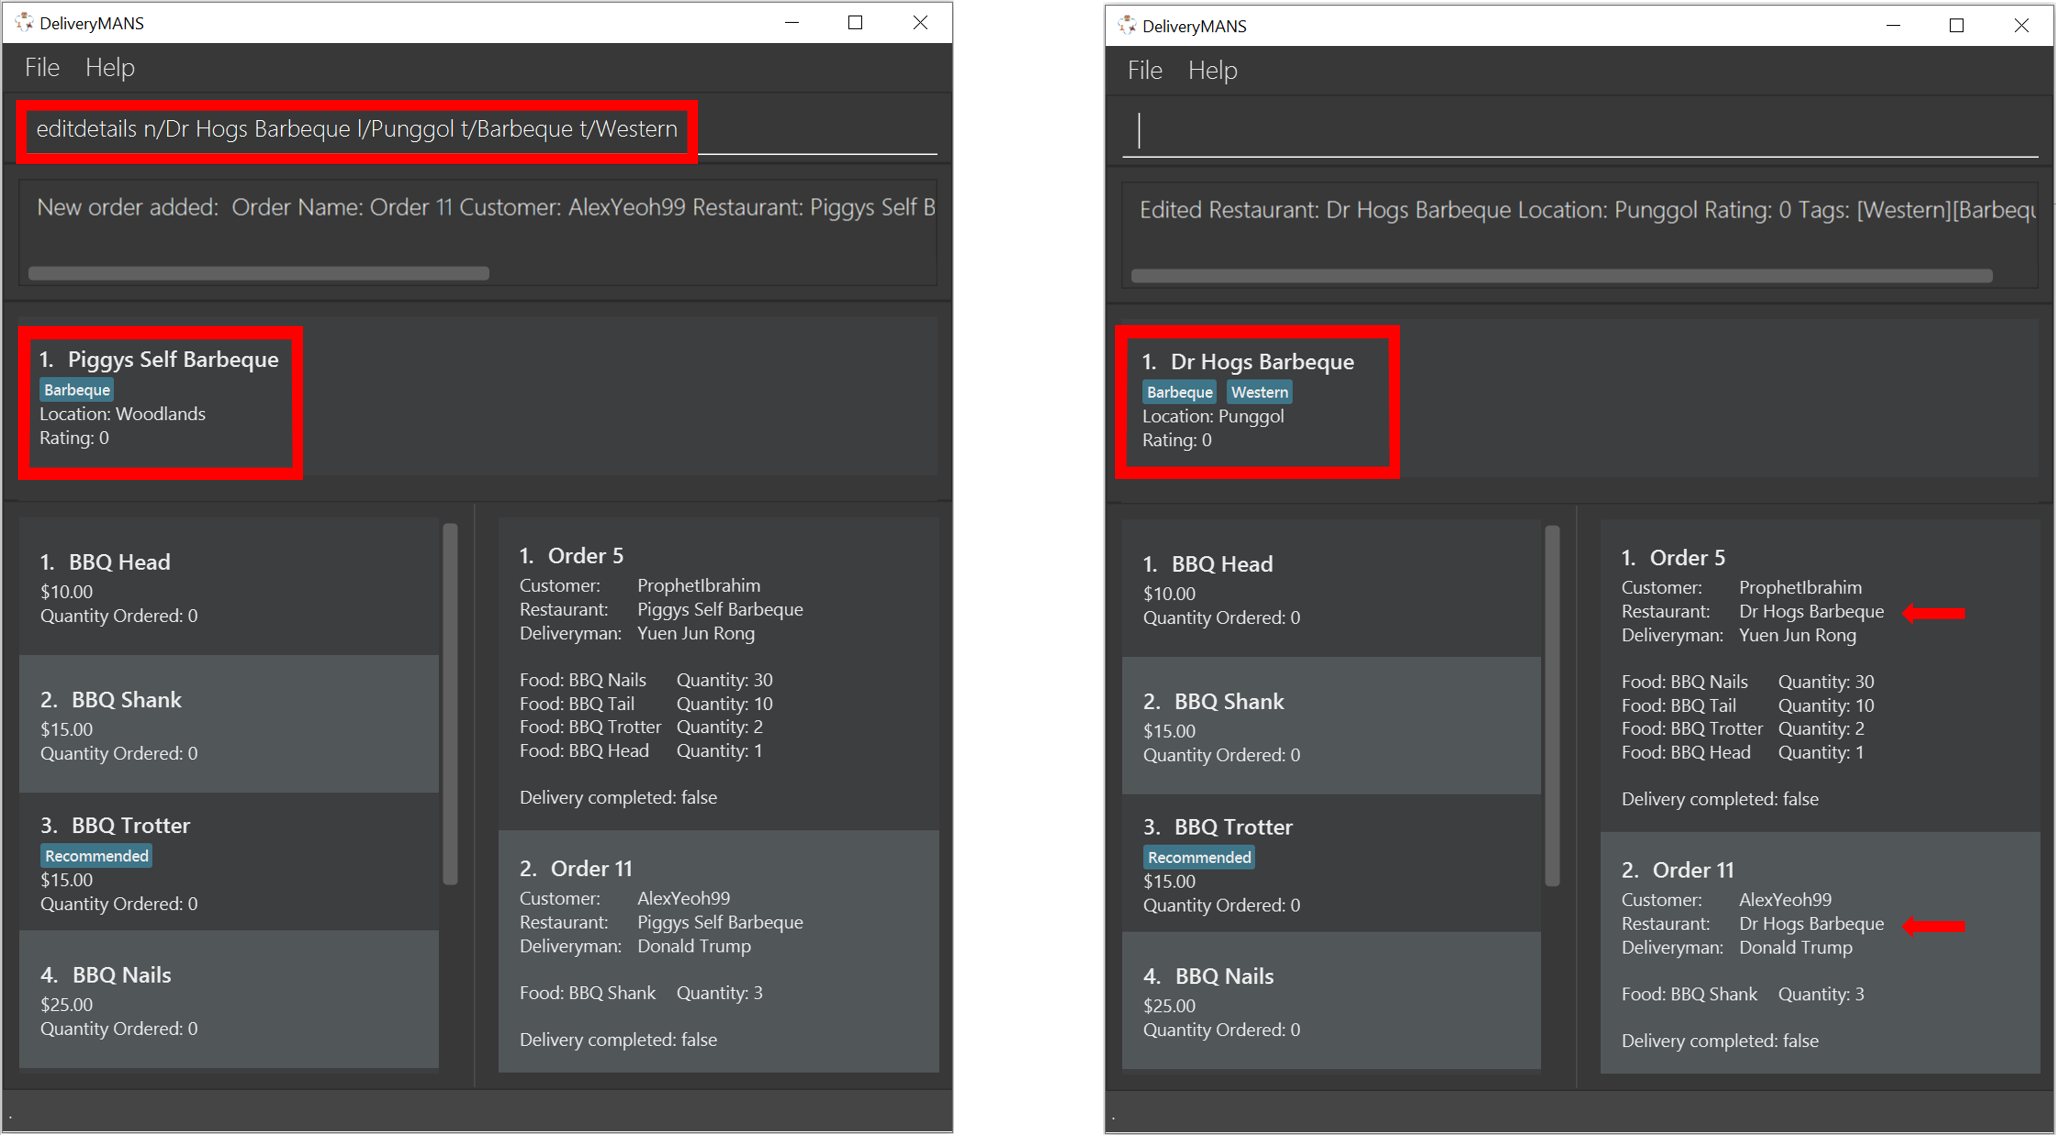
3.3.4. Editing restaurant’s details (under EditMode): editdetails
This command edits the details of the restaurant under EditMode.
Format: editdetails [n/NAME] [l/LOCATION] [t/TAG]…
-
At least one of the optional fields must be provided.
-
Existing values will be updated to the input values.
-
When editing tags, the existing tags of the restaurant will be removed i.e adding of tags is not cumulative.
-
You can remove all the restaurant’s tags by typing t/ without specifying any tags after it.
Example: editdetails n/Dr Hogs Barbeque l/Punggol t/Barbeque t/Western
|
Note:
|
3.3.5. Adding food item (under EditMode): add
This command adds a food item to the menu of the restaurant under EditMode.
Format: add n/NAME a/PRICE [t/TAG]…
-
You can only tag a food item as "Recommended".
Example: add n/Chicken a/7.90 t/Recommended
3.3.6. Deleting food item (under EditMode): delete
This command deletes the food item at the specified index in the menu of the restaurant under EditMode.
Format: delete INDEX
-
INDEXmust be a positive integer from 1 to n, the number of food items in the restaurant’s menu.
Example: delete 1
|
Note:
|
3.3.7. Adding a rating (under EditMode): rate
This command adds a rating to the restaurant under EditMode and updates the new average rating of all the ratings added to date.
Format: rate RATING
-
RATINGmust be a non-negative integer from 0 to 5.
Example: rate 4
3.3.8. Exiting EditMode: exitedit
This command exits EditMode for the specific restaurant and returns to the list of restaurants
Format: exitedit
3.3.9. Auto-tagging of food item as "Popular"
Food items with quantity ordered more than 1.5 times the average quantity ordered of food items in the restaurant will be automatically tagged as "Popular".
Example (refer to image below):
-
16 food items are ordered in Order 2 (1 + 2 + 6 + 7), an average quantity ordered of 4 per food item.
-
Quantity ordered of food items Cheese Prata and Prata Bomb (6 and 7 respectively) is more than 1.5 times the average quantity ordered. Automatically tagged as "Popular" upon completion of Order 2.

|
Note:
|
3.4. Deliverymen commands
These are the commands you can use after entering the deliverymen context (via the command -deliverymen).
The screenshot below shows how the deliverymen context looks like.
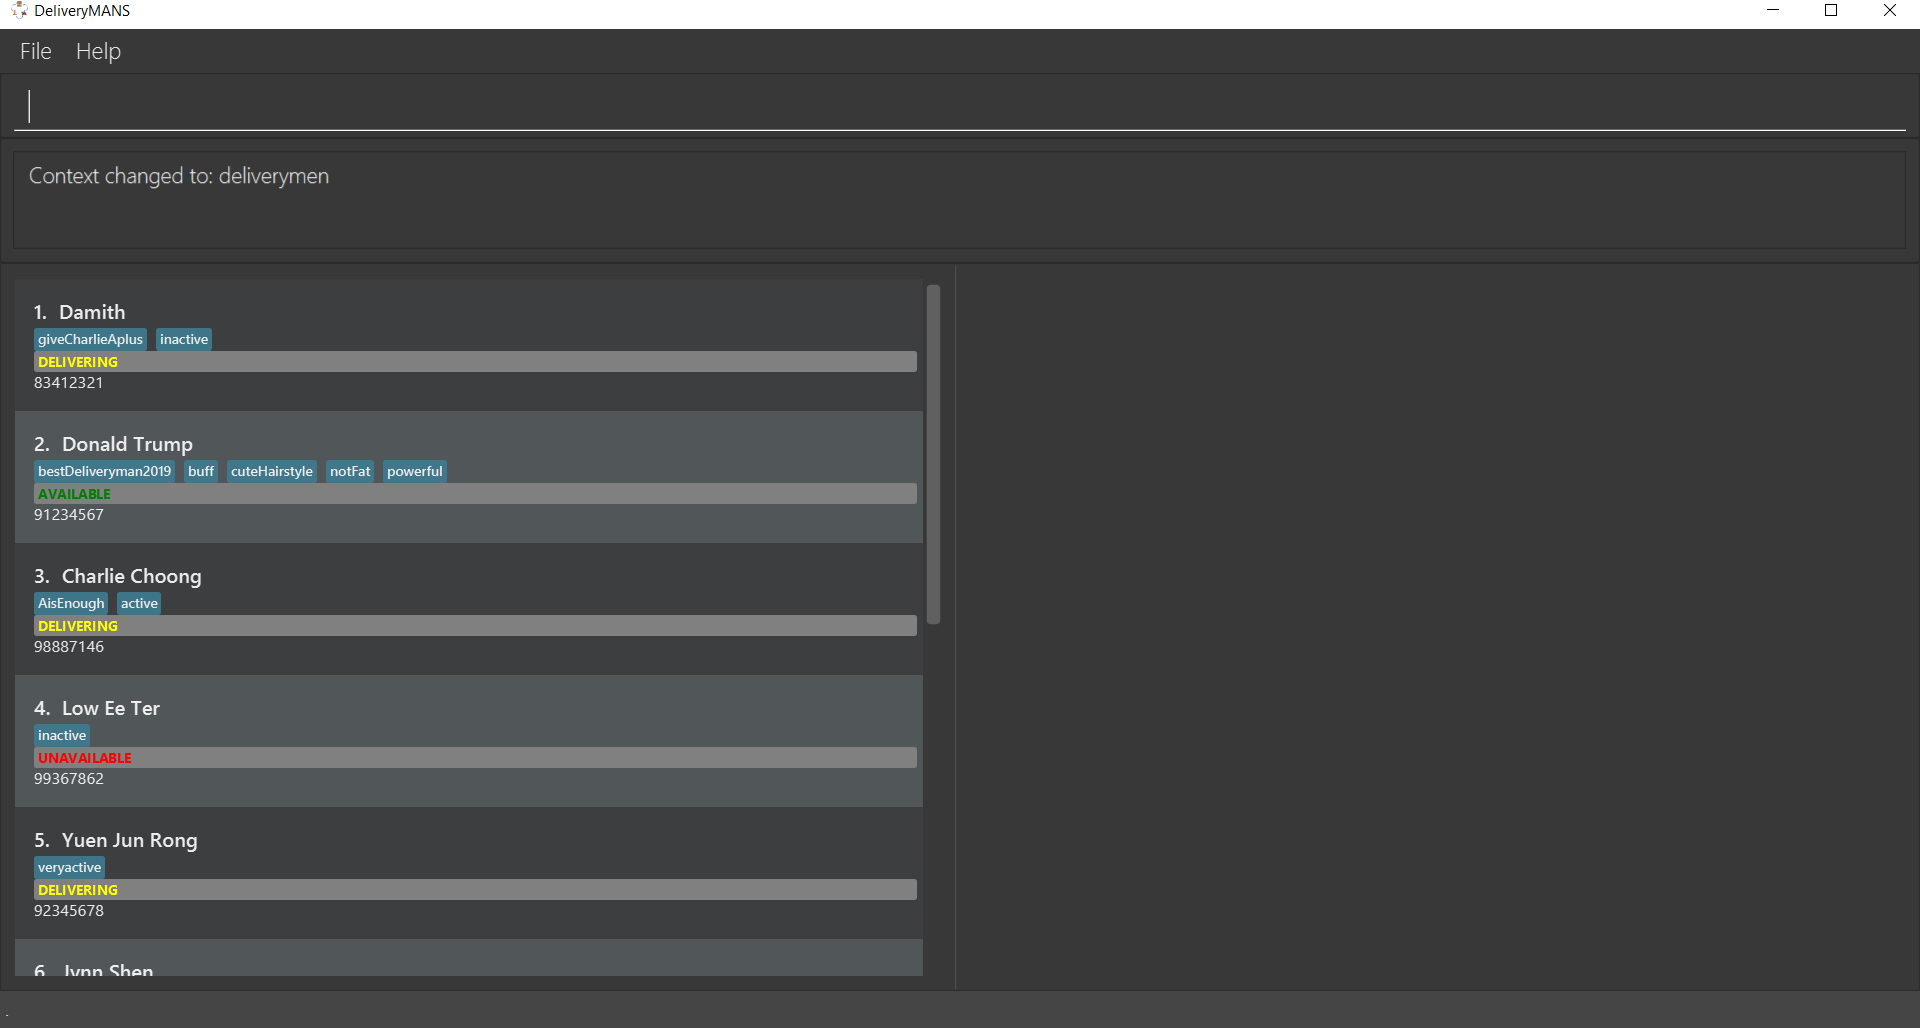
For each deliveryman, his information will be displayed in the following vertical order: name, tag(s), current status and phone number. This is shown in another screenshot below.

|
Note:
A deliveryman can have any of the 3 statuses: AVAILABLE, UNAVAILABLE, DELIVERING. |
3.4.1. Adding a deliveryman: add
This command allows you to add a new deliveryman to the deliverymen database. The name and phone number of the deliveryman must be provided.
Format: add n/NAME p/PHONE
Example: add n/John Doe p/91234567
|
Requirements
|
|
Note:
|
3.4.2. Editing a deliveryman: edit
This command allows you to edit an existing deliveryman in the deliverymen database. The index of the deliveryman to be edited must be provided. You can edit only the field that you wish to change, but at least one field must be edited (eg. name, phone number, tag(s)). You can also add more than one tag, as illustrated in Example 2.
Format: edit INDEX [n/NAME] [p/PHONE] [t/TAG]*
Example 1: edit 1 n/John Hoe p/97654321
Example 2: edit 1 t/active t/buff t/bestDeliveryman2019
|
Requirements
|
3.4.3. Deleting a deliveryman: delete
This command allows you to delete an existing deliveryman from the deliverymen database. The index of the deliveryman to be deleted must be provided.
Format: delete INDEX
Example: delete 1
|
Requirements
|
3.4.4. Listing status lists of deliverymen: lists
This command allows you to view all the deliverymen sorted according to their statuses. For easy navigation, you can click on any of the three buttons, as shown in the red box of the screenshot below, to display the status list that you wish to view.
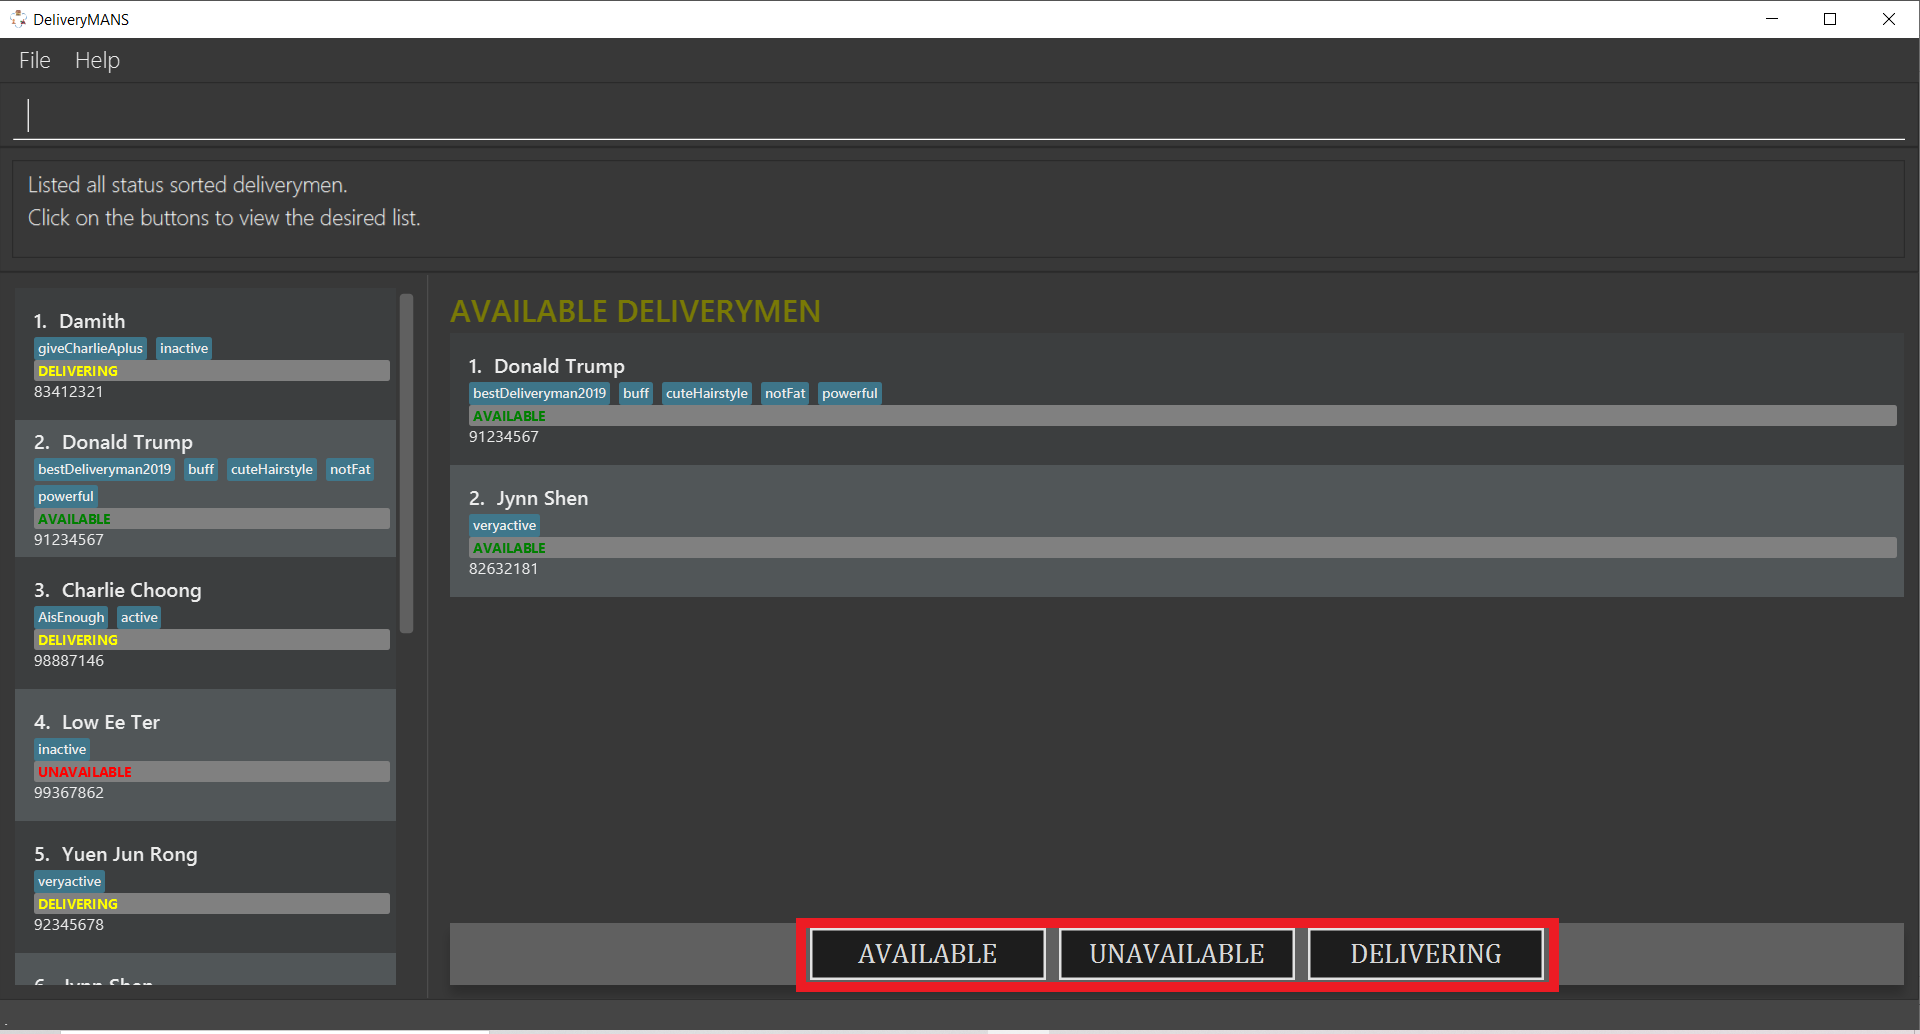
Format: lists
Example: lists
3.4.5. Changing status of a deliveryman: status
This command allows you to switch the status of a deliveryman between AVAILABLE and UNAVAILABLE. Using this command
will prompt the status lists as well (that can also be done through lists command explained in Section 3.4.4).
Format: status INDEX
Example: status 3
|
Requirements
|
|
Note:
You are not allowed to change the status of a deliveryman who has the status DELIVERING. It can only be changed
through changes to orders assigned to him.
|
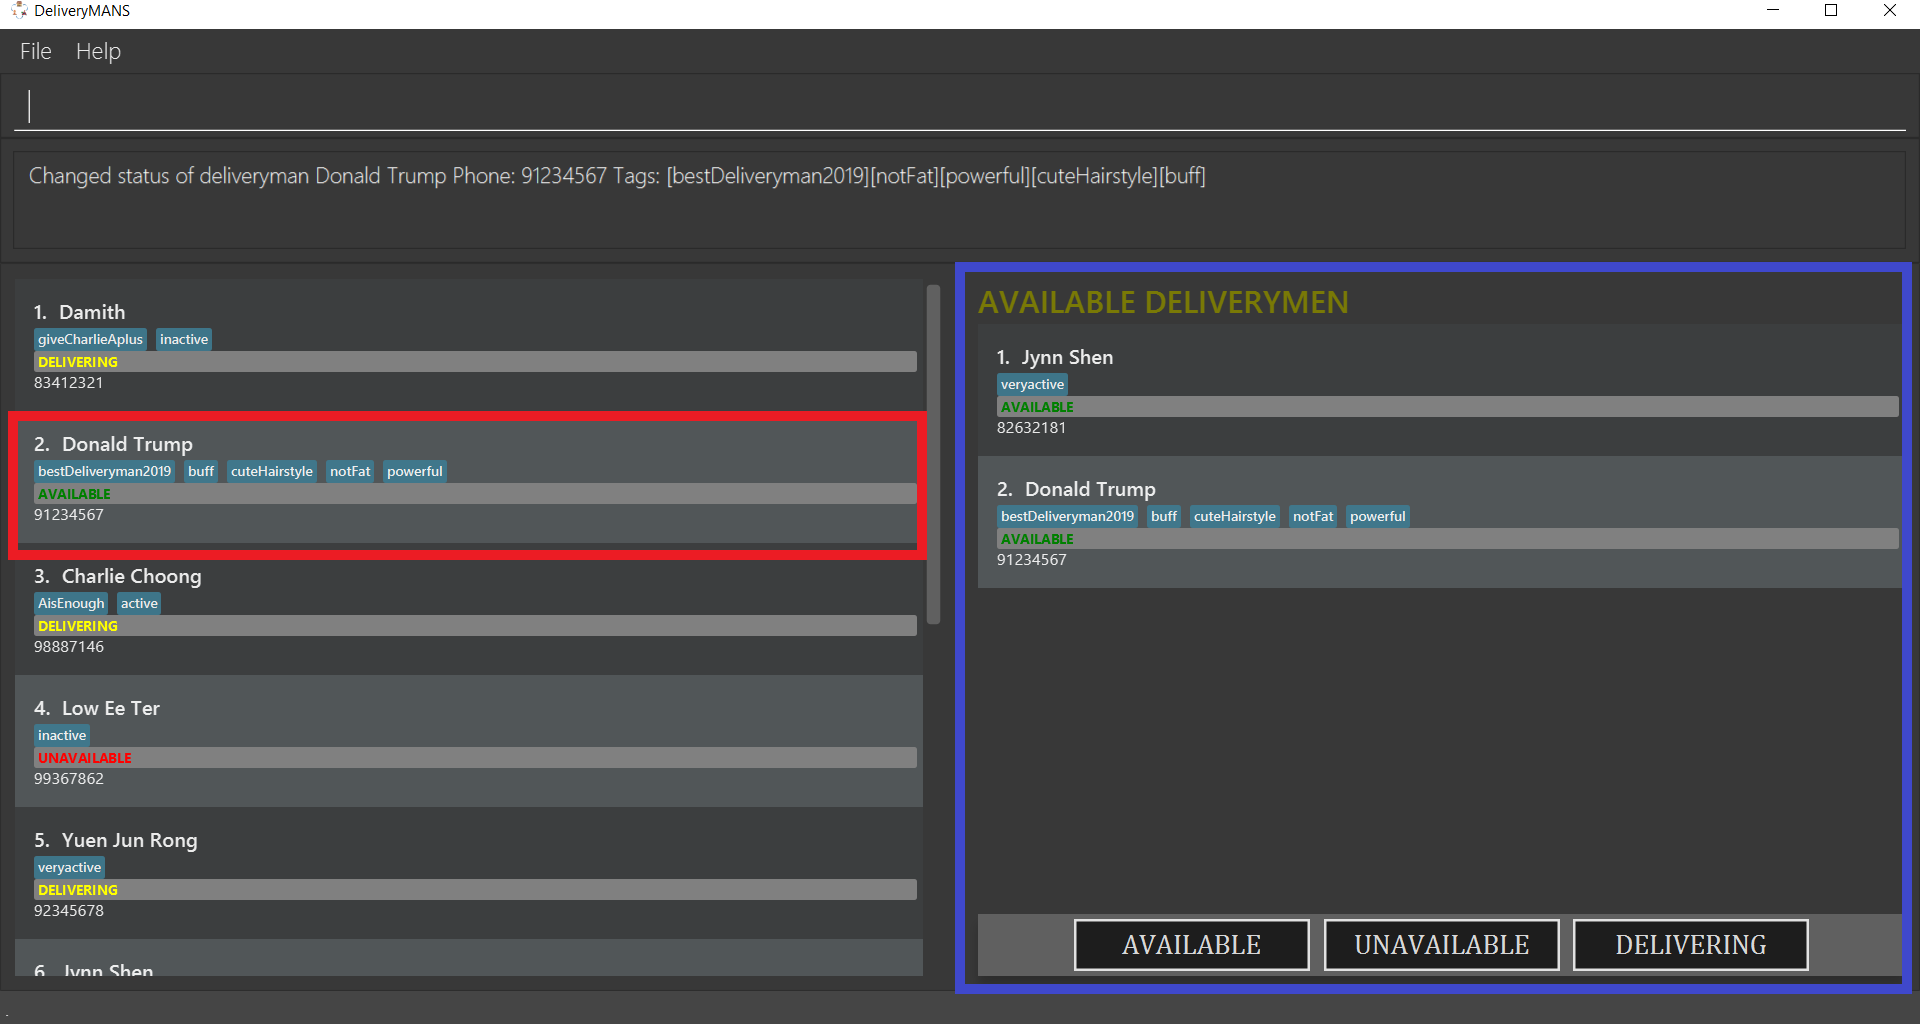
-
Your deliveryman, Donald Trump, was on sick leave and his status is currently UNAVAILABLE. However, he just informed you that he has recovered and is ready to work again! You want to set his status back to AVAILABLE.
-
You search for his name and identify his index as
2, as shown in the red border. Then you type in the commandstatus 2.
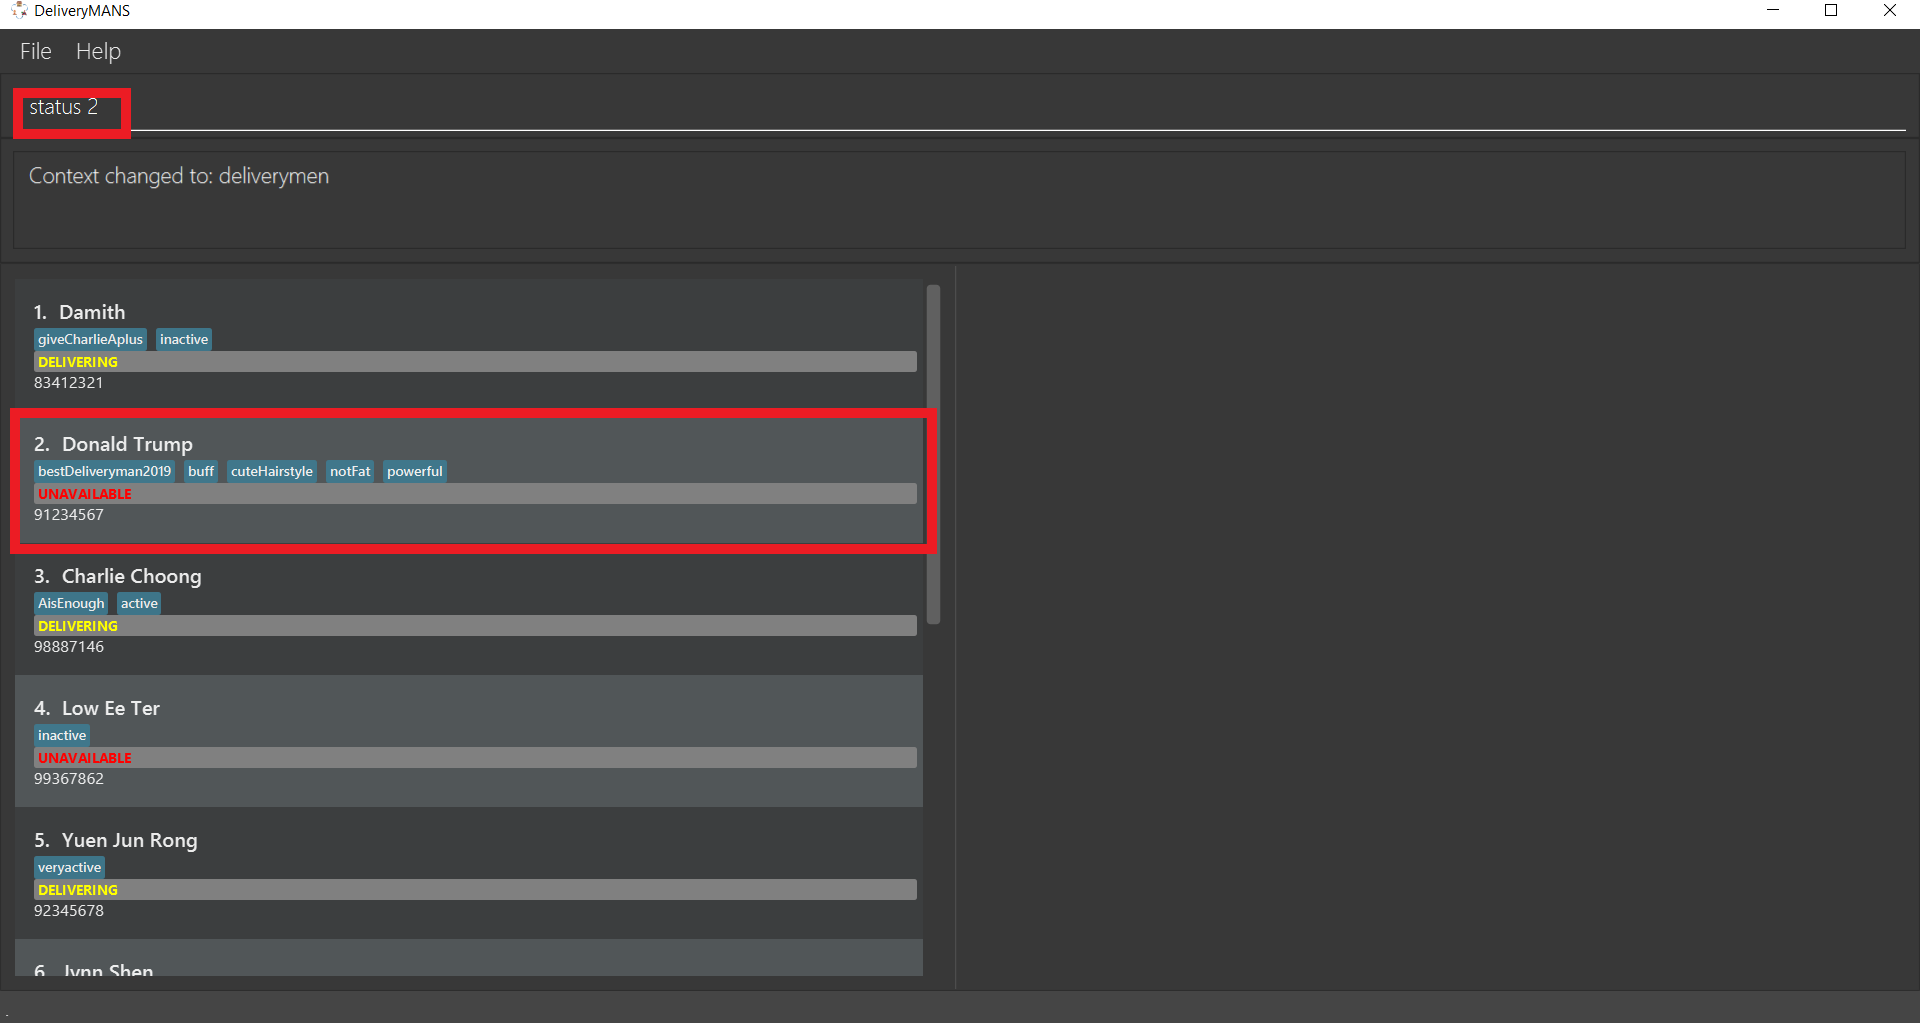
-
The result box will display that the status of Donald Trump has been changed. And indeed, it has been switched to AVAILABLE! Also, you notice that the status lists have been prompted, as shown in the blue border.
3.4.6. Viewing the statistics of the deliverymen statuses: stats
This command allows you to view the statistics of the current statuses of deliverymen. Relevant statistics such as the utilisation level will also be computed and displayed for your reference. A brief explanation of each statistic is provided as well.
Format: stats
Example: stats

In the screenshot above, the information inside the blue border is the statistics. The text shown inside the red border is a summary of the analysis.
| If you just want a brief update on the current state of your deliverymen, the textual analysis displayed inside the red border summarizes it all for you! |
4. Command summary
Command: format
-
Universal commands
-
View help:
-help -
Add order:
-add_order c/CUSTOMER r/RESTAURANT f/FOOD… q/QUANTITY… -
Assign order:
-assign_order n/ORDERNAME -
Complete order:
-complete_order n/ORDERNAME -
Edit order:
-edit_order n/ORDERNAME [c/CUSTOMER] [r/RESTAURANT] [f/FOOD]… [q/QUANTITY]… -
Delete order:
-delete_order n/ORDERNAME -
List orders:
-list_orders -
Switch to restaurant context:
-restaurant -
Switch to customer context:
-customer -
Switch to deliverymen context:
-deliverymen -
Undo command:
-undo -
Redo command:
-redo -
List undo/redo:
-undo_list -
Undo/redo till:
-undo_till INDEX -
Exit application:
-exit
-
-
Customer commands
-
Add a customer:
add u/USERNAME n/NAME p/PHONE ad/ADDRESS -
Edit a customer:
edit INDEX [n/NAME] [p/PHONE] [ad/ADDRESS] -
Delete a customer:
delete INDEX -
View a customer’s order history:
history INDEX
-
-
Restaurant commands
-
Add a restaurant:
add n/NAME l/LOCATION [t/TAG]… -
Delete a restaurant:
delete INDEX -
Enter EditMode:
editmode INDEX -
Edit a restaurant’s details (under EditMode) :
editdetails [n/NAME] [l/LOCATION] [t/TAG]… -
Add a food item (under EditMode) :
add n/NAME a/PRICE [t/TAG]… -
Delete a food item (under EditMode) :
delete INDEX -
Add a rating (under EditMode) :
rate RATING -
Exit EditMode (under EditMode) :
exitedit
-
-
Deliverymen commands
-
Add a deliveryman:
add n/NAME p/PHONE -
Delete a deliveryman:
delete INDEX -
Edit a deliveryman:
edit INDEX [n/NAME] [p/PHONE] [t/TAG]… -
List deliverymen sorted by status:
lists -
Switch status of a deliveryman:
status INDEX -
View statistics for deliverymen current statuses:
stats
-