By: Team AY1920S1-CS2103-T12-2 Since: Sept 2019 Licence: NUS
1. Introduction
1.1. Software overview
DeliveryMANS is a command-line application designed specifically for delivery centre administrators who are in charge of food delivery service. It encompasses a well-structured system for users to keep track and manage the entire delivery process. It facilitates food delivery service by coaliasing the delivery men, customers and restaurant menu. From auto-assigning deliverymen for deliveries when orders are made, to viewing statistics of the most popular dish of restaurants as well as customer ordering trends for further promotions, financial and business management decisions, DeliveryMANs is everything you need to help improve managing deliveries. With just a few simple commands, this delivery manager can help to kickstart your delivery service.
1.2. Purpose
This document has been created to explain the software architecture and implementations of DeliveryMANS. The intended audience for this document are software testers and future developers.
2. Setting up
To setup DeliveryMANS on your system, please refer to the user guide here.
3. Design
3.1. Architecture
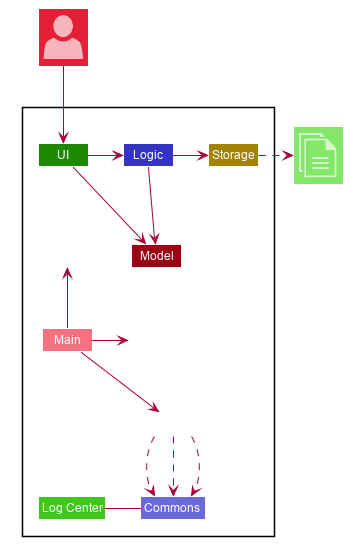
The Architecture Diagram given above explains the high-level design of the App. Given below is a quick overview of each component.
The .puml files used to create diagrams in this document can be found in the diagrams folder.
Refer to the Using PlantUML guide to learn how to create and edit diagrams.
|
-
At app launch: Initializes the components in the correct sequence, and connects them up with each other.
-
At shut down: Shuts down the components and invokes cleanup method where necessary.
Commons represents a collection of classes used by multiple other components.
The following class plays an important role at the architecture level:
-
LogsCenter: Used by many classes to write log messages to the App’s log file.
The rest of the App consists of four components.
Each of the four components
-
Defines its API in an
interfacewith the same name as the Component. -
Exposes its functionality using a
{Component Name}Managerclass.
For example, the Logic component (see the class diagram given below) defines it’s API in the Logic.java interface and exposes its functionality using the LogicManager.java class.
In addition, there are 4 different contexts that the App has:
-
Universal/Order -
Customer -
Restaurant -
Deliverymen
Each context will allow the application the execute commands in the context the application is currently in. For example, Customer commands can only be executed in the Customer context. This is to allow separation between the 4 contexts, and also the 4 databases the App has. The Universal context will also execute commands pertaining to Order.
Because of this, the context are interchangeable in the diagrams below (and the one above) as changing the context will not change how the application is structured. For example, when the diagram is shown in a Customer context, it will also apply in a Restaurant context.
However, there are differences between the 4 different context that will be explained in the Model section.
How the architecture components interact with each other
The Sequence Diagram below shows how the components interact with each other for the scenario where the user issues the command delete 1.
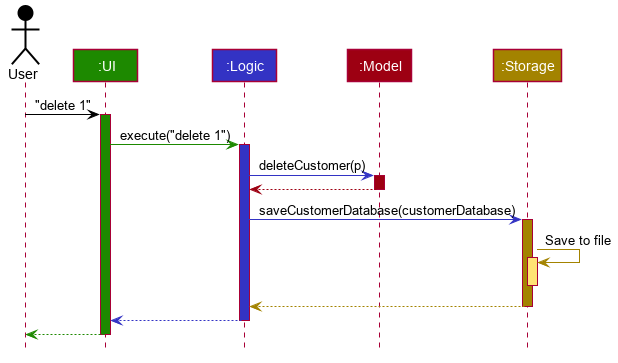
delete 1 commandThe sections below give more details of each component.
3.2. UI component
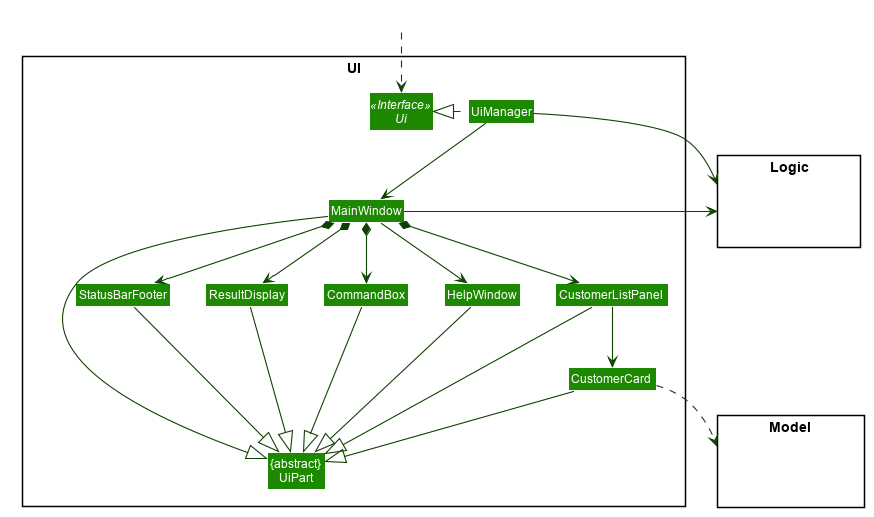
API : Ui.java
The UI consists of a MainWindow that is made up of parts e.g.CommandBox, ResultDisplay, CustomerListPanel, StatusBarFooter etc. All these, including the MainWindow, inherit from the abstract UiPart class.
The UI component uses JavaFx UI framework. The layout of these UI parts are defined in matching .fxml files that are in the src/main/resources/view folder. For example, the layout of the MainWindow is specified in MainWindow.fxml
The UI component,
-
Executes user commands using the
Logiccomponent. -
Listens for changes to
Modeldata so that the UI can be updated with the modified data.
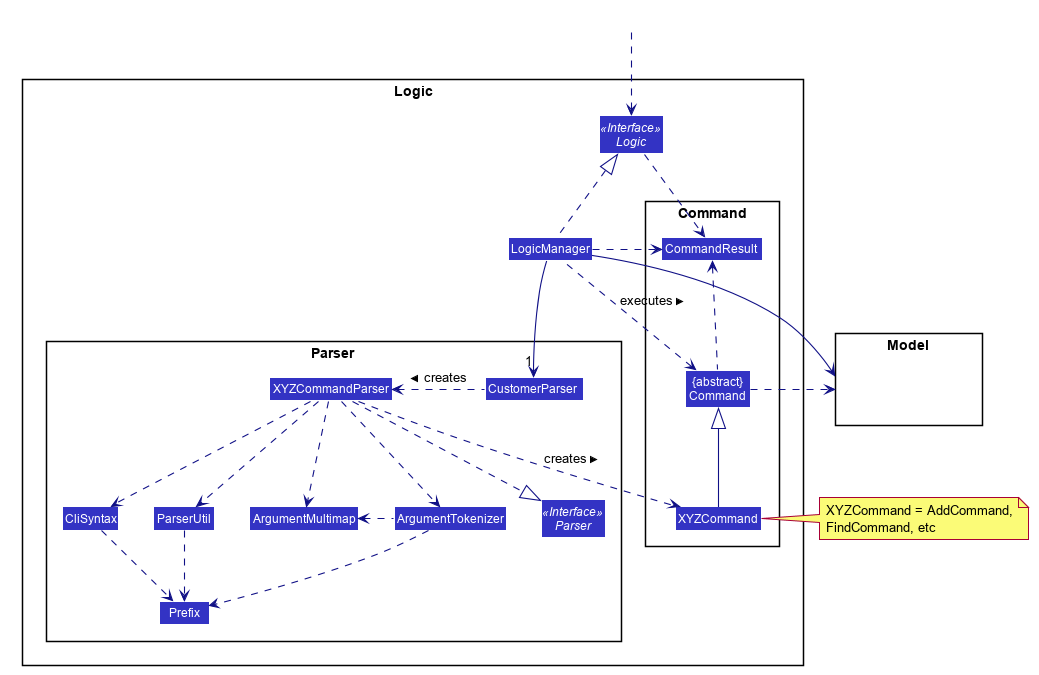
3.3. Logic component
API :
Logic.java
-
Logicuses theCustomerParserclass to parse the user command. -
This results in a
Commandobject which is executed by theLogicManager. -
The command execution can affect the
Model(e.g. adding a customer). -
The result of the command execution is encapsulated as a
CommandResultobject which is passed back to theUi. -
In addition, the
CommandResultobject can also instruct theUito perform certain actions, such as displaying help to the user.
3.4. Model component
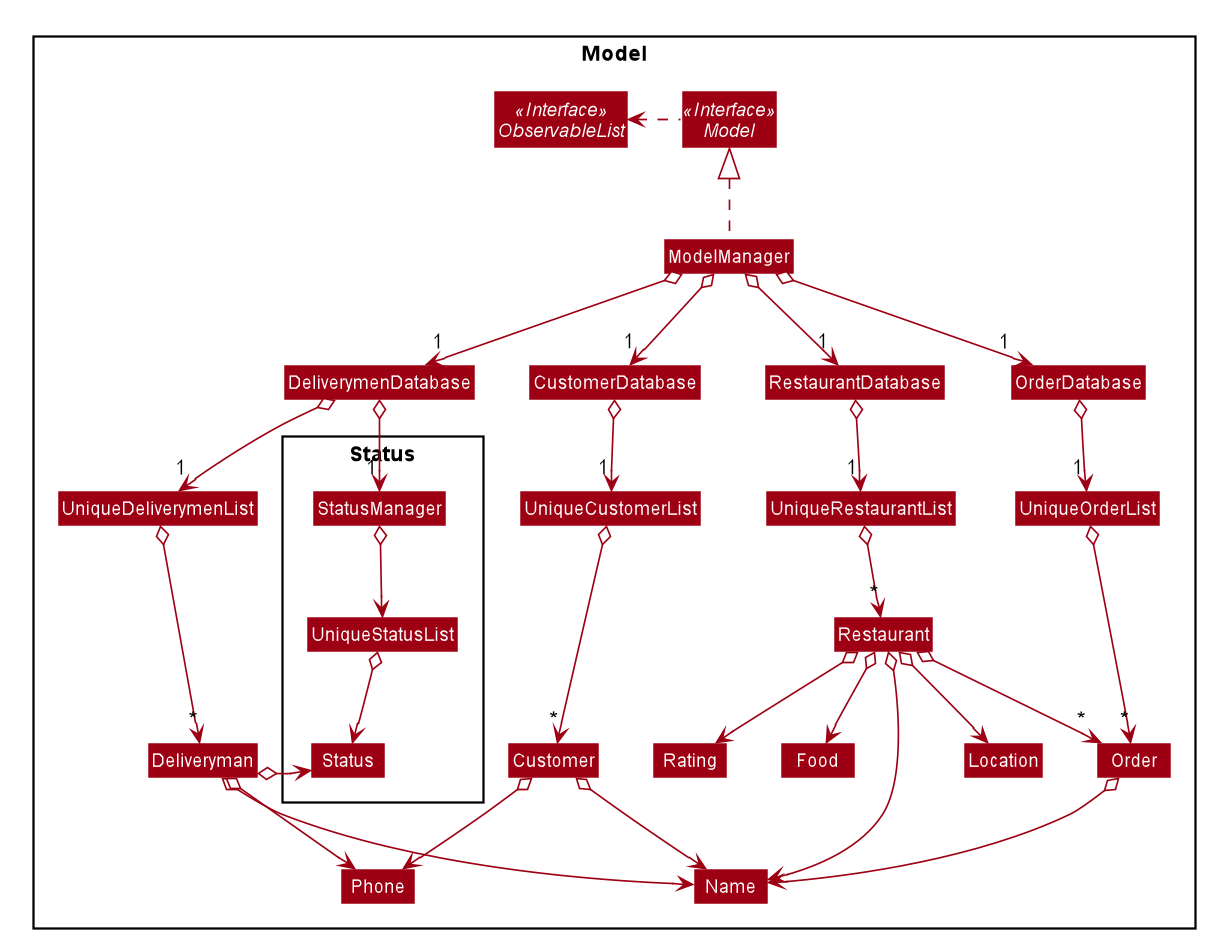
API : Model.java
The Model,
-
stores a
UserPrefobject that represents the user’s preferences. -
stores the customer, restaurant, deliverymen and order data.
-
exposes an unmodifiable
ObservableList<>that can be 'observed' e.g. the UI can be bound to this list so that the UI automatically updates when the data in the list change. -
does not depend on any of the other three components.
3.5. Storage component
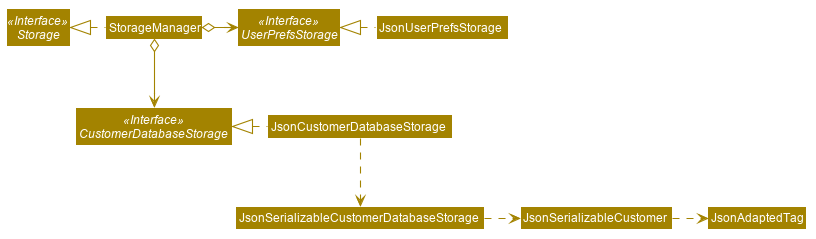
API : Storage.java
The Storage component,
-
can save
UserPrefobjects in json format and read it back. -
can save the customer, restaurant, deliverymen and order data in json format and read it back.
3.6. Common classes
Classes used by multiple components are in the seedu.deliverymans.commons package.
4. Implementation
This section describes some noteworthy details on how certain features are implemented.
4.1. Undo/redo feature
The undo/redo feature lets users undo and redo changes to the data stored in the app, which were effected by commands they have executed.
4.1.1. Implementation
The main class containing the states of the data in the app is UndoHistory. The history is
represented as a list of states. It includes the following methods:
-
notifyChange()— Saves the current state in the history if it is not equal to the previous state, as defined by itsequals()method. -
undo()— Moves its internal pointer backwards and returns the previous state. -
redo()— Moves its internal pointer forwards and returns the next state.
ModelManager contains an UndoHistory, and exposes its functionality via similarly named
methods. When undo() or redo() of ModelManager is called, it sets its own data to that
returned by the respective methods of UndoHistory.
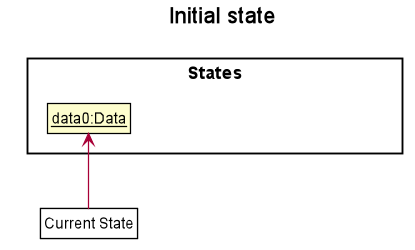
Given below is an example usage scenario and how the undo/redo mechanism behaves at each step. The model data mentioned below encapsulates the data stored in the model (such as the restaurant, customer, and deliveryman data).
Step 1. The user launches the application for the first time. The UndoHistory will be initialized with the initial address book state, and the current state pointer pointing to that single model data state.
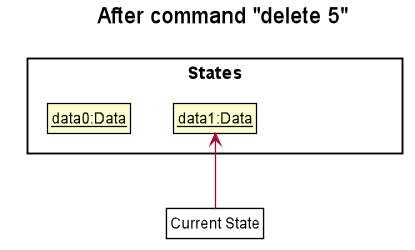
Step 2. The user executes the delete 5 command to delete the 5th customer in the address book. After each command, LogicManager calls Model#notifyChange(), causing the modified state of the data after the delete 5 command executes to be saved in the history list, and the current state pointer is shifted to the newly inserted model data state.
Step 3. The user executes add u/David … to add a new person. LogicManager calls Model#notifyChange() again, causing another modified state to be saved into the history list.

If a command does not modify the data, when UndoHistory checks whether the current data is equal
to the data in the previous state according to its equals() method, it will realise that it is
indeed equal. It will then not store the state into the history list.
|
Step 4. The user now decides that adding the person was a mistake, and undoes that action by executing the undo command. The undo command will call Model#undo(), which will shift the current state pointer once to the left, pointing it to the previous state, and restores the data to that state.
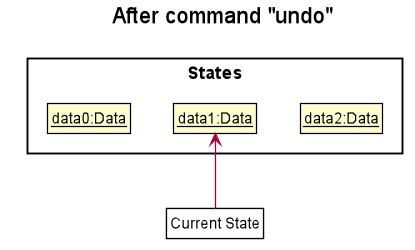
If the current state pointer is at index 0, i.e. pointing to the initial state, then there are no previous states to restore. The undo command uses Model#hasUndo() to check if this is the case. If so, it will return an error to the user rather than attempting to perform the undo.
|
The following sequence diagram shows how the undo operation works:
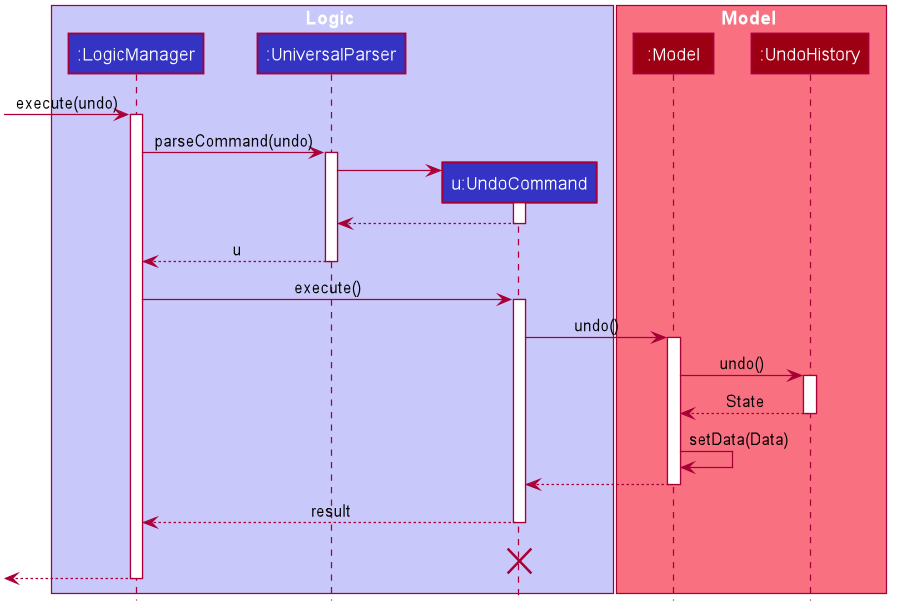
The lifeline for UndoCommand should end at the destroy marker (X) but due to a limitation of PlantUML, the lifeline reaches the end of diagram.
|
The redo command does the opposite — it calls Model#redo(), which shifts the current state pointer once to the right, pointing to the previously undone state, and restores the data to that state.
If the current state pointer is at index history.size() - 1, i.e. pointing to the latest model data state, then there are no undone states to restore. The redo command uses Model#hasRedo() to check if this is the case. If so, it will return an error to the user rather than attempting to perform the redo.
|
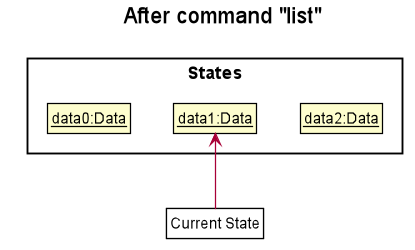
Step 5. The user then decides to execute the command list. If a command does not modify the data, it will not be stored in the undo history as UndoHistory checks for equality with the previous state. Thus, the history list remains unchanged.
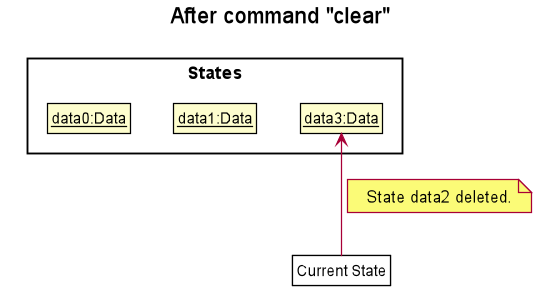
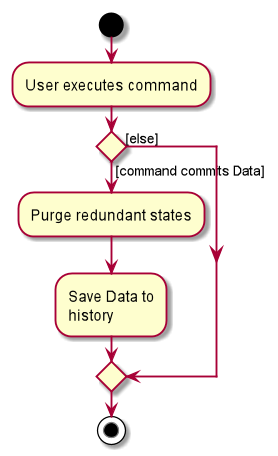
Step 6. The user executes clear, which calls Model#notifyChange(). Since the current state pointer is not pointing at the end of the history list, all model data states after the current state pointer will be purged. We designed it this way because it no longer makes sense to redo the add u/David … command. This is the behavior that most modern desktop applications follow.
The following activity diagram summarizes what happens when a user executes a new command:
4.1.2. Design Considerations
This section discusses current and possible alternative methods to design the undo/redo function.
Aspect: How undo & redo executes
-
Alternative 1 (current choice): Saves the entire address book.
-
Pros: Is easy to implement.
-
Cons: May have performance issues in terms of memory usage.
-
-
Alternative 2: Individual command knows how to undo/redo itself.
-
Pros: Will use less memory (e.g. for
delete, just save the person being deleted). -
Cons: Must ensure that the implementation of each individual command is correct.
-
Saving the entire address book was chosen because it is more straightforward. Adding logic to each command to undo itself would be too much work given the time constraints.
Aspect: How undo states are copied
-
Alternative 1 (current choice): Make all objects in the databases immutable.
-
Pros: Easy to undo and redo, and objects which are not modified can be shared, saving memory.
-
Cons: Slightly more complex to understand, and every minor change requires updating the database with a new object.
-
-
Alternative 2: Add a clone method.
-
Pros: Slightly simpler to reason about.
-
Cons: Uses a lot of memory as each command executed requires cloning of all objects.
-
Making all objects immutable was chosen as it was the original design of AB3 and saves memory.
4.2. Autocomplete commands feature
This is a feature which allows you to view all available commands matching the input keyword or letters, eliminating the need to memorize the commands or leave a browser tab open with the User Guide of this application.
4.2.1. Implementation
The autocomplete mechanism is facilitated by the KeyListener and a Trie, a tree-like abstract data type (ADT).
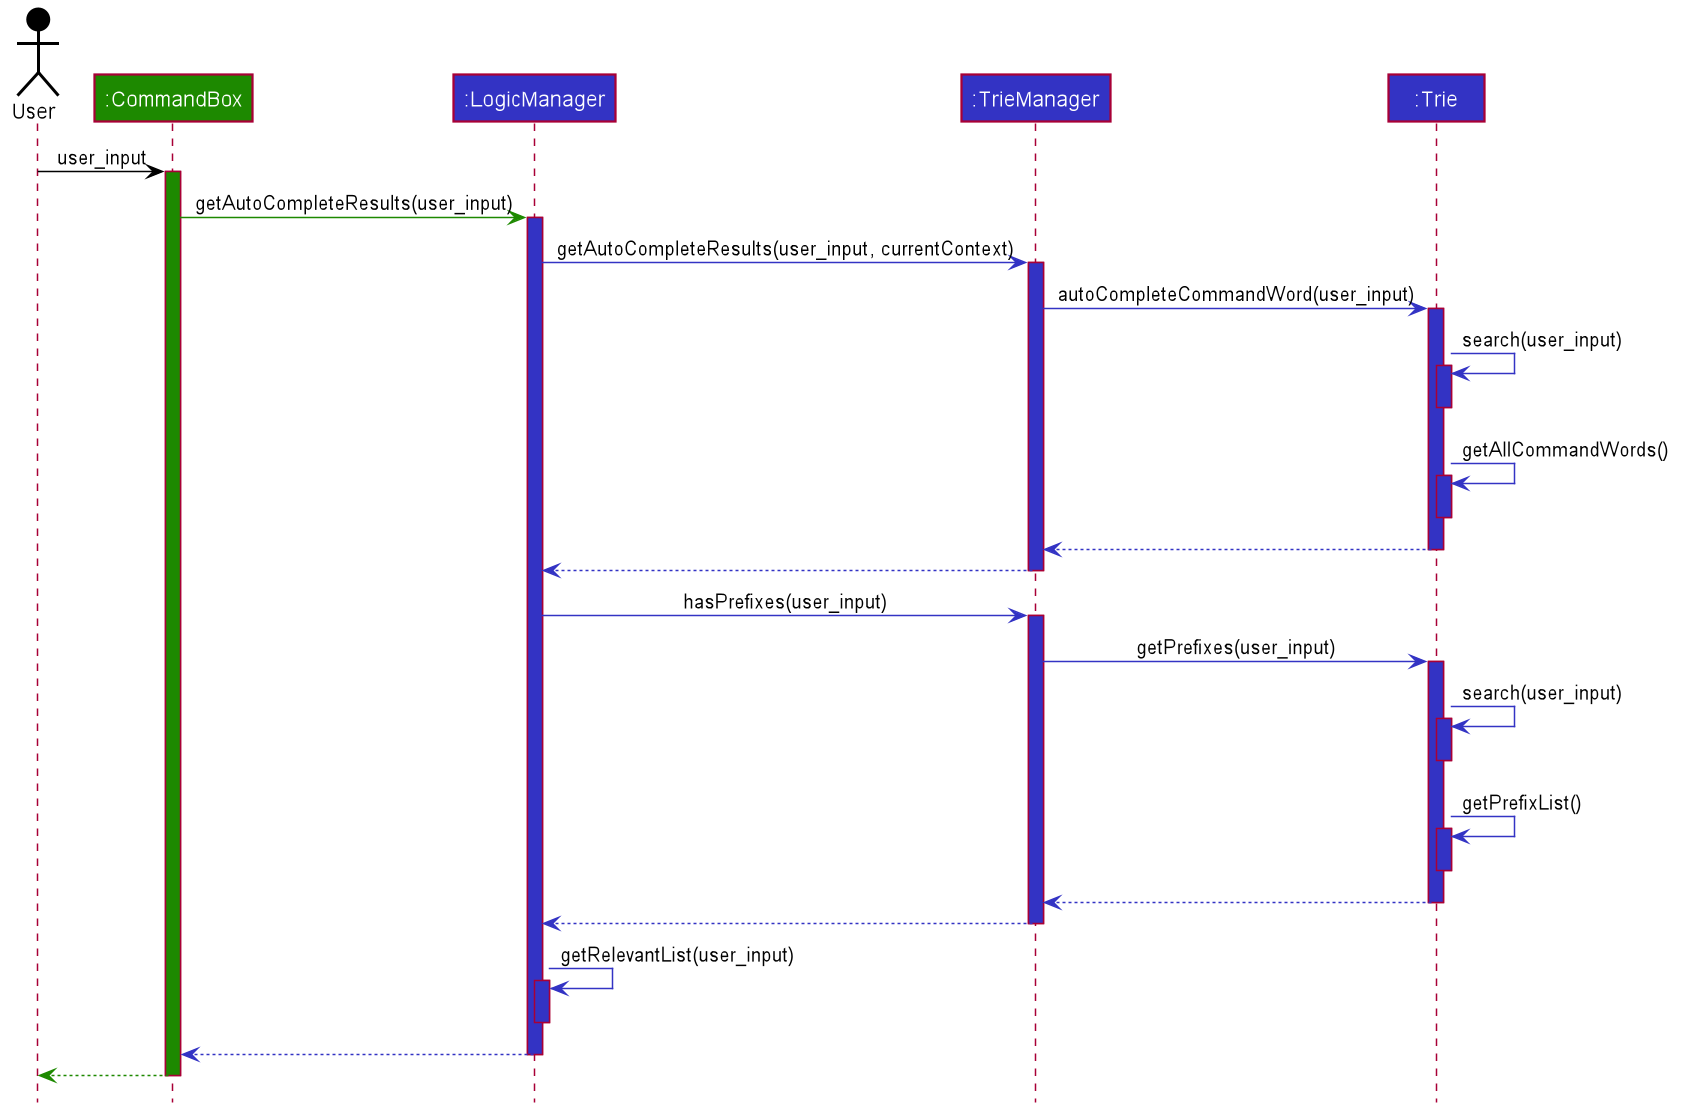
The KeyListener passes the current input text in the input command box to the TrieManager via LogicManager#getAutoCompleteResults().
The TrieManager calls Trie#autoCompleteCommandWord() and a sorted list of matching commands is passed back to the CommandBox and is displayed on the Ui via a dropdown box below the user input command box.
The underlying data structure used is a directed Graph with the Trie as a Node and HashMap<Character, Trie> to represent all outgoing edges.
The Keys in the HashMap are Characters in the command words while the Values are the Tries containing the subsequent Characters in the command words.
Each Trie contains a List<String> of command words, which is returned when Trie#autoCompleteCommandWord() is called.
Given below is an example usage scenario and how the autocomplete mechanism behaves at each step.
Step 1: You launch the application. The TrieManager initializes the respective Tries with their context-specific command words using Trie#insertCommand().
The Trie adds each Character of the input String and new Tries into the HashMap<Character, Trie>, as well as the command word into the List<String>, recursively as illustrated by the activity diagram below.

Step 2: You want to add an order to the database, however are uncertain how to spell the command and type in ‘order’.
The KeyListener passes the String in the CommandBox to the Trie via the LogicManager and TrieManager.
The trie searches for relevant commands and pass them as a list back to the CommandBox via Trie#getAutoCompleteCommandWord(), Trie#search() and Trie#getAllCommandWords().
The ‘Ui’ displays the relevant results in a dropdown box below the user input command box.
Step 3: You can now complete the command you want by entering the relevant command shown in the dropdown box.

4.2.2. Design Considerations
Below are a few design considerations of the autocomplete commands feature.
Aspect: How autocomplete executes
-
Alternative 1 (current choice): Use a
KeyListenerto record and handle user inputs in the user input command box before they are entered.-
Pros: Aesthetically pleasing, allows for on-the-fly display of results.
-
Cons: Laborious to implement, especially in terms of debugging and troubleshooting. It may also break Object-Oriented Programming (OOP) principles if not implemented properly.
-
-
Alternative 2: Handle user input only when the command is entered, utilizing the
Parserto handle user inputs and pass it to theTrieto be evaluated.-
Pros: Adheres to current flow of command executions, will not break any OOP principles.
-
Cons: Tedious for the user, as the user will have to retype the whole command again. Furthermore, it does not look aesthetically pleasing.
-
Alternative 1 was selected, as it is more user friendly, and leaves a better impression onto users compared to alternative 2.
Aspect: Data structure to support the autocomplete commands feature
-
Alternative 1 (current choice): Use a
Trieto storeCharactersof commands as keys.-
Pros: Efficient and rapid searching, retrieving and displaying of results due to the tree-like ADT.
-
Cons: Tedious to implement, as
Triesare not currently implemented in Java.
-
-
Alternative 2: Use a list to store all current commands.
-
Pros: Easy to implement as lists are already available in Java.
-
Cons: Inefficient and slow searching, because of the need to iterate through the entire list of commands while calling
.substring()and.contains()methods.
-
Alternative 1 was selected, as it allows for faster searching and listing of relevant commands compared to alternative 2.
4.3. Order Manager
Order Manager has some useful functions specifically catered towards the ease of management of orders.
Firstly, the automated allocation of deliveryman once new orders are added or completed. When a new order is created on the database, or when an existing order is completed, a deliveryman will be assigned to deliver the new/existing pending orders based on whether he/she is present as well as whether he/she is currently preoccupied with delivering another order. This helps to ease the burden on the user as they would not need to manually allocate deliverymen to the orders. However, the feature to manually allocate is still present if the user wishes to do so.
Secondly, the Order Manager allows for sorting of orders, based on date, customer, restaurant, menu or even deliveryman, depending on what information the user wishes to see to allow for better management.
Additionally it implements the following operations:
-
-add_order- adds an order to the database. -
-assign_order- assigns an available deliveryman to an existing order in the database. -
-complete_order- updates the completion status of an existing order in the database. -
-delete_order- removes an existing order in the database. -
-edit_order- edits an existing order in the database. -
-list_orders- lists all existing orders in the database.
These operations are exposed in the ModelManager class as ModelManager#addOrder(), ModelManager#getOrder(), ModelManager#setOrder(), ModelManager#deleteOrder() and ModelManager#assignUnassignedOrder().
Order manager implements its own Model, Command and Parser for the Logic Component, JsonOrderDatabaseStorage, JsonSerializableOrderDatabase, JsonAdaptedOrder and JsonAdaptedFoodOrder, along with methods in the StorageManager for the Storage Component and lastly, OrderCard and OrderListPanel for displaying on the Ui Component.
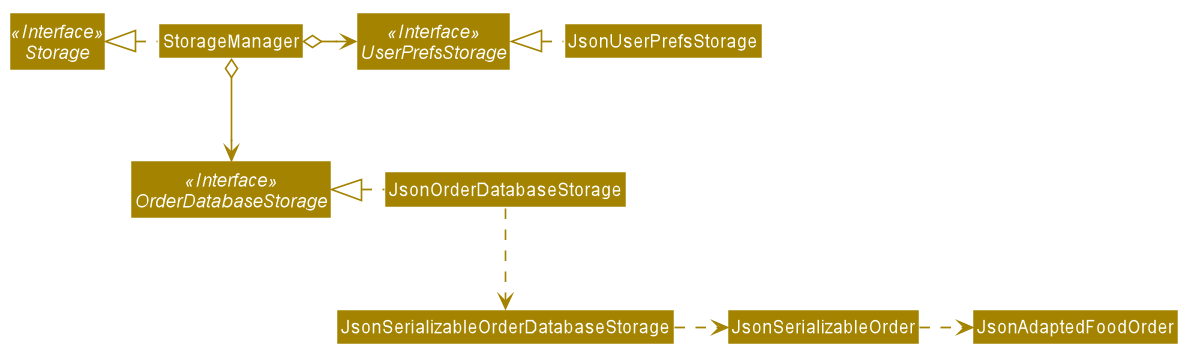
Order in Storage Component to illustrate the design of Order components4.3.1. Implementation
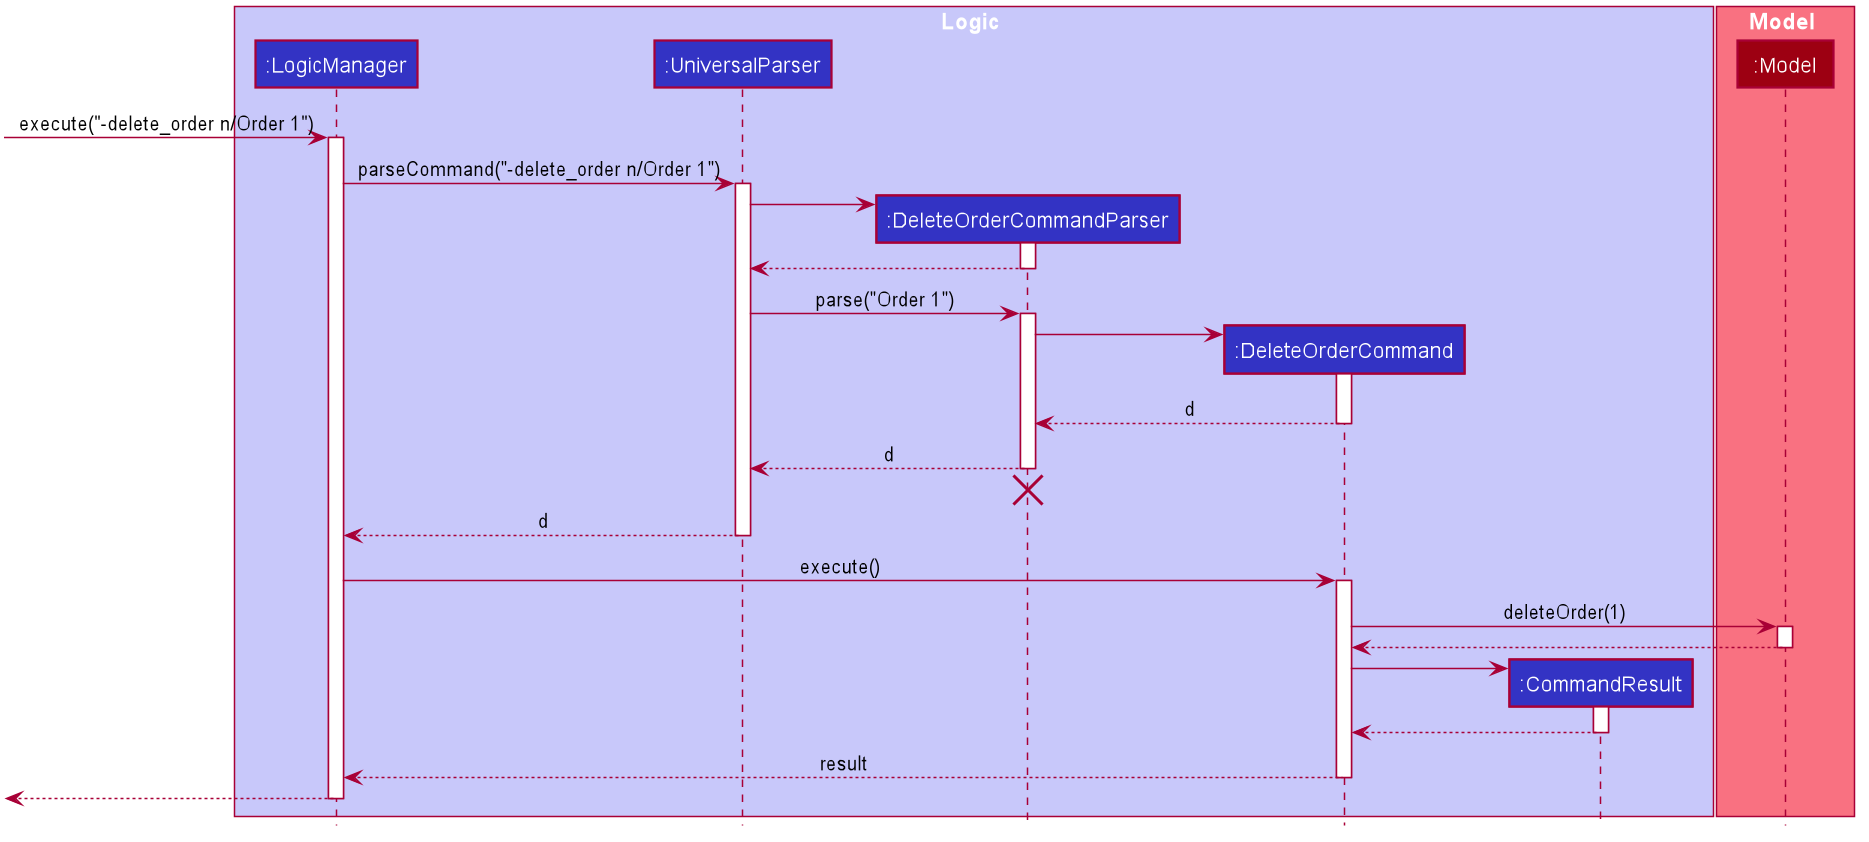
Listed are the implementations of each command. The sequence of command execution for Orders is as follows: the LogicManager receives input from the user and calls UniversalParser#parseCommand().
The UniversalParser calls the respective OrderCommandParser#parse() to create new OrderCommand objects.
The object is passed back to the LogicManager, and executed through OrderCommand#execute(). The ModelManager is used for the storing of changes to Orders (if any), and the CommandResult is passed back to the LogicManager to be displayed on the Ui for the user.
Order commandsAdd command: -add_order
The add command adds an order to the ModelManager and UniqueOrderList. The UniversalParser invokes AddOrderCommandParser#parse(), which parses the target customer, restaurant, food and quantity from a String into Name and Integer objects.
Only valid customer, restaurant, food and quantity are allowed. This validation is done through accessing UniqueCustomerList and UniqueRestaurantList through ModelManager#getFilteredCustomerList(), ModelManager#getFilteredRestaurantList() and calling their respective isValidName() methods. Food validity will be checked through retrieving the respective using Restaurant#getMenu() and Menu#isValidName().
Duplicated Order will be checked for using ModelManager#hasOrder() and is then added to the UniqueOrderList via ModelManager#addOrder().
Delete command: -delete_order
The delete command deletes an Order from the ModelManager and UniqueOrderList by a specified index. The UniversalParser invokes DeleteOrderCommandParser#parse() and user input is used to get the index of the Order to be deleted.
Edit command: -edit_order
The edit command edits an Order in the UniqueOrderList of the ModelManager by its specified ORDERNAME. The UniversalParser invokes EditOrderCommandParser#parse() which parses the target customer, restaurant, food and quantity (if present) from a String into Name and Integer objects.
Only valid customer, restaurant, food and quantity are allowed. This validation is done through accessing UniqueCustomerList and UniqueRestaurantList through ModelManager#getFilteredCustomerList(), ModelManager#getFilteredRestaurantList() and calling their respective isValidName() methods. Food validity will be checked through retrieving the respective using Restaurant#getMenu() and Menu#isValidName().
Valid edition of Orders will be checked through AddOrderCommand#isValidOrder().
Assign command: -assign_order
The assign command assigns an unassigned Order to a random available deliveryman in the UniqueOrderList of the ModelManager by its specified ORDERNAME. The UniversalParser invokes AssignOrderCommandParser#parse() which parses the target Order from a String into a Name object.
The deliveryman will then be allocated using ModelManager#getOneAvailableDeliveryman().
Complete command: -complete_order
The complete command completes an Order that is already assigned by its specified ORDERNAME in the UniqueOrderList of the ModelManager. The UniversalParser invokes CompleteOrderCommandParser#parse() which parses the target Order from a String into a Name object.
Validation will be done through checking the Name of the assigned deliveryman to ensure that it is not unassigned, as well as checking the completion status of the order using Order#isCompleted().
It also updates the restaurant and its quantity through ModelManager#getFilteredRestaurantList() and Restaurant#updateQuantity().
List command: -list_order
The list command lists all orders currently in the ModelManager. The UniversalParser creates a new ListOrderCommand object, which changes the Context of the ModelManager to Context.GLOBAL.
This then updates the Ui to display the order list.
4.3.2. Design Considerations
Below are a few design considerations of the Order manager class.
Aspect: Data structure for modelling, storage and utilization of Order.
-
Alternative 1 (current choice): Make use of existing data structures as references to create new data structures needed for the implementation of an Order Manager.
-
Pros: Straightforward to implement.
-
Cons: Tedious to implement as several regions of the codebase needs to be edited for
Orderto run, display and save successfully.
-
-
Alternative 2: Implement data structures from scratch.
-
Pros: Pride and accomplishment of implementing data structures from scratch.
-
Cons: Tedious and time wasting to code the necessary classes.
-
Alternative 1 was selected, as it is much faster to implement compared to alternative 2, given the short time spam of 6 weeks to complete the project.
4.4. Deliverymen status statistics feature
Tracking the amount of available manpower you have at any point in time is very crucial to deal with sudden changes in food orders. This is a feature which allows the user to effectively manage the deliverymen by providing relevant statistics in regards to their status. The user will be able to foresee and hence prepare for any sudden shortage or excess in manpower. Relevant statistics include current utilization level and activity level of the deliverymen.
| A deliveryman can have any of the 3 status: AVAILABLE, UNAVAILABLE, DELIVERING. To effectively manage their status, 3 different lists are used to categorise all the deliverymen based on their status. This way of implementation is efficient when it comes to sorting or searching for a deliveryman. |
4.4.1. Implementation
The statistics feature is primarily managed by the StatisticsManager, which has access to the status of every deliveryman in the database through the 3
status lists - lists of available deliverymen, unavailable deliverymen and delivering deliverymen respectively.
The StatisticsManager obtains these 3 status lists from the StatusManager and passes it to the Analyzer to compute the relevant data, which in turn
returns a filled StatisticsRecordCard containing the computed statistics.
From the status lists, the Analyzer computes two data:
-
Utilization Level
-
This signals to the user the amount of available manpower that is not utilized. It is the percentage of the number of deliverymen who are working (ie. delivering an order) over the number of active deliverymen (ie. available or delivering an order) .
-
It is computed as follows:
-
UtilizationLevel = DeliveringMen / (AvailableMen + DeliveringMen) x 100
-
-
-
Activity Level
-
This signals to the user the amount of active manpower. It is the percentage of the number of deliverymen who are active deliverymen over the total number of deliverymen.
-
It is computed as follows:
-
ActivityLevel = (AvailableMen + DeliveringMen) / (TotalMen) x 100
-
-
With this structure, it implements the following operation:
-
DeliverymenDatabase#analyzeDeliverymenStatus()— Retrieves a filled record card containing all the relevant statistics regarding deliverymen statuses
This feature requires a high degree of interaction between the Status component and Statistics component of DeliverymenDatabase.
This interaction of the relevant classes are illustrated in the class diagram below.
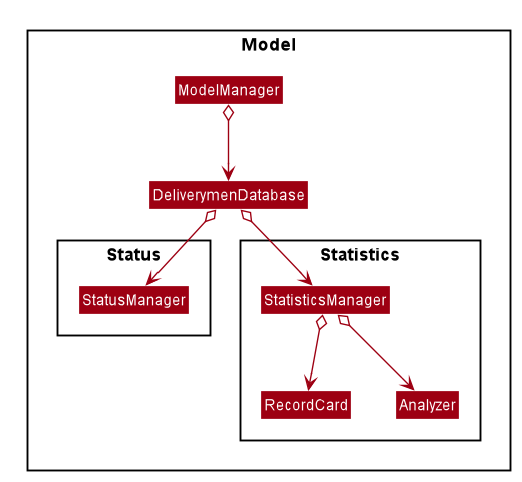
The DeliverymenDatabase acts as an agent for both components to parse information around. This helps to maintains a clear
separation of concerns to carry out different functions.
The following sequence diagram shows how the stats operation works:
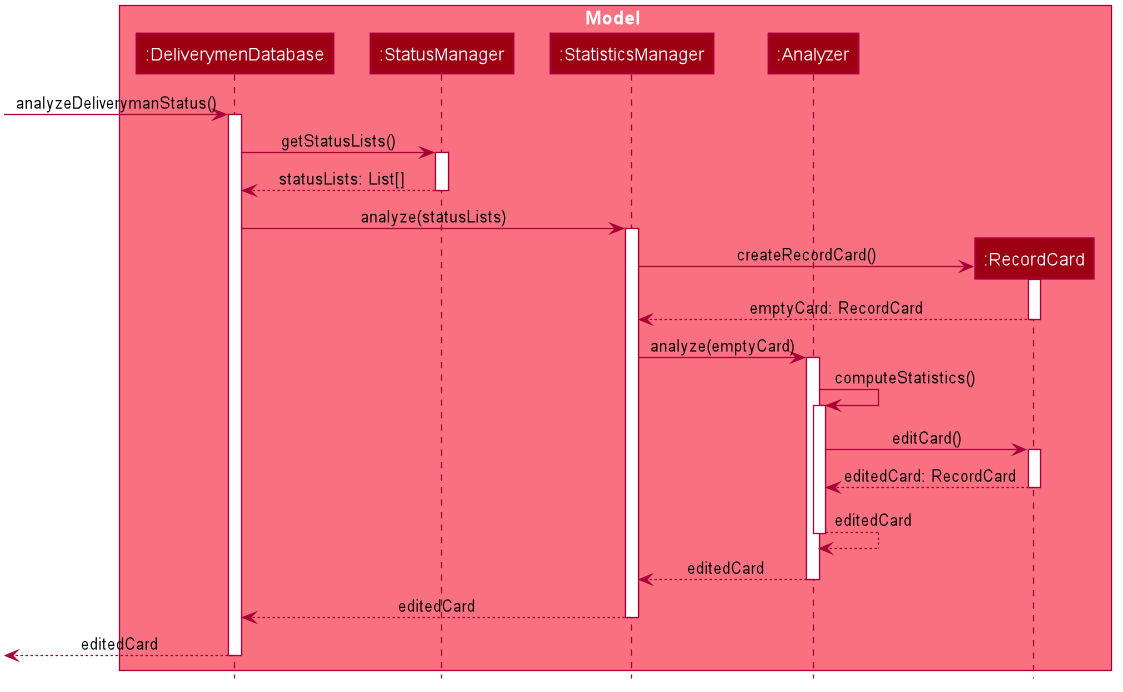
As seen in Figure 10, for every use of the stats command, a RecordCard object is created. The Analyzer will take in the status lists and the RecordCard
to compute and record the results onto the RecordCard. Subsequently, it will return the edited `RecordCard to the StatisticsManager.
The above explanation and sequence diagram (Figure 10) only illustrates what happens inside the Model component of the architecture
when the stats command is used. The higher-level components such as LogicManager are left out, even though they are
also involved in the execution of this command.
|
4.4.2. Design Considerations
Aspect: Analysing the status lists
This feature necessitates the analysis of the status lists. A consideration is the design of the architecture in which the statistics feature should be implemented. It may be subtle in the current version of DeliveryMANS, but will have significant implications when the app is further developed.
-
Alternative 1(current choice): Create another class (
StatisticsManager) to deal with all the statistics-related methods.-
Pros: Allows for a more structured and object-oriented way of executing out the
statscommand. This makes it easier to extend additional statistics-related enhancements in future, such as adding predictive capabilities to predict the utilisation level over the next few weeks. -
Cons: More inefficient as the status lists from
StatusManagerhave to be passed through different classes before reachingStatisticsManager. This can affect the runtime of the command when the enhancements get more complicated.
-
-
Alternative 2: Modify the existing
StatusManagerto handle statistics computation as well.-
Pros: More convenient as the status lists can be directly obtained from the same class instead of having to pass it around.
-
Cons: Harder to manage in future as the app is improved due to coupling between status management and statistics management. Changes to status-related issues may cause regressions to the statistics feature.
-
4.5. Automated tagging of customer
Tags determine the customer’s favourite cuisine. It is helpful to the user as having this information will enable the user to make better analysis on the current trend of food. Although we can opt for the user to manually add in tags, it might be problematic once the number of customers in the database gets too large for a single user to handle. Thus, this feature aids the user by automatically tagging the customer based on the customer’s order history.
4.5.1. Implementation
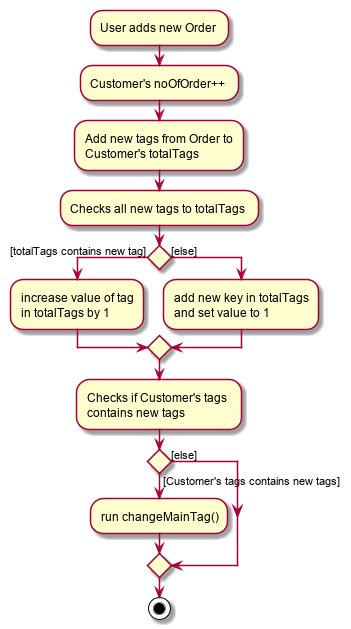
The Tag of the Customer is related to the Tag of the Restaurant. If an Order has been added to the database, the Tag of the Restaurant will be added to the Tag of the Customer. If the Customer has multiple Orders, the Tag that will be shown on the CustomerCard will be the highest two Tags. This is the main process on how the application automatically tags the customers.
An activity diagram below shows the automated tagging process when adding an order:
Another function called changeMainTag() is used to change the main Tags of the Customer to show on the CustomerCard. The activity diagram below shows how the application determines the top two Tags:
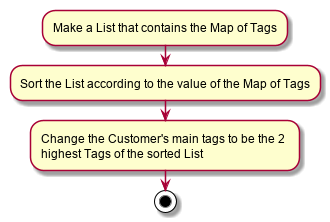
Customer's main Tags4.5.2. Design considerations
Aspect: Method of editing Customer's Tags
-
Alternative 1 (current choice): Adding, deleting and editing of
Orderwill edit theTags inCustomer.-
Pros: Only the commands that add, delete or edit an
Orderwill require editing theCustomer'sTags. -
Cons: Creates more dependency between
CustomerandCommandclasses.
-
-
Alterative 2:
Customerstoring a list ofOrders and iterate through that list to get the number ofTags.-
Pros: Editing
Customer'sTags only happen in theCustomerobject itself and doesn’t need to depend on information from other objects. -
Cons: Every single change to any
Orderhas to be reflected onCustomer'sOrderlist. Including edits toOrders made inDeliverymenandRestaurantcontext. This makesCustomerhave a lot of dependency with other classes.
-
We chose to go with the first alternative as Customer class will have lesser dependency with other classes when editing tags. In addition, displaying the Customer's order history will only require Customer to access the OrderDatabase to get the list of orders. Both of these requirements together still makes the Customer class have lesser dependency with other classes compared to implementing the second alternative that makes the Customer class have dependencies with every Order related classes.
Aspect: Method of storing Tags
-
Alternative 1 (current choice): Using a map to store the
Customer'sTags where key is theTagand value is the number of tags.-
Pros: Faster access of
Tags in the map and getting the number of a certainTagonly takes O(1) time. -
Cons: More memory is needed to store the information. A map to store all
Tags and a set to store the mainTag(s) to display onCustomerCard.
-
-
Alternative 2: Using a list that stores all
Tags that are inCustomer.-
Pros: The list is capable of storing all of the
Tags thatCustomerhas. -
Cons: The list needs to be iterated through to determine the top
Tag(s) ofCustomer.
-
We chose to go with alternative 1 as we believe speed is more important to the user and sacrificing memory space is the better choice.
4.6. EditMode for restaurants
A Restaurant object contains many attributes. On top of a Name, Location, Rating and a list of Tag,
it also includes a list of Food as its menu, as well as a list of Order. This makes it difficult to edit
an entire Restaurant object using just one Command.
The EditMode feature allows editing of a specific Restaurant object’s details (name, location, rating, tags),
menu and orders individually under 1 interface, using different commands.
4.6.1. Implementation
Model:
In addition to the filteredRestaurantList that contains all the restaurants in the restaurant database,
ModelManager now contains a editingRestaurantList, which holds and allows access to the single restaurant
currently under EditMode.
When user inputs the editmode INDEX command:
-
The restaurant referenced by the
INDEXin the list of restaurants will be placed in theeditingRestaurantListvia the function callModel#setEditingRestaurant(Restaurant editingRestaurant. -
Subsequent commands that edit the restaurant, such as
AddFoodCommand,DeleteFoodCommand,AddRatingCommandandEditDetailsCommandwill create a new restaurant with the edited attributes. -
The outdated restaurant will be replaced with the new edited restaurant in both the
filteredRestaurantListandeditingRestaurantListvia the function callModel#setRestaurant(Restaurant oldRestaurant, Restaurant newRestaurant).
Logic:
The Logic for EditMode is facilitated by Context enum type, which contains the following constants:
GLOBAL, CUSTOMER, RESTAURANT, DELIVERYMEN and EDITING. It determines the Context the application is in,
as well as the commands the user can access. It is contained inside LogicManager as an attribute. EditModeCommand is only
accessible in Context.RESTAURANT, and entering a valid EditModeCommand will change the Context to Context.EDITING.
The following class diagram shows the relevant structure of Logic and Parser:
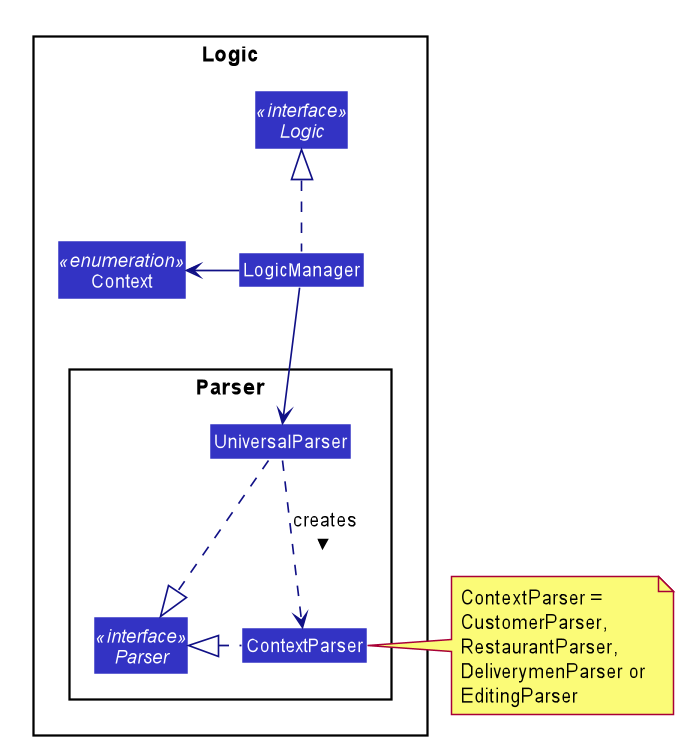
When the user inputs a command:
-
userInputwill always be parsed byUniversalParserfirst, regardless of the currentContext. The reason for this is to check for universal commands, which are accessible in allContext. -
Subsequently, if the command word in
userInputmatches none of the universal commands, thenUniversalParserwill create a context specificParserbased on the currentContext, i.e.CustomerParser,RestaurantParser,DeliverymenParser,EditingParser, which takes over and parses theuserInput. Any context switching command will then change theContextinLogicManager.
The following activity diagram summarises what happens when the user enters a command:
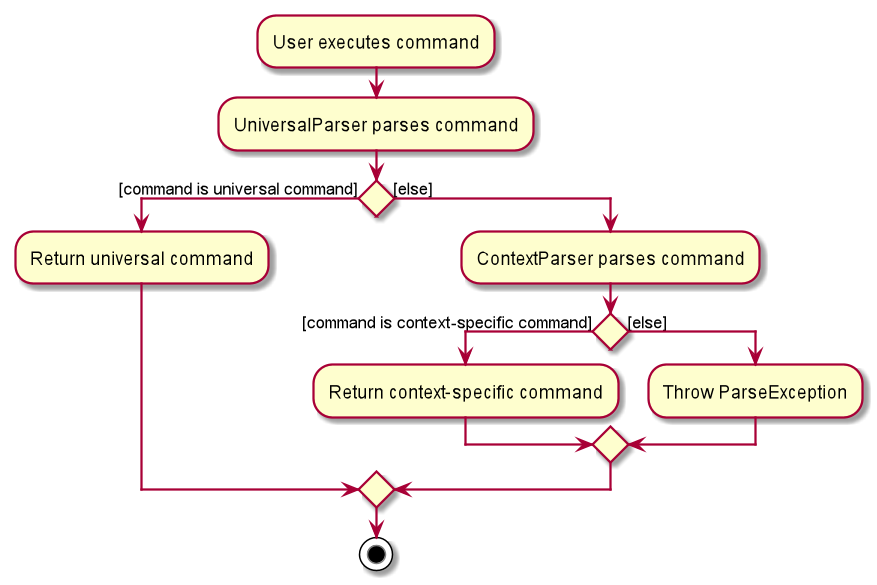
When user inputs the editmode INDEX command:
-
UniversalParserwill parse it first. -
Since
editmodematches none of the universal commands,UniversalParserwill create a newRestaurantParser(since currentContextisContext.RESTAURANTasEditModeCommandis only accessible in saidContext). -
The new
RestaurantParserwill then parse theuserInputand subsequently change theContextinLogicManagertoContext.EDITING, unlocking commands to edit the restaurant, such asAddFoodCommand,DeleteFoodCommand,AddRatingCommandandEditDetailsCommand.
UI:
Commands that change the UI will either:
-
Pass its command class to
MainWindowin the UI package if the command doesn’t change theContext -
Pass the new
ContexttoMainWindowin the UI package if the command changes theContext.
as the second parameter of the CommandResult returned by the command.
When MainWindow receives the CommandResult, it will extract out either the command class or Context from
CommandResult and make changes to the UI accordingly via the function call
MainWindow#changeDisplay(Context context) or MainWindow#changeDisplay(Class commandClassName).
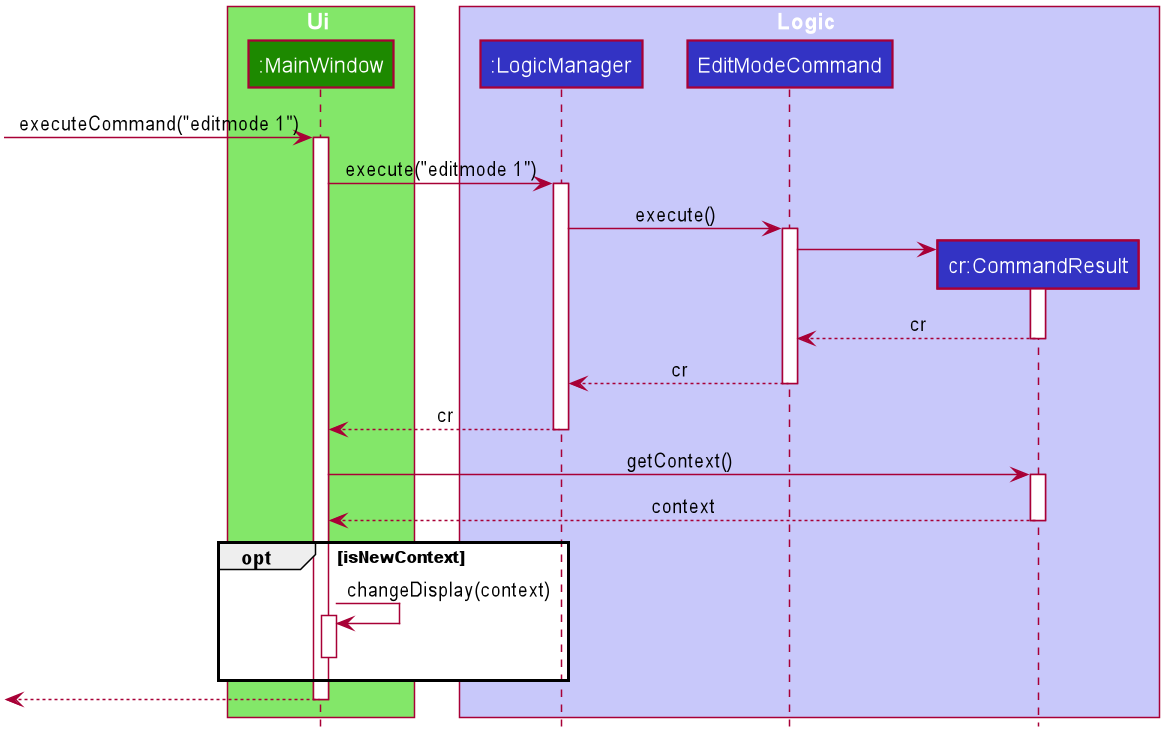
When user inputs the EditModeCommand:
-
Since
Contextis changed toContext.EDITING, it will be passed as the second parameter of theCommandResultreturned by theEditModeCommand. -
Upon receiving this new
Context,MainWindowwill call the functionchangeDisplay(Context.EDITING)to change the UI. An extraStackPaneshowing the restaurant under EditMode will be displayed, while theSplitPanedisplaying the list of restaurants originally will now be filled with the restaurant’sFoodmenu andOrderlist.
The following sequence diagram summarises how the EditModeCommand changes the UI:
4.6.2. Design Considerations
Aspect: Structure of Logic and Parser
-
Current:
LogicManagercontains only theUniversalParser, which then creates a context-specific parser depending on the currentContextinLogicManager.-
Pros: Checking whether
userInputis a universal command only needs to be done once inUniversalParser -
Cons: Doesn’t make as much sense for
UniversalParserto be able to create other context-specific parsers.
-
-
Alternative: Instead of containing only the
UniversalParser, which then creates the other 4 context-specific parsers,LogicManagercontains all 5 parsers.-
Pros: Makes more sense to have
LogicManagercontaining all 5 parsers which parsesuserInputindividually based on the current context. -
Cons: Checking whether
userInputis a universal command needs to be repeated in each parser.
-
Aspect: Changing of UI
-
Current: If the
Commandthat changes the UI does not change theContext, pass its command name toMainWindowinstead of creating a newContextto signal a change in UI.-
Pros: Does not create unnecessary
Context. -
Cons: 2 method signatures are needed for
MainWindow#changeDisplayto change the UI.
-
-
Alternative: A new
Contextis created for everyCommandthat changes the UI.-
Pros: Only 1 method signature is needed for
MainWindow#changeDisplayto change the UI. -
Cons: Creates many unnecessary
ContextthatLogicManagerwill never be in.
-
5. Documentation
Refer to the guide here.
6. Testing
Refer to the guide here.
7. Dev Ops
Refer to the guide here.
Appendix A: Product Scope
Target user profile:
-
has a need to manage a significant number of contacts
-
has to juggle among several fronts (customer side, deliverymen side and restaurant side) and act as the point of contact among them
-
prefers a centralised app that brings all 3 fronts together for better management
-
prefer desktop apps over other types
-
can type fast
-
prefers typing over mouse input
-
is reasonably comfortable using CLI apps
Value proposition: Our application allows better management of all fronts for delivery-service-command-centre administrators, and allows for more efficiency and control in handling of daily tasks.
Appendix B: User Stories
Priorities: High (must have) - * * *, Medium (nice to have) - * *, Low (unlikely to have) - *
| Priority | As an … | I want to … | So that I can… |
|---|---|---|---|
|
Administrator |
check on all of/ sort the deliverymen at once |
better manage the deliverymen |
|
Administrator |
help customers add/edit/remove orders |
better manage customers' orders |
|
Administrator |
see the expected timings of the orders |
know the priority of the orders |
|
Administrator |
add and remove food items from restaurants' menu |
update restaurants' menu |
|
Administrator |
add and remove restaurants |
update the list of restaurants in the database |
|
Administrator |
edit restaurants' details |
update the details of restaurants |
|
Administrator |
add ratings for restaurants |
update the displayed ratings of restaurants |
|
Administrator |
see the location of the deliverymen currently |
track the progress of delivery (and update customers accordingly) |
|
Administrator |
view the schedule of deliverymen |
see how many times deliverymen have delivered and reward them for their hard work |
Appendix C: Use Cases
(For all use cases below, the System is the DeliveryMANS and the Actor is the user, unless specified otherwise)
Use case: Delete restaurant
MSS
-
User requests to list restaurants
-
DeliveryMANS shows a list of restaurants
-
User requests to delete a specific restaurant in the list
-
DeliveryMANS deletes the restaurant
Use case ends.
Extensions
-
2a. The list is empty.
Use case ends.
-
3a. The given index is invalid.
-
3a1. DeliveryMANS shows an error message.
Use case resumes at step 2.
-
Appendix D: Non Functional Requirements
-
Should work on any mainstream OS as long as it has Java
11or above installed. -
Should be able to hold up to 1000 customers / restaurants / deliverymen without a noticeable sluggishness in performance for typical usage.
-
A user with above average typing speed for regular English text (i.e. not code, not system admin commands) should be able to accomplish most of the tasks faster using commands than using the mouse.
Appendix F: Instructions for Manual Testing
Given below are instructions to test the app manually.
| These instructions only provide a starting point for testers to work on; testers are expected to do more exploratory testing. |
F.1. Launch and Shutdown
-
Initial launch
-
Download the jar file and copy into an empty folder
-
Double-click the jar file
Expected: Shows the GUI with a set of sample orders. The window size may not be optimum.
-
-
Saving window preferences
-
Resize the window to an optimum size. Move the window to a different location. Close the window.
-
Re-launch the app by double-clicking the jar file.
Expected: The most recent window size and location is retained.
-
F.2. Entering EditMode
-
Entering EditMode for a restaurant when all the restaurants are listed
-
Prerequisites: List all restaurants using the
-restaurantcommand. Multiple restaurants in the list. -
Test case:
editmode 1
Expected: EditMode is entered for the first restaurant in the list. An extraStackPaneshowing the restaurant under EditMode will be displayed, while theSplitPanedisplaying the list of restaurants originally will now be filled with the restaurant’sFoodmenu andOrderlist. Details of the restaurant shown in the status message. -
Test case:
editmode 0
Expected: EditMode is not entered for any restaurant. Error details shown in the status message. Status bar remains the same. -
Other incorrect delete commands to try:
editmode,editmode x(where x is larger than the restaurant list size)
Expected: Similar to previous.
-
F.3. Deleting a restaurant
-
Deleting a restaurant
-
Prerequisites: Currently in restaurant context. Multiple restaurants in the list.
-
Test case:
delete 1
Expected: First restaurant is deleted from the list. Details of the deleted restaurant are shown in the status message. -
Test case:
delete 0
Expected: No restaurant is deleted. Error details shown in the status message. -
Other incorrect delete commands to try:
delete,delete x(where x is larger than the list size) {give more}
Expected: Similar to previous.
-
F.4. Saving data
-
Dealing with missing/corrupted data files
-
Prerequisites: There are .json files in the data/ folder currently
-
Test case: Deleting
customerdatabase.jsonin data/
Expected: Customer database in application will revert to default Sample Util data. -
Test case: Adding "a" to the top of the
deliverymendatabase.json
Expected: Deliverymen database will be wiped and start as an empty database.
-
F.5. Tagging Customers
-
Adding orders to tag the customers automatically
-
Prerequisites: The customers in the database are default from the Sample Util data.
-
Test case:
-add_order c/PrettyCharlotte r/Prata House f/Cheese Prata q/1
Expected:Indiantag will be added to PrettyCharlotte’sCustomerCard. -
Test case:
-add_order c/David r/Burger Palace f/Chicken Cheese Burger q/1,-add_order c/David r/Prata House f/Cheese Prata q/1and-add_order c/David r/Prata House f/Curry Fountain q/1in this order
Expected:Burgerstag will appear first and after adding the next 2 orders,Indiantag will replaceJapanesetag because there are moreIndiantags in David’s order history.
-
-
Deleting orders to remove customer’s tags automatically
-
Prerequisites: The customers in the database are default from the Sample Util data.
-
Test case:
-delete_order n/Order 1
Expected: AlexYeoh99 will have no more tags on hisCustomerCard.
-
F.6. Switching the status of a deliveryman
-
Switching the deliveryman status from AVAILABLE to UNAVAILABLE, or vice versa.
-
Prerequisites: Currently in deliverymen context. The customers in the database are default from the Sample Util data. The current status of the deliveryman is either AVAILABLE or UNAVAILABLE; it cannot be DELIVERING.
-
Test case:
switch 1
(NOTE: For default data, the first deliveryman is 'Damith' with the status AVAILABLE)
Expected: The status of the first deliveryman, 'Damith', has been switched to UNAVAILABLE. -
Test case:
switch 2
(NOTE: For default data, the second deliveryman is 'Donald Trump' with the status DELIVERING)
Expected: The status of the second deliveryman, 'Donald Trump', remains unchanged. Error details shown in the status message. -
Test case:
switch 0
Expected: No change in any deliveryman status. Error details shown in the status message.
-